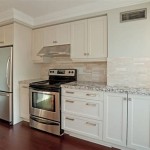
How to Install Crown Molding Around Cabinets
Installing crown molding around cabinets can elevate the aesthetic appeal of a kitchen or bathroom, adding a touch of sophistication and elegance to the space. This project, while requiring some precision and attention to detail, is achievable for homeowners with basic DIY skills. This guide will provide a comprehensive overview of the necessary steps to successfully install crown molding around cabinets, ensuring a professional-looking finish.
Step 1: Planning and Preparation
Before embarking on the installation process, meticulous planning is crucial. This step involves accurately measuring the area surrounding the cabinets, determining the type of crown molding to use, and gathering the necessary tools and materials.
Start by measuring the length and width of the cabinet area where the crown molding will be installed. Consider the height of the cabinets, the desired overhang of the crown molding, and any existing trim or moldings. It's advisable to slightly overestimate the measurements to avoid any potential shortages.
Next, select the crown molding that complements the style of your cabinets and the overall design of the room. Consider factors like the size, profile, and material of the molding. For instance, MDF (Medium Density Fiberboard) is a popular choice due to its affordability and ease of workability. Other popular materials include wood and polyurethane.
Once the crown molding is chosen, gather the necessary tools, including a miter saw, a level, a tape measure, a pencil, a sawhorse, a nail gun or hammer, finishing nails, wood glue, and caulk.
Step 2: Cutting and Installing the Molding
The next step involves accurately cutting and installing the crown molding. This requires precision and careful attention to detail, ensuring a seamless and visually appealing finish.
Begin by marking the molding pieces to the required lengths based on the measurements taken in the previous step. Use a miter saw to make precise cuts, ensuring that the angles are accurate. When cutting mitered corners, it's advisable to practice on scrap wood to ensure accuracy before cutting the final pieces.
Starting from a corner, attach the first piece of crown molding using wood glue and finishing nails. Position the molding against the wall and cabinet, ensuring it is level and flush. Secure the molding in place using finishing nails spaced approximately every 12 inches. Repeat the process for the remaining pieces, ensuring that each piece aligns perfectly with the previous one.
When installing mitered corners, apply wood glue to the mitered ends of the molding pieces before joining them. Use a nail gun or hammer to secure the pieces together. Ensure that the mitered joint is tight and flush.
Step 3: Finishing Touches
The final step involves applying finishing touches to the crown molding, creating a smooth, professional look.
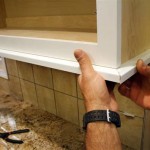
Once the molding is installed, use caulk to fill any gaps between the crown molding and the cabinets or walls. Allow the caulk to dry completely before proceeding to the next step.
If desired, paint or stain the crown molding to match the existing trim or cabinets. Apply multiple thin coats of paint or stain, allowing each coat to dry completely before applying the next.
Finally, use a sanding block or sandpaper to smooth out any rough edges or imperfections on the molding. This will create a smooth and polished finish.
By following these steps and paying attention to detail, homeowners can successfully install crown molding around cabinets, enhancing the aesthetic appeal of their kitchen or bathroom and adding a touch of elegance to the space.

Adding Crown Molding To Kitchen Cabinets Young House Love

How To Attach Crown Mouldings Frameless Cabinets Stonehaven Life

Installing Crown Molding On Kitchen Cabinets

Cabinet Crown Molding

How To Add Crown Molding Kitchen Cabinets Abby Organizes

Diy Kitchen Cabinet Upgrade With Paint And Crown Molding

How To Install Crown Molding On Kitchen Cabinets Sawdust Girl

Diy Kitchen Cabinet Upgrade With Paint And Crown Molding

Cabinet Crown Molding Rogue Engineer

How To Install Kitchen Cabinets Crown Molding Zothex Flooring More
Related Posts