How To Install Crown Molding On Kitchen Cabinets
Crown molding adds a sophisticated and finished look to kitchen cabinets, elevating their appearance from ordinary to extraordinary. This guide will provide you with the essential steps and tips to ensure a successful crown molding installation on your kitchen cabinets.
Materials Needed:
- Crown molding
- Miter saw
- Caulk gun
- Caulk
- Finishing nails
- Nail gun (optional)
Step 1: Measure and Cut the Molding
Start by measuring the length of each cabinet run where crown molding will be installed. Use a miter saw to cut the molding at 45-degree angles. The long sides of each section should be angled away from the corner where they will meet.
Step 2: Dry Fit the Molding
Before attaching the crown molding, dry fit it to ensure proper alignment. Place the molding on top of the cabinets and adjust the angles of the miters until they fit together seamlessly. Use a level to check if the molding is level.
Step 3: Apply Caulk
Before securing the crown molding, apply a thin bead of caulk along the bottom edge of the molding where it will meet the cabinets. This caulk will help to fill any gaps and prevent air leaks.
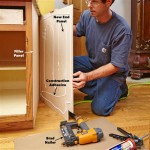
Step 4: Attach the Molding
Use finishing nails or a nail gun to attach the crown molding to the cabinets. Space the nails approximately 12-18 inches apart. Start by nailing the molding to the center of the cabinets and work your way towards the edges.
Step 5: Miter Corners
To create mitered corners, cut two pieces of crown molding at 45-degree angles. Dry fit them together and adjust the angles as needed. Apply caulk to the inside corners of the molding and press them together.
Step 6: Secure Corners
Use finishing nails or a nail gun to secure the mitered corners. Nail through both pieces of molding into the cabinets. Countersink the nails slightly below the surface of the molding.
Step 7: Fill Nail Holes
Once all the crown molding is installed, use a wood filler to fill the nail holes. Apply the filler with a putty knife and smooth it over the holes. Allow the filler to dry and sand it flush with the surface of the molding.
Tips:
- Use a brad nail setter to countersink the finishing nails below the surface of the molding.
- If the mitered corners do not fit perfectly, you can use a coping saw to adjust the angles.
- Allow the caulk to dry completely before painting or staining the molding.
Conclusion:
Installing crown molding on kitchen cabinets is a rewarding project that can transform the look of your kitchen. By following these steps and tips, you can achieve a professional-looking installation that will add elegance and value to your home.

Adding Crown Molding To Kitchen Cabinets Young House Love

10 Steps To Install Crown Molding On Cabinets Fine Homebuilding

How To Install Crown Molding On Your Cabinets Construction Repair Wonderhowto

How To Install Kitchen Cabinets Crown Molding Zothex Flooring More

How To Attach Crown Mouldings Frameless Cabinets Stonehaven Life

Crown Installation On Kitchen Cabinets Issue Contractor Talk Professional Construction And Remodeling Forum

Mudroom Update Installing Wall Cabinets Home Remodeling Decor Easy

Diy Kitchen Cabinet Upgrade With Paint And Crown Molding

How To Install Kitchen Cabinet Crown Molding Family Handyman

Installing Crown Molding On Kitchen Cabinets
Related Posts