How To Install Crown Molding On Top Of Kitchen Cabinets
Crown molding is an excellent way to add a touch of elegance and sophistication to your kitchen. Crown molding can also help to cover up gaps between the cabinets and the ceiling, giving your kitchen a more polished look.
Selecting The Right Crown Molding
There are a few things to consider when choosing crown molding for your kitchen. First, you need to decide what material you want the molding to be made from. Crown molding is available in various materials, including wood, plastic, and MDF. Wood molding is the most expensive option, but it is also the most durable. Plastic molding is a more affordable option, but it is not as durable as wood. MDF molding is a medium-density fiberboard that is made from recycled wood fibers. It is less expensive than wood, but it is also less durable. It can be challenging to cut, so it is not the best option for DIYers.
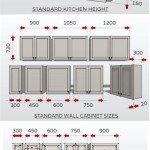
Once you have decided on the material, you need to choose a style of crown molding. Crown molding comes in various shapes and sizes, so you can find a style that matches your kitchen's decor. When choosing a size, keep in mind the height of your cabinets. You want the crown molding to be proportional to the cabinets so that it does not overwhelm them.
Measuring And Cutting The Crown Molding
Once you have selected the crown molding, you need to measure and cut it to size. Start by measuring the length of the wall where you want to install the crown molding. Then, add 1 inch to the measurement to allow for overhang. Cut the crown molding to the desired length using a miter saw.
Next, you need to cut the crown molding at a 45-degree angle. This will create a mitered joint when the two pieces of crown molding are joined together. To cut the crown molding at a 45-degree angle, use a miter box. Place the crown molding in the miter box and cut it at a 45-degree angle. Repeat this process for the other piece of crown molding.
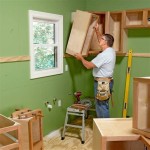
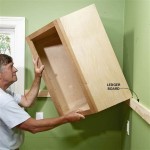
Installing The Crown Molding
Once the crown molding is cut to size, you can begin to install it. Start by applying a bead of caulk to the back of the crown molding. Then, press the crown molding into place against the wall. Use a nail gun to secure the crown molding to the wall. Space the nails about 16 inches apart.
Once the crown molding is installed, you need to fill in the gaps between the crown molding and the ceiling. You can do this using caulk or spackling. Once the gaps are filled, you can paint the crown molding to match the cabinets.
Tips For Installing Crown Molding On Top Of Kitchen Cabinets
- Make sure that the cabinets are level before you begin installing the crown molding.
- Use a level to ensure that the crown molding is installed straight.
- Use a nail gun to secure the crown molding to the wall. This will help to prevent the crown molding from coming loose.
- Fill in the gaps between the crown molding and the ceiling using caulk or spackling.
- Paint the crown molding to match the cabinets.

Adding Crown Molding To Kitchen Cabinets Young House Love

Diy Kitchen Cabinet Upgrade With Paint And Crown Molding

Diy Kitchen Cabinet Upgrade With Paint And Crown Molding

How To Add Crown Molding Kitchen Cabinets Abby Organizes

Adding Height To The Kitchen Cabinets Tempting Thyme

How To Install Crown Molding On Kitchen Cabinets

Adding Crown Molding To Kitchen Cabinets Young House Love

How To Attach Crown Mouldings Frameless Cabinets Stonehaven Life

Adding Height To The Kitchen Cabinets Tempting Thyme

How To Install Crown Molding On Kitchen Cabinets Sawdust Girl
Related Posts