How to Install Crown Moulding on Top of Kitchen Cabinets
Crown moulding, a decorative trim that adds an elegant touch to any space, can transform the look of your kitchen. Installing it on top of your cabinets can create a finished and refined aesthetic, enhancing the overall design of the room. This project requires careful planning and execution, but with the right approach and tools, even a DIY enthusiast can achieve professional results.
1. Planning and Preparation
Before you begin, it's crucial to plan and prepare adequately. This involves:
- Measuring and Marking: Measure the length of each cabinet run and mark the wall with a pencil to indicate the location of the crown moulding. Ensure all lines are level and consistent.
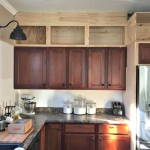
- Choosing the Right Moulding: Select a crown moulding style that complements your kitchen's design. Consider the size, profile, and material, taking into account the existing cabinetry.
- Gathering Tools and Materials: Gather all necessary tools, including a circular saw, miter saw, level, tape measure, pencil, nail gun, finishing nails, wood glue, putty knife, sanding block, and primer/paint.
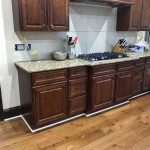
- Preparing the Surface: Ensure the walls and cabinet surfaces are clean, dry, and smooth. Any imperfections should be addressed with spackle or wood filler.
2. Cutting and Installing the Crown Moulding
The next step involves cutting and installing the crown moulding. Follow these steps:
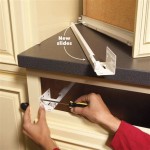
- Cutting the Moulding: Using a miter saw, cut the moulding pieces to the required lengths, ensuring accurate angles for corners and transitions.
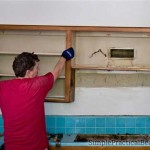
- Starting Point: Begin with the corner section. Securely fasten the first piece of crown moulding to the wall by applying wood glue and using a nail gun to drive finishing nails into the wall through the moulding.
- Positioning and Securing: Position each subsequent piece of moulding flush against the previous one and secure it in the same manner, ensuring proper alignment and levelness.
- Covering Gaps: If any gaps appear between the moulding pieces, fill them with wood filler or spackle and allow it to dry completely.
3. Finishing Touches
Once the crown moulding is installed, finish the project by adding finishing touches:
- Sanding: Sand the moulding to smooth out any nail holes and imperfections, creating a seamless finish.
- Priming and Painting: Apply a primer to the crown moulding, allowing it to dry completely before painting with your desired color. This ensures even paint coverage and enhances the overall appearance.
- Caulking: Caulk any gaps along the top edge of the crown moulding and where it meets the wall. This creates a clean and professional finish, hiding any imperfections.
Installing crown moulding on top of kitchen cabinets can be a rewarding project for a DIY enthusiast. With careful planning, preparation, and attention to detail, you can transform your kitchen and elevate its visual appeal. Remember to follow safety precautions and consult with an experienced professional if you encounter any difficulties.

Adding Crown Molding To Kitchen Cabinets Young House Love

Installing Kitchen Cabinet Crown Molding

Adding Crown Molding To Kitchen Cabinets Young House Love

How To Install Kitchen Cabinet Crown Molding Family Handyman

How To Add Crown Molding Kitchen Cabinets Abby Organizes

Installing Crown Molding On Top Of Kitchen Cabinets Van Dyke S Rers

Adding Crown Molding To Kitchen Cabinets Young House Love

Installing Crown Molding On Kitchen Cabinets Diy Cabinet

How To Install Crown Molding On Kitchen Cabinets

How To Attach Crown Mouldings Frameless Cabinets Stonehaven Life
Related Posts