How To Install Floating Kitchen Cabinets
Floating kitchen cabinets offer a modern, sleek aesthetic and can create the illusion of a larger space. Their installation, while requiring careful planning and execution, is achievable for the DIY enthusiast with moderate carpentry skills. This guide provides a comprehensive step-by-step approach to installing floating kitchen cabinets.
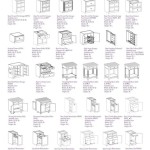
Planning and Preparation: Accurate measurements are crucial for a successful installation. Begin by meticulously measuring the wall area where the cabinets will be installed. Note the locations of studs, electrical wiring, and plumbing pipes. Transfer these measurements to a scaled drawing to visualize the cabinet layout and ensure proper spacing and alignment. This planning phase also includes checking the cabinets for any damage or defects and verifying that all necessary hardware is included.
Gathering Necessary Tools and Materials: Assembling the required tools and materials beforehand streamlines the installation process. Essential tools typically include a stud finder, level, drill, screwdriver, measuring tape, pencil, safety glasses, and a dust mask. Materials required are the floating kitchen cabinets, appropriate wall anchors (depending on wall type), screws, and shims.
Marking and Locating Studs: Using a stud finder, locate and mark the center of each wall stud within the installation area. These markings are critical as the cabinets will be primarily supported by the studs. Double-check the stud locations for accuracy. If installing multiple cabinets, ensure consistent spacing between them.
Installing a Support Rail (Optional but Recommended): A support rail, especially for heavier cabinets, provides additional support and helps ensure stability. Cut the support rail to the desired length, ensuring it spans across multiple studs. Pre-drill holes through the rail and into the studs, then securely attach the rail to the wall using appropriate screws. Ensure the rail is level throughout its length.
Attaching the Mounting Brackets: Most floating cabinets are installed using a combination of mounting brackets and a cleat system. The brackets are typically mounted directly to the wall studs. Position the brackets according to the manufacturer's instructions, ensuring they are level and aligned. Secure the brackets to the wall studs using appropriate screws.
Installing the Cabinet Cleats: The cleat, a horizontal piece of wood or metal, is attached to the back of the cabinet. It corresponds with the brackets mounted on the wall. Align the cabinet cleat with the wall-mounted brackets and carefully hang the cabinet onto the brackets. Ensure the cabinet is flush against the wall and level. Some systems may require additional screws to secure the cabinet to the brackets.
Securing the Cabinets: Once the cabinets are hung and level, further secure them to the wall using screws through pre-drilled holes in the cabinet back into the studs. This step adds stability and prevents movement. If a support rail is used, ensure the cabinet is securely attached to the rail as well.
Making Adjustments and Shimming: Minor adjustments may be necessary to ensure the cabinets are perfectly level and aligned. Use shims as needed to fill any gaps between the cabinet and the wall. Once the desired alignment is achieved, trim any excess shim material.
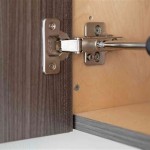
Installing Doors and Hardware: After all cabinets are securely mounted, install the doors and hardware according to the manufacturer’s instructions. Ensure proper alignment and functionality of all doors and drawers. Adjust hinges as needed to achieve a consistent and even appearance.
Finishing Touches: Conceal screws with screw caps or wood filler, if desired. Clean the cabinets and surrounding area to remove any dust or debris accumulated during the installation process. Finally, step back and admire the newly installed floating kitchen cabinets.
Working with Different Wall Types: Different wall types require specific anchoring methods. For drywall, standard wall anchors or toggle bolts might suffice. Concrete or brick walls necessitate the use of concrete anchors or masonry screws. Consult a professional if unsure about the appropriate anchors for a specific wall type.
Electrical and Plumbing Considerations: Exercise extreme caution when working near electrical wiring or plumbing. If the cabinet installation requires rerouting any electrical or plumbing lines, consult a qualified professional.
Safety Precautions: Prioritize safety throughout the installation process. Wear appropriate safety glasses and a dust mask. Use caution when operating power tools. If uncomfortable with any aspect of the installation, seek professional assistance.
Dealing with Uneven Walls: Uneven walls can present a challenge during installation. Use shims liberally to compensate for any irregularities in the wall surface. Ensure the cabinets are level and plumb despite the unevenness of the wall.
Seeking Professional Help: While installing floating kitchen cabinets is achievable for many DIY enthusiasts, complex installations or situations involving extensive electrical or plumbing work may require professional assistance. Don't hesitate to consult a qualified contractor if needed.

How To Install A Floating Cabinet Upcycled Edition

Floating Kitchen Cabinets And Cupboards Schüller Kitchens

Floating Kitchen Cabinets Islands How Do They Work

How To Install Kitchen Cabinets Diy Family Handyman

How To Install A Floating Cabinet Upcycled Edition

How To Install A Floating Cabinet Upcycled Edition

How To Install Floating Kitchen Shelves Over A Tile Backsplash

Installing Open Shelving In Kitchen Taryn Whiteaker Designs

Genius Diy Raising Kitchen Cabinets And Adding An Open Shelf The Crazy Craft Lady

How To Install A Floating Cabinet Upcycled Edition
Related Posts