How To Install Hardwired Under Cabinet Lighting Kitchen
Upgrading your kitchen with under-cabinet lighting is a fantastic way to enhance functionality and ambiance. Hardwired under-cabinet lighting provides a sleek, professional-looking finish that seamlessly integrates with your existing electrical system. This comprehensive guide will walk you through the essential steps of installing hardwired under-cabinet lighting in your kitchen, ensuring a successful and safe outcome.
Planning and Preparation
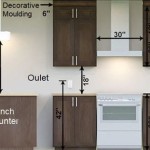
Before you begin the installation process, it's crucial to plan and prepare thoroughly. Gather the necessary materials, including under-cabinet light fixtures, wiring, a junction box, electrical tape, and appropriate tools. Determine the desired placement of the lighting fixtures and mark the locations on the underside of your cabinets.
Electrical Safety Precautions
Electrical work can be hazardous, so it's imperative to prioritize safety. Turn off the power at the circuit breaker or fuse box before commencing any electrical work. Wear gloves and safety glasses for protection. If you are not comfortable working with electricity, consider consulting a qualified electrician for assistance.
Mounting the Light Fixtures
Using the marked locations, mount the under-cabinet light fixtures securely to the underside of the cabinets. Ensure they are properly aligned and fastened with the provided screws or brackets.
Wiring the Fixtures
Connect the wiring harnesses of the light fixtures according to the manufacturer's instructions. Typically, black wires are connected to black wires, white wires to white wires, and green or bare copper wires to the ground wire. Secure the connections with electrical tape to prevent loose wires.
Installing the Junction Box
Install a junction box at a central location under the cabinets. The junction box will serve as the connection point for all the light fixtures. Bring the wiring from the fixtures into the junction box and make the appropriate connections.
Connecting to the Power Source
Identify a nearby junction box or electrical outlet that provides power to your kitchen. Connect the wiring from the under-cabinet lighting junction box to the power source using an appropriate wire connector. Ensure the connections are secure and insulated.
Testing the Lights
Turn on the power at the circuit breaker or fuse box. Test the under-cabinet lighting to ensure they are functioning correctly. If any fixture is not illuminating, check the connections and ensure there is power to the junction box.
Troubleshooting
In case of any issues, check the following:
- Loose connections: Ensure all wire connections are tight and secure.
- Faulty fixtures: Replace any defective light fixtures.
- Power supply: Verify that the power source is providing adequate power to the lighting circuit.
Maintenance and Safety
Periodically inspect the under-cabinet lighting for any loose connections or damage. Clean the light fixtures regularly to maintain optimal performance. Always remember to turn off the power before performing any maintenance or cleaning tasks.

Kitchen Under Cabinet Lighting No Plugs Hardwired Installation

Kitchen Under Cabinet Lighting No Plugs Hardwired Installation

Easy How To Install Under Cabinet Lighting Inexpensive Hardwired

How To Install Hardwired Under Cabinet Lighting Solving The Puzzle

Choosing And Installing Under Cabinet Lighting For Your Kitchen Bob Vila

How To Install Wired Under Cabinet Lighting True Value

Kitchen Under Cabinet Lighting No Plugs Hardwired Installation

How To Install Under Cabinet Lighting In The Kitchen Using Led Light Strips

Choosing And Installing Under Cabinet Lighting For Your Kitchen Bob Vila

Guide To Undercabinet Lighting