How to Install Kitchen Cabinet End Panels: A Comprehensive Guide
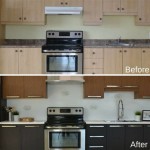
Kitchen cabinet end panels, also known as cabinet sides or finished ends, are essential components for achieving a polished and professional look in kitchen design. They serve not only an aesthetic purpose but also provide structural support and protection for exposed cabinet sides. Installing these panels correctly ensures a seamless transition between cabinets and walls or other appliances, enhancing the overall visual appeal and longevity of the kitchen.
This article provides a detailed, step-by-step guide on how to successfully install kitchen cabinet end panels. It covers essential preparation steps, accurate measurement techniques, secure attachment methods, and the final finishing touches required for a professional-looking result. The process is designed to be manageable for individuals with basic carpentry skills and a foundational understanding of home improvement projects.
Essential Tools and Materials
Before commencing the installation, gathering the necessary tools and materials is crucial for a smooth and efficient workflow. The following list outlines the key items required for installing kitchen cabinet end panels:
- End Panels: Ensure that the end panels are of the correct size, material, and finish to match the existing cabinets. Panels are typically purchased pre-finished to match the cabinet doors and frames.
- Measuring Tape: A reliable measuring tape is essential for accurate measurements, ensuring a precise fit for the end panel.
- Level: A level is necessary to ensure the end panel is installed vertically plumb and aligned with the cabinet face.
- Stud Finder: A stud finder is used to locate wall studs behind the drywall, providing secure anchor points for attaching the end panel.
- Drill/Driver: A drill/driver is used to pre-drill pilot holes and drive screws for attaching the end panel to the cabinet and wall studs.
- Screws: Choose screws of appropriate length and type for attaching the end panel to the cabinet and wall studs. Typically, wood screws are used.
- Construction Adhesive: Construction adhesive provides an additional layer of bonding between the end panel and the cabinet side.
- Clamps: Clamps are used to hold the end panel in place while the adhesive dries and the screws are being installed.
- Shims: Shims are thin, tapered pieces of wood used to level the end panel if the cabinet or wall is not perfectly square or plumb.
- Safety Glasses: Always wear safety glasses to protect your eyes from dust and debris during drilling and cutting.
- Pencil: A pencil is used for marking measurements and indicating screw locations.
- Caulk (optional): Caulk can be used to seal any gaps between the end panel and the wall or floor, creating a clean and professional finish.
- Wood Filler (optional): Wood filler can be used to fill any screw holes or imperfections in the end panel surface.
- Sandpaper (optional): Sandpaper is used to smooth any wood filler or rough edges on the end panel.
- Touch-up Paint or Stain (optional): Touch-up paint or stain can be used to conceal any scratches or imperfections on the end panel surface.
Preparation and Measurement
Proper preparation is paramount for a successful installation. This stage involves assessing the existing cabinet structure, taking accurate measurements, and preparing the end panel for attachment. Neglecting this step can lead to alignment issues and a less-than-desirable final result.
Begin by inspecting the cabinet side where the end panel will be installed. Ensure that the surface is clean, dry, and free of any debris or obstructions. Remove any existing trim or hardware that may interfere with the installation. Use a level to check the cabinet side for plumbness and squareness. If the cabinet is not perfectly level or plumb, use shims to correct any discrepancies. Shims are typically placed between the cabinet frame and the floor or wall to achieve a level and plumb surface.
Next, measure the height and width of the cabinet side that the end panel will cover. Measure from the floor to the top of the cabinet, and from the front edge to the back wall or appliance. These measurements will determine the required dimensions of the end panel. It is essential to measure accurately, as even slight discrepancies can result in an ill-fitting panel. It's generally advisable to measure at multiple points along the height and width to account for any irregularities.
If the end panel needs to be cut to size, transfer the measurements to the panel using a measuring tape and pencil. Double-check the measurements before cutting to avoid errors. Use a circular saw or jigsaw to cut the panel to the required dimensions. When cutting, it's recommended to use a fine-tooth blade to minimize chipping or splintering of the panel surface. After cutting, sand the edges of the panel to remove any sharp edges or imperfections. This ensures a smooth and professional finish.
Finally, before attaching the end panel, it's beneficial to pre-drill pilot holes in the panel at the points where it will be attached to the cabinet. Pilot holes prevent the wood from splitting when screws are driven in. The size of the pilot holes should be slightly smaller than the diameter of the screws being used. Place the pilot holes strategically along the edges and center of the panel, ensuring they align with the cabinet frame and wall studs (if possible).
Installation Procedures
The installation procedure involves securely attaching the prepared end panel to the cabinet side and wall, ensuring a seamless and flush fit. Precise execution of this stage is critical for the structural integrity and aesthetic appeal of the installation.
Apply a thin bead of construction adhesive to the back of the end panel, focusing on the areas that will come into contact with the cabinet side. The adhesive provides an additional layer of bonding between the panel and the cabinet, enhancing its stability and preventing movement. Position the end panel against the cabinet side, aligning it with the top, bottom, and front edges. Use clamps to hold the panel in place while the adhesive dries. Ensure that the panel is flush with the cabinet face and that there are no gaps or overlaps. The clamps should be positioned strategically to distribute pressure evenly across the panel surface.
Using the pre-drilled pilot holes as a guide, drive screws through the end panel and into the cabinet frame. Use screws of appropriate length and type for attaching the panel to the cabinet. The screws should be long enough to penetrate the cabinet frame securely but not so long that they protrude through the other side. Space the screws evenly along the edges and center of the panel, ensuring a secure and stable attachment. Avoid overtightening the screws, as this can damage the panel or cabinet frame.
Locate the wall studs behind the drywall using a stud finder. Mark the location of the studs on the end panel. Pre-drill pilot holes through the end panel and into the wall studs. Drive screws through the end panel and into the wall studs, securing the panel to the wall. This provides additional stability and prevents the panel from shifting or moving over time. The screws used to attach the panel to the wall studs should be long enough to penetrate the studs securely but not so long that they damage any electrical wiring or plumbing within the wall.
Once the panel is securely attached, remove the clamps and inspect the installation for any gaps or imperfections. If there are any gaps between the panel and the wall or floor, use caulk to seal them. Caulk creates a clean and professional finish, preventing moisture from entering behind the panel. Apply the caulk evenly along the edges of the panel, smoothing it with a wet finger or caulk tool. If there are any screw holes or imperfections in the panel surface, use wood filler to fill them. Allow the wood filler to dry completely before sanding it smooth. Sand the filled areas with fine-grit sandpaper to create a seamless surface.
Finishing Touches
The final stage involves concealing any imperfections and ensuring a seamless integration with the existing kitchen décor. These finishing touches elevate the installation from functional to aesthetically pleasing.
After the wood filler is dry and sanded, apply touch-up paint or stain to the filled areas to match the color and finish of the end panel. Use a small brush or sponge to apply the paint or stain evenly, blending it into the surrounding surface. Allow the paint or stain to dry completely before applying a second coat if necessary. For a more durable finish, consider applying a clear coat of varnish or polyurethane to the entire end panel surface. This will protect the panel from scratches, stains, and moisture.
Inspect the entire installation for any remaining imperfections or areas that need attention. Touch up any scratches or blemishes with touch-up paint or stain. Ensure that all screws are flush with the panel surface and that there are no sharp edges or protruding screws. If necessary, countersink the screws slightly and fill the holes with wood filler. Clean the end panel with a damp cloth to remove any dust or debris. Apply a furniture polish or cleaner to the panel to enhance its shine and luster. This will help to protect the panel and keep it looking its best.
Finally, step back and admire your work. The properly installed kitchen cabinet end panel should seamlessly blend in with the existing cabinets and create a polished and professional look. By following these steps carefully, you can achieve a high-quality installation that will enhance the beauty and functionality of your kitchen for years to come.

Diy Cabinet End Panels With Shaker Style Trim Average But Inspired

Installing Cabinet End Panels In Solid Oak Kitchens Wood Kitchen Cabinets Information Guides

Kitchen Cabinet End Panel How To Make

Diy Cabinet End Panels With Shaker Style Trim Average But Inspired

Diy Cabinet End Panels Domestic Deadline

Installing Cabinet End Panels In Solid Oak Kitchens Wood Kitchen Cabinets Information Guides

Diy Cabinet End Panels With Shaker Style Trim Average But Inspired

Diy Kitchen Cabinet End Panels

Cabinet End Panels Rogue Engineer

Dishwasher End Panel Ana White
Related Posts