How To Install Kitchen Cabinet Hardware: A Comprehensive Guide
Installing kitchen cabinet hardware, such as knobs, pulls, and hinges, is a common home improvement project that can significantly enhance the aesthetic appeal and functionality of a kitchen. Whether upgrading existing hardware or installing it in new cabinets, following a systematic approach ensures a professional and lasting result. This article provides a comprehensive guide to installing different types of kitchen cabinet hardware, outlining the necessary tools, preparation steps, and installation techniques.
Gathering the Necessary Tools and Materials
Before commencing the installation process, assembling the required tools and materials is crucial for efficiency and accuracy. The specific tools needed may vary depending on the type of hardware being installed and the construction of the cabinets, but the following list represents a standard set for most installations:
1. Measuring Tape: A measuring tape is essential for accurately determining the placement of hardware on cabinet doors and drawers. Precise measurements are vital for ensuring uniformity and a visually appealing outcome.
2. Pencil: A pencil is used to mark the desired locations for drilling holes. It's recommended to use a pencil with a fine point to ensure accuracy.
3. Drill: A power drill with various drill bit sizes is necessary for drilling pilot holes and installing screws. A cordless drill offers greater maneuverability and convenience.
4. Drill Bits: A selection of drill bits, including a pilot drill bit (smaller than the screw size) and a bit matching the screw head size, is required for creating the appropriate holes. Different types of wood might necessitate different drill bit types to prevent splintering.
5. Screwdriver: A screwdriver, either manual or electric, is used to tighten the screws that secure the hardware to the cabinets. Ensure the screwdriver matches the screw head type (e.g., Phillips head or flat head).
6. Level: A small level is used to ensure that hardware is installed straight and level. This is particularly important for longer pulls and hinges.
7. Cabinet Hardware Jig (Optional but Recommended): A cabinet hardware jig is a template specifically designed to guide the placement of drill holes for knobs and pulls. It significantly improves accuracy and consistency, especially when installing hardware on multiple cabinets. Different jigs are available for different types of hardware.
8. Center Punch (Optional): A center punch can be used to create a small indentation at the marked drilling location. This helps to prevent the drill bit from wandering, especially on slick surfaces.
9. Safety Glasses: Safety glasses are essential to protect the eyes from flying debris during drilling.
10. Masking Tape: Masking tape can be applied to the cabinet surface before marking and drilling. This helps to prevent chipping or scratching the finish and provides a better surface for pencil marks.
11. Screws: Ensure that the supplied screws are the correct length and type for the cabinet thickness. Longer screws may protrude through the back of the cabinet door or drawer, while shorter screws may not provide sufficient holding power.
12. New Hardware: Have all the new knobs, pulls, hinges, and screws ready to go. It's a good idea to lay them out and check for any defects before starting.
Preparing the Cabinets for Hardware Installation
Proper preparation is a critical step in ensuring a successful hardware installation. This involves cleaning the cabinet surfaces, determining the desired hardware placement, and accurately marking the locations for drilling holes.
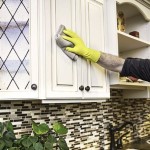
1. Cleaning the Cabinet Surface: Before starting the installation, clean the cabinet doors and drawers with a mild detergent and water. This removes any dirt, grease, or grime that could interfere with marking or drilling.
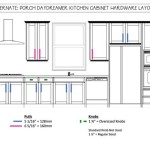
2. Determining Hardware Placement: The placement of hardware is largely a matter of personal preference, but some general guidelines can help achieve a balanced and aesthetically pleasing result. For cabinet doors, knobs or pulls are typically placed in the corner of the door opposite the hinges. The exact location can vary depending on the style of the cabinet and the size of the hardware. For drawer fronts, knobs or pulls are typically centered horizontally. For wider drawers, two pulls may be used, spaced evenly across the drawer front. Consider the overall design of the kitchen and the existing hardware when making placement decisions.
3. Marking Drilling Locations: Once the desired hardware placement has been determined, use a measuring tape and pencil to accurately mark the locations for drilling holes. If using a cabinet hardware jig, position the jig according to the manufacturer's instructions and mark the drill locations through the jig's openings. Double-check all measurements and markings before proceeding to the next step.
4. Using Masking Tape (Optional): Applying masking tape to the cabinet surface before marking and drilling can help to prevent chipping or scratching the finish. It also provides a smoother surface for pencil marks.
5. Pre-Drilling Pilot Holes: Using a drill bit slightly smaller than the screw size, pre-drill pilot holes at the marked locations. This helps to prevent the wood from splitting when the screws are installed. Ensure that the pilot holes are drilled straight and at the correct depth.
Installing Different Types of Cabinet Hardware
The installation process varies slightly depending on the type of hardware being installed. The following sections provide specific instructions for installing knobs, pulls, and hinges.
1. Installing Knobs: Knobs are typically attached with a single screw that passes through the cabinet door or drawer front. After pre-drilling the pilot hole, simply insert the screw through the back of the cabinet and tighten it into the knob. Ensure that the knob is aligned correctly and that the screw is tightened securely, but avoid over-tightening, which could damage the cabinet or the knob.
2. Installing Pulls: Pulls are typically attached with two or more screws that pass through the cabinet door or drawer front. After pre-drilling the pilot holes, align the pull with the holes and insert the screws through the back of the cabinet. Tighten the screws securely, ensuring that the pull is aligned correctly. Again, avoid over-tightening the screws.
3. Installing Hinges: Installing hinges can be slightly more complex, depending on the type of hinge being installed. There are various types of hinges, including concealed hinges and surface-mounted hinges. For concealed hinges, specialized tools may be required to create the necessary recesses in the cabinet door and frame. Follow the manufacturer's instructions carefully when installing concealed hinges. For surface-mounted hinges, align the hinge with the cabinet door and frame and secure it with screws. Ensure that the hinge is aligned correctly and that the screws are tightened securely. The door should swing smoothly and align properly with the cabinet frame.
4. Adjusting Hardware: After installing the hardware, check that all knobs, pulls, and hinges are aligned correctly and functioning properly. Adjust the hardware as needed to ensure a consistent and uniform appearance. For hinges, this may involve adjusting the screws that control the door's alignment and closing speed. For pulls, this may involve slightly loosening and re-tightening the screws to adjust the pull's position.
5. Concealed Hinges Specifics: Concealed hinges, also known as European hinges, require precise mortise cuts in both the door and cabinet frame to accommodate the hinge cup and mounting plate. These hinges allow for full adjustability, providing the ability to fine-tune door alignment after installation. To install, first mark the location for the hinge cup using a template or measuring tool. Then, use a forstner bit to create the recess for the hinge cup in the door. Next, attach the mounting plate to the cabinet frame, ensuring it is properly aligned. Finally, snap the hinge cup onto the mounting plate and make any necessary adjustments to the hinge screws to achieve proper door alignment.
6. Addressing Common Installation Issues: During the installation process, some common issues may arise. These include screws that strip or break, drill bits that slip or wander, and cabinets that are not perfectly square. If a screw strips, try using a screw that is slightly longer or wider. If a drill bit slips, use a center punch to create a small indentation at the marked drilling location. If cabinets are not perfectly square, it may be necessary to shim the hinges or pulls to achieve a consistent appearance.
7. Dealing with Painted Cabinets: When working with painted cabinets, extra care should be taken to prevent chipping or scratching the paint. Use masking tape to protect the surrounding area and drill slowly and carefully. If the paint chips, touch it up with matching paint after the hardware has been installed.
8. Handling Warped Doors or Drawers: Warped doors or drawers can make hardware installation challenging. If a door or drawer is slightly warped, try using shims to level it out before installing the hardware. If the warping is severe, it may be necessary to replace the door or drawer.
9. Safety Precautions: Always wear safety glasses when drilling or using power tools. Be careful not to over-tighten screws, as this can damage the cabinet or the hardware. If you are not comfortable working with power tools, consider hiring a professional to install the hardware.
10. Maintaining Installed Hardware: Once the hardware is installed, regular maintenance will help to keep it looking and functioning properly. Clean the hardware regularly with a mild detergent and water. Tighten any loose screws. If necessary, lubricate the hinges with a silicone-based lubricant.

How To Install Cabinet Handles Ultimate Stress Free Tips

How To Install Hardware Like A Pro Kitchen Renovation House Of Hepworths

How To Install Cabinet Handles Ultimate Stress Free Tips

How To Install Cabinet Handles Ultimate Stress Free Tips

Mistakes To Avoid When You Install Kitchen Cabinet Pulls Free Template

How To Replace Kitchen Cabinet Hardware A Girl S Guide Home Diy

Cabinet Hardware Installation Guide At Cabinetknob Com

How To Easily Install Kitchen Cabinet Hardware The American Patriette

How To Install Cabinet Hardware Ask This Old House

How To Place Cabinet Knobs Pulls
Related Posts