How To Install Kitchen Cabinets Yourself: A Comprehensive Guide
Installing kitchen cabinets is a significant undertaking that can dramatically improve the functionality and aesthetics of a home. While professional installation is often preferred, a homeowner with intermediate carpentry skills, the right tools, and a detailed plan can successfully complete this project. This article provides a comprehensive guide to installing kitchen cabinets, outlining the crucial steps involved and offering practical advice for a smooth and efficient process.
Before commencing any work, thorough preparation is essential. This preparation involves accurately measuring the kitchen space, ordering the correct number and type of cabinets, gathering the necessary tools and materials, and preparing the walls for installation. Skipping this preparatory stage can lead to errors, delays, and ultimately, a less-than-satisfactory outcome.
Key Point 1: Planning and Preparation: The Foundation of a Successful Installation
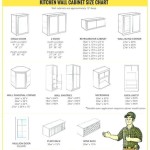
The first step in installing kitchen cabinets is meticulous planning. Start by creating a detailed layout of the kitchen, including the precise location of appliances, plumbing fixtures, and electrical outlets. Measure the kitchen's dimensions accurately, paying close attention to any irregularities in the walls, floors, or ceilings. These measurements will be crucial when ordering cabinets and planning their placement.
Next, determine the desired cabinet configuration. Consider factors such as storage needs, countertop space, and the overall aesthetic of the kitchen. Explore different cabinet styles, finishes, and hardware options to create a design that meets both functional and aesthetic requirements. Consult with a kitchen designer or utilize online planning tools to visualize the finished space.
Once the layout is finalized, place the cabinet order. Provide the supplier with precise measurements and specifications to ensure accurate delivery. Before ordering, carefully review the order form to verify the quantities, sizes, and finishes of each cabinet. It is wise to order a few extra pieces of trim, filler, or touch-up material to account for potential errors or damage during installation.
Upon receiving the cabinets, inspect them thoroughly for any damage or defects. Report any issues to the supplier immediately and arrange for replacements or repairs. Store the cabinets in a dry, secure location until ready for installation. Protect them from dust, moisture, and physical damage.
Gather the necessary tools and materials. A basic toolkit should include a level (at least 4 feet long), a stud finder, a drill with various bits, a screwdriver (both Phillips and flathead), a measuring tape, a pencil, a utility knife, a circular saw or jigsaw, a hammer, and safety glasses. Additional tools that may be helpful include a laser level, a cabinet jack, and a pneumatic nailer. Collect all required fasteners, including screws of various lengths, shims, and construction adhesive.
Prepare the walls for cabinet installation. Remove any existing cabinets, wallpaper, or trim. Locate and mark the wall studs using a stud finder. The cabinets will need to be securely attached to the studs for support. If the walls are uneven, use shims to create a level surface. Ensure that all plumbing and electrical work is completed before installing the cabinets. Verify that all water and power lines are turned off before working near them.
Finally, identify the high point in the floor. This is important for leveling the base cabinets. Use a level and a straight edge to find the highest point along the floor where the base cabinets will be installed. This point will serve as the reference for leveling the rest of the cabinets.
Key Point 2: Installing Base Cabinets: Ensuring a Level and Stable Foundation
Base cabinets form the foundation of the kitchen and must be installed level and securely. Start by marking a level line on the wall at the desired height for the top of the base cabinets. This line will serve as a guide during installation.
Begin installing the cabinets in a corner, if applicable. This provides a stable starting point and helps ensure that the rest of the cabinets are aligned correctly. Use shims to level the first cabinet, ensuring that it is flush with the level line on the wall. Secure the cabinet to the wall studs using screws.
As each subsequent cabinet is installed, align it with the adjacent cabinet and secure them together using screws or clamps. Use shims to adjust the height and level of each cabinet to ensure that they are perfectly aligned. Pay close attention to the seams between the cabinets to ensure that they are tight and even.
Once all the base cabinets are in place, double-check that they are level and aligned correctly. Use a long level to check the overall level of the cabinets and make any necessary adjustments. Fill any gaps between the cabinets and the wall with shims or filler strips.
Secure the base cabinets to the floor. This provides additional stability and prevents them from shifting or moving over time. Use screws or nails to attach the cabinets to the subfloor. Ensure that the fasteners are long enough to penetrate the subfloor and provide a secure hold.
Cut out openings for plumbing and electrical fixtures. Use a jigsaw or hole saw to create openings in the back of the cabinets for pipes and wires. Be careful not to damage the cabinets or the fixtures during this process. Seal the openings with caulk or foam to prevent drafts and moisture from entering the cabinets.
Key Point 3: Installing Upper Cabinets: Safety and Precision are Paramount
Installing upper cabinets requires extra caution and precision, as they are typically heavier and more difficult to maneuver than base cabinets. Before starting, ensure that the wall studs are properly reinforced to support the weight of the cabinets. Consult with a structural engineer or contractor if necessary.
Mark a level line on the wall at the desired height for the bottom of the upper cabinets. This line will serve as a guide during installation. Use a laser level or a chalk line to create a precise and visible line.
Use a temporary support system to hold the upper cabinets in place while they are being installed. This can be a commercially available cabinet jack or a homemade support system using lumber and shims. The support system will free up hands and prevent the cabinets from falling during installation.
Begin installing the cabinets in a corner, if applicable. This provides a stable starting point and helps ensure that the rest of the cabinets are aligned correctly. Use shims to level the first cabinet, ensuring that it is flush with the level line on the wall. Secure the cabinet to the wall studs using screws.
As each subsequent cabinet is installed, align it with the adjacent cabinet and secure them together using screws or clamps. Use shims to adjust the height and level of each cabinet to ensure that they are perfectly aligned. Pay close attention to the seams between the cabinets to ensure that they are tight and even.
Once all the upper cabinets are in place, double-check that they are level and aligned correctly. Use a long level to check the overall level of the cabinets and make any necessary adjustments. Fill any gaps between the cabinets and the wall with shims or filler strips.
Secure the upper cabinets to the wall studs using screws. Use long screws that penetrate deep into the studs for maximum support. Consider using cabinet screws, which have a larger head and are designed to provide a secure hold. Install additional screws along the top and bottom of the cabinets for added stability.
Install any trim or molding to conceal gaps or seams. Use a miter saw to cut the trim to the correct angles and lengths. Secure the trim to the cabinets using nails or adhesive. Caulk any gaps between the trim and the cabinets or walls to create a seamless finish.
Finally, install the cabinet doors and hardware. Attach the hinges to the cabinet frames and doors. Align the doors and adjust the hinges as necessary to ensure that they open and close smoothly. Install the knobs or pulls on the doors and drawers. Ensure that all hardware is securely fastened.
Installing kitchen cabinets requires careful planning, meticulous execution, and attention to detail. By following these steps and utilizing the appropriate tools and materials, a homeowner can successfully transform their kitchen and create a functional and beautiful space.

How To Install Kitchen Cabinets Diy Family Handyman

How To Install Kitchen Cabinets All By Yourself Re

How To Install Upper Cabinets Like A Pro Cabinetselect Com

Here S How Install New Upper Kitchen Cabinets

How To Install Upper Kitchen Cabinets By Yourself The Handyman

How To Install Cabinets Like A Pro Installing Kitchen Wall

How To Install Kitchen Cabinets Yourself Cherished Bliss

How To Install Perfect Kitchen Cabinets Diy Guide

How To Install Kitchen Cabinets Yourself Cherished Bliss

How To Prepare For A Kitchen Cabinet Installation
Related Posts