How to Install Kitchen Cupboard Handles
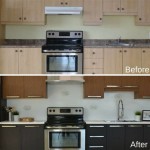
When it comes to giving your kitchen a quick and easy facelift, installing new cupboard handles can do wonders. With just a few simple tools and a bit of patience, you can transform the look of your kitchen in an afternoon.
Gather Your Tools and Materials
Before you get started, gather the following tools and materials:
- New cupboard handles
- Screwdriver
- Measuring tape or ruler
- Pencil or marking tool
- Drill (optional)
- Screws (if not provided with handles)
Determine Handle Placement
The first step is to determine where you want to place the handles. Most handles are installed in the center of each cupboard door or drawer front. However, you may prefer to install them higher or lower depending on your preference.
Use a measuring tape to measure the height of the cupboard door or drawer front. Divide this measurement in half to find the center point. Mark this point with a pencil or marking tool.
Drill Pilot Holes (Optional)
If your cupboard doors or drawer fronts are made of hardwood, it may be necessary to drill pilot holes before installing the handles. This will prevent the wood from splitting when the screws are tightened.
To drill pilot holes, use a drill bit that is slightly smaller than the diameter of the screws you will be using. Drill a hole at each mark you made earlier.
Install the Handles
Now it's time to install the handles. If you purchased handles that come with their own screws, use those. Otherwise, use screws that are the appropriate size for the handles and the thickness of your cupboard doors or drawer fronts.
Place a handle over each mark and align the holes in the handle with the pilot holes (or marks if you did not drill pilot holes). Insert a screw into each hole and tighten it using a screwdriver. Do not overtighten the screws, as this could damage the handles or the wood.
Check for Level
Once you have installed all of the handles, step back and check that they are all level. If any of the handles are crooked, simply loosen the screws and adjust the position until they are level. Then, tighten the screws again.
Congratulations! You have now successfully installed new cupboard handles. Enjoy the updated look of your kitchen!

How To Install Cabinet Handles Ultimate Stress Free Tips

How To Install Cabinet Handles Ultimate Stress Free Tips

How To Install Hardware Like A Pro Kitchen Renovation House Of Hepworths

How To Install Cabinet Handles Ultimate Stress Free Tips

How To Install Kitchen Cabinet Handles Detailed Guide 2024

Mistakes To Avoid When You Install Kitchen Cabinet Pulls Free Template

How To Install Cabinet Handles Ultimate Stress Free Tips

How To Install Cabinet Hardware Ask This Old House

How To Replace Kitchen Cabinet Hardware A Girl S Guide Home Diy

How To Install Kitchen Cabinet Handles Easy Diy
Related Posts