How To Install Kitchen Cupboard Hinges
Installing kitchen cupboard hinges might seem like a daunting task, but with the right tools, preparation, and understanding of the different types of hinges, it can be a straightforward and rewarding project. Whether replacing worn-out hinges or installing new cabinets, this article provides a comprehensive guide to navigating the process. Attention to detail and methodical execution are key to achieving professional-looking results and ensuring the long-term functionality of your kitchen cupboards.
Before commencing the installation, it is vital to identify the type of hinge required. Kitchen cupboard hinges come in various configurations, each designed for specific cabinet styles and functions. Common types include:
- Butt Hinges: These are traditional hinges mortised into the cabinet door and frame. They are often used for inset doors where the door sits flush with the frame.
- Surface-Mount Hinges: These hinges attach directly to the surface of the door and frame, without requiring mortising. They are easier to install but might not offer the same aesthetic appeal as mortised hinges.
- Concealed Hinges (European Hinges): Also known as cup hinges, these hinges are largely hidden when the cabinet door is closed. They offer adjustability for alignment, making them a popular choice for modern kitchens.
- Overlay Hinges: These hinges allow the cabinet door to overlay the cabinet frame. The degree of overlay (e.g., full overlay, half overlay, or partial overlay) determines the specific hinge type needed.
- Inset Hinges: These hinges are used when the cabinet door is set inside the cabinet frame, flush with the face of the frame.
Identifying the correct hinge type is crucial for achieving the desired look and functionality. Incorrect hinge selection can lead to misalignment, improper door closure, and potential damage to the cabinet.
Key Point 1: Gathering Essential Tools and Materials
Proper preparation begins with assembling all necessary tools and materials. This proactive approach minimizes interruptions during the installation process and ensures a smoother workflow. Essential items include:
- New Hinges: Purchase the correct type and quantity of hinges for the project. Ensure they are of good quality to withstand regular use.
- Screws: Use screws that are appropriate for the material of your cabinets (wood screws for wooden cabinets, etc.). The screw length should be sufficient to provide a secure hold without protruding through the back of the door or frame.
- Drill/Driver: A power drill or driver with various drill bits and screwdriver heads is essential for creating pilot holes and driving in screws.
- Screwdriver Set: Both Phillips head and flathead screwdrivers are required for adjusting or manually tightening screws.
- Measuring Tape: Accurate measurements are crucial for proper hinge placement.
- Pencil: Use a pencil to mark hinge locations on the door and frame.
- Level: A small level ensures that the doors are installed straight and evenly.
- Combination Square or T-Square: These tools assist in marking straight lines for hinge placement, especially when mortising.
- Chisel Set (for Butt Hinges): If installing butt hinges, a sharp chisel set is needed for creating the mortises.
- Hammer (for Butt Hinges): A hammer is used in conjunction with chisels to carefully remove wood when mortising.
- Safety Glasses: Protect your eyes from flying debris during drilling and chiseling.
- Dust Mask: A dust mask prevents inhalation of sawdust and other particles.
- Clamps: Clamps can be used to hold doors in place while installing hinges, preventing movement and ensuring accurate placement.
- Hinge Jig (Optional): For concealed hinges, a hinge jig simplifies the process of drilling the precise holes required for the hinge cups.
Having these tools readily available streamlines the installation and contributes to a more professional outcome.
Key Point 2: Step-by-Step Installation Process (Concealed Hinges)
Concealed hinges, also known as European hinges, are widely used in modern kitchens due to their adjustability and clean appearance. The installation process involves several key steps:
- Mark Hinge Locations: Determine the desired placement of the hinges on the cabinet door and frame. Typically, hinges are positioned a few inches from the top and bottom of the door. Use a pencil to mark the center of the hinge cup location on the door and the corresponding location on the cabinet frame.
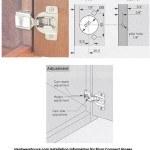
- Drill Hinge Cup Holes: Using a Forstner bit or a specialized hinge cup drilling bit (usually 35mm in diameter, but check your hinge specifications), drill the hinge cup recess in the cabinet door. Ensure the depth is correct to accommodate the hinge cup without drilling through the door. A hinge jig can be utilized to ensure accurate placement and drilling depth.
- Position the Hinge on the Door: Place the hinge cup into the drilled recess and align it properly. Use the provided screws to secure the hinge to the door. Ensure the screws are tightened sufficiently but avoid over-tightening, which can strip the screw holes.
- Attach the Mounting Plate to the Cabinet Frame: Position the mounting plate of the hinge on the cabinet frame at the marked location. Use screws to securely attach the mounting plate to the frame. Again, ensure screws are tight but not over-tightened.
- Clip the Hinge Arm to the Mounting Plate: Connect the hinge arm to the mounting plate. Most concealed hinges feature a clip-on mechanism for easy attachment.
- Adjust the Hinges: Concealed hinges offer adjustability in three dimensions: side-to-side, up-and-down, and in-and-out. Use the adjustment screws on the hinge to align the door perfectly with the frame. Check the alignment by opening and closing the door. Make incremental adjustments until the door is flush with the frame and operates smoothly.
- Repeat for Additional Hinges: Repeat the process for all remaining hinges on the door and frame.
Accurate drilling and careful adjustments are essential for achieving a professional-looking installation with concealed hinges.
For other types of hinges, the installation process varies. Butt hinges require mortising, which involves carefully removing wood from both the door and frame to create recesses that accommodate the hinge leaves. Surface-mount hinges are simpler to install as they attach directly to the surface of the door and frame without the need for mortising. Regardless of the hinge type, precise measurements and proper screw placement are crucial for a successful installation.
Key Point 3: Ensuring Proper Alignment and Functionality
After installing the hinges, meticulous attention must be paid to ensuring proper alignment and functionality. This involves carefully inspecting the door's position relative to the cabinet frame and making necessary adjustments to achieve a seamless and functional result.
Checking Door Alignment: Examine the door to ensure it is flush with the cabinet frame when closed. Look for any gaps or unevenness along the edges. Misalignment can be caused by incorrect hinge placement, loose screws, or uneven cabinet surfaces. Correct any issues by adjusting the hinges or shimming the cabinet frame if necessary.
Adjusting Hinge Settings: Most concealed hinges offer three-way adjustability, allowing for precise alignment in the vertical, horizontal, and depth directions. Use a screwdriver to adjust the screws on the hinge mechanism until the door is perfectly aligned. Small adjustments can make a significant difference in the door's appearance and function.
Addressing Binding or Sticking: If the door binds or sticks when opening or closing, this indicates an issue with alignment or hinge placement. Check for any obstructions that may be interfering with the door's movement. Loosen the hinge screws slightly and reposition the door until it operates smoothly. Tighten the screws securely once the issue is resolved.
Checking Screw Security: Ensure that all screws are tightened securely but not over-tightened. Loose screws can cause the door to sag or become misaligned over time. Stripped screw holes can be repaired using wood filler or toothpicks and wood glue. Allow the filler to dry completely before re-drilling the screw holes.
Lubricating Hinges: Applying a small amount of lubricant, such as silicone spray or white lithium grease, to the hinges can help to ensure smooth and quiet operation. This is particularly important for hinges that are frequently used or those that exhibit any signs of friction.
Testing Door Functionality: Open and close the door several times to ensure it operates smoothly and without any issues. Listen for any unusual noises or resistance. Make any necessary adjustments to the hinges or door alignment until the door functions perfectly.
By carefully checking alignment, adjusting hinge settings, and addressing any functional issues, it is possible to achieve a professional-quality installation that ensures the long-term functionality and aesthetic appeal of your kitchen cupboards. Consistent monitoring and minor adjustments over time may be necessary to maintain optimal performance.
Maintaining kitchen cabinet hinges involves regular cleaning to remove dust and grime, tightening screws as needed to prevent loosening, and lubricating the hinges to ensure smooth operation. Implementing these simple maintenance practices can significantly extend the lifespan of the hinges and maintain the functionality of the cabinet doors.
Professional installation may be considered if the project involves a large number of cabinets or if the homeowner lacks the necessary tools or experience. A professional installer can ensure accurate hinge placement, proper alignment, and a high-quality finish. However, with careful planning, attention to detail, and the right tools, installing kitchen cupboard hinges can be a manageable and rewarding DIY project.

How To Install Cabinet Hinges A Step By Guide

How To Install Overlay Kitchen Cabinet Hinges Roots Wings Furniture Llc

How To Install Overlay Kitchen Cabinet Hinges Roots Wings Furniture Llc

Installing Concealed Cabinet Door Hinges Handles The Easy Way

How To Install Concealed Hinges The Complete Guide

How To Install Overlay Kitchen Cabinet Hinges Roots Wings Furniture Llc

Installing Corner Cabinet Door And Hinges

How To Measure Cabinet Openings Add Overlay Install Hinges Align Doors Cabinetdoors Com

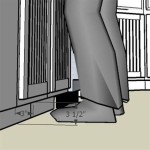
Hinges Installation Trick For Cabinets Young House Love

Replacing Cabinet Hinges With Overlay Self Closing The Palette Muse
Related Posts