How To Install Kitchen End Panels: A Comprehensive Guide
Kitchen end panels, also known as gable ends or side panels, are decorative and functional components that finish the exposed sides of kitchen cabinets. Installing end panels enhances the aesthetic appeal of a kitchen by providing a cohesive and polished look, concealing the raw edges of cabinet boxes and adding a touch of elegance. Furthermore, these panels offer structural support and protection to the cabinets, shielding them from potential damage from daily wear and tear, moisture, and impacts. Achieving a professional-looking installation requires careful planning, precise measurements, and attention to detail. This article provides a comprehensive guide on how to install kitchen end panels, covering the necessary steps, tools, and techniques to ensure a successful outcome.
Before commencing the installation process, it is crucial to determine the type of end panel suitable for the kitchen design. End panels are available in various materials and styles, including veneered panels, painted panels, and solid wood panels, each offering different levels of durability and aesthetic qualities. The choice of material should complement the existing cabinets and overall kitchen décor. Furthermore, end panels are often designed to match the door style of the cabinets, creating a seamless and harmonious appearance. Once the appropriate end panels have been selected, proper preparation is essential for a smooth and efficient installation.
Key Point 1: Preparation and Measurement
Prior to installing the end panels, the work area needs to be adequately prepared, ensuring a clean and organized environment. This typically involves removing any obstructions, covering the surrounding surfaces with protective sheeting to prevent scratches or damage, and gathering all the necessary tools and materials. The tools commonly required for installing end panels include a measuring tape, a level, a pencil, a saw (circular saw or jigsaw), a drill with various drill bits, a countersink bit, screws, construction adhesive, clamps, and safety glasses. Having all these tools readily available minimizes disruptions and streamlines the installation process.
Accurate measurement is paramount to achieving a professional finish. The height and width of the end panels must be precisely determined to ensure a perfect fit. Begin by measuring the height of the cabinet from the floor to the top edge. Add a small allowance (typically 1/8 to 1/4 inch) to this measurement to ensure the panel sits slightly above the floor, preventing direct contact with moisture and potential water damage. This gap can later be concealed with a plinth or kickboard. Next, measure the width of the exposed side of the cabinet. If the cabinet is not flush with the wall, measure the distance from the wall to the front edge of the cabinet. This measurement will determine the width of the end panel. Double-check all measurements to minimize errors and ensure accuracy.
Once the measurements have been taken, the end panel needs to be cut to the appropriate dimensions. If using a circular saw, clamp the panel securely to a workbench and use a straight edge as a guide to ensure a clean and accurate cut. For more intricate cuts or curves, a jigsaw may be more suitable. Always wear safety glasses to protect the eyes from flying debris. After cutting the panel, use sandpaper to smooth any rough edges and remove any splinters. This step is important for achieving a professional finish and preventing injuries during handling.
Prior to permanently attaching the end panel, it is advisable to perform a dry fit. This involves placing the panel against the cabinet to ensure it fits correctly and that there are no gaps or interferences. If necessary, make any adjustments to the panel's dimensions until a perfect fit is achieved. This proactive approach helps identify and rectify any potential issues before applying adhesive or drilling holes, saving time and preventing costly mistakes.
Key Point 2: Attachment and Securing the Panel
After confirming the proper fit, the next step involves attaching the end panel to the cabinet. This is typically accomplished using a combination of construction adhesive and screws. Construction adhesive provides a strong and durable bond, while screws ensure the panel remains securely in place over time. Apply a generous bead of construction adhesive to the back of the end panel, focusing on the areas that will be in contact with the cabinet box. Ensure the adhesive is spread evenly to maximize its bonding strength.
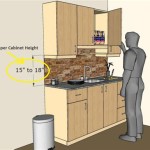
Carefully align the end panel with the cabinet, ensuring it is flush with the front edge and level with the top. Press the panel firmly against the cabinet to allow the adhesive to make good contact. Use clamps to hold the panel in place while the adhesive cures. The number of clamps required will depend on the size of the panel and the strength of the clamps. As a general guideline, use clamps every 12 to 18 inches to ensure even pressure distribution. Allow the adhesive to cure for the recommended time specified by the manufacturer, typically 24 hours.
While the adhesive is curing, reinforce the bond by using screws to further secure the end panel to the cabinet. Predrill pilot holes through the end panel and into the cabinet frame to prevent the wood from splitting. Use a countersink bit to create a recess for the screw heads, ensuring they are flush with the surface of the panel. This will provide a clean and professional appearance. Select screws that are long enough to penetrate the cabinet frame securely, but not so long that they protrude through the other side. Space the screws evenly along the perimeter of the panel, typically every 8 to 12 inches. Once the screws are in place, tighten them carefully to avoid over-tightening and damaging the panel or cabinet.
After the adhesive has fully cured and the screws are securely fastened, remove the clamps. Inspect the installation to ensure the panel is firmly attached and there are no gaps or loose areas. If necessary, apply additional adhesive or screws to reinforce any weak points. Wipe away any excess adhesive with a damp cloth. At this stage, the end panel should be securely and permanently attached to the cabinet, providing both aesthetic appeal and structural support.
Key Point 3: Finishing Touches and Sealing
Once the end panel is securely attached, the final step involves adding finishing touches to enhance its appearance and protect it from moisture and damage. This may include applying edge banding, filling any gaps or imperfections, and sealing or painting the panel to match the existing cabinets. Edge banding is a thin strip of material that is applied to the exposed edges of the end panel to conceal the raw particleboard or MDF core. It is available in various colors and finishes to match the panel's surface. Apply edge banding using an iron-on method, following the manufacturer's instructions. Ensure the edge banding is applied smoothly and evenly, with no gaps or overlaps. Trim any excess edge banding with a utility knife or edge trimmer.
Inspect the installed end panel for any gaps or imperfections, such as small holes or scratches. Fill these imperfections with wood filler or caulk that matches the color of the panel. Apply the filler or caulk sparingly and smooth it out with a putty knife or finger. Allow the filler or caulk to dry completely before sanding it smooth with fine-grit sandpaper. This will create a seamless and professional-looking surface. After sanding, wipe away any dust with a clean cloth.
To protect the end panel from moisture and damage, apply a sealant or paint that is suitable for kitchen environments. If the end panel is made of wood, apply a clear sealant to protect it from water damage and stains. If the end panel is painted, apply a topcoat of clear varnish or polyurethane to increase its durability and resistance to scratches. Ensure the sealant or paint is applied evenly and smoothly, following the manufacturer's instructions. Allow the sealant or paint to dry completely before using the kitchen. Proper sealing and painting will not only protect the end panel but also enhance its appearance and prolong its lifespan.
Finally, install any necessary trim or molding to further enhance the appearance of the end panel. This may include adding a plinth or kickboard to conceal the gap between the panel and the floor, or adding decorative molding along the top edge of the panel. Choose trim and molding that complements the style of the kitchen and the existing cabinets. Attach the trim and molding using construction adhesive and finish nails. Once the trim and molding are in place, the installation of the kitchen end panel is complete.
By following these steps and techniques, homeowners and contractors alike can effectively install kitchen end panels, enhancing the aesthetic appeal and functionality of the kitchen space. Careful planning, accurate measurement, precise cutting, secure attachment, and meticulous finishing touches are essential elements of a successful end panel installation. The result is a professional-looking kitchen with a cohesive and polished appearance.

How To Install A Kitchen End Panel Diy At Bunnings

How To Install A Kitchen Like Pro Perfectly Level And Doors Aligned

Installing Kitchen End Panels Between Appliances The Carpenter S Daughter

How To Fit End Panels Ideas Advice Diy At B Q

Kitchen Cabinet End Panel How To Make

Diy Cabinet End Panels With Shaker Style Trim Average But Inspired

End Panels Infill And Corner Posts A Guide

Kitchen Cabinet End Panel How To Make

How To Install A Kitchen Like Pro Perfectly Level And Doors Aligned

Diy Cabinet End Panels With Shaker Style Trim Average But Inspired
Related Posts