How to Install Sliding Kitchen Cabinet Doors
Installing sliding kitchen cabinet doors can significantly enhance the functionality and aesthetics of your kitchen. They provide a space-saving solution, especially in smaller kitchens, and can add a modern touch to your cabinetry. This guide will walk you through the process, helping you achieve a professional installation.
Step 1: Gather Tools and Materials
Before you begin, ensure you have the necessary tools and materials. This includes:
- Sliding door hardware kit (including tracks, rollers, and handles)
- Cabinet doors
- Measuring tape
- Level
- Pencil
- Drill with assorted drill bits
- Screwdriver
- Wood glue
- Safety glasses
- Work gloves
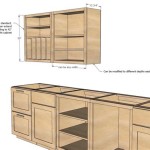
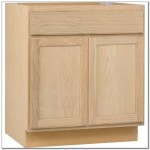
Step 2: Prepare the Cabinet
The first step is to prepare the cabinet for door installation. This involves removing existing doors and hardware, cleaning the cabinet surface, and ensuring the cabinet is level.
- Remove any existing doors and hardware. Make sure to label the hardware for easier reassembly.
- Clean the cabinet surface thoroughly to remove any dust, debris, or sticky residue.
- Use a level to check if the cabinet is level. If not, adjust its position using shims or other leveling tools.
Step 3: Install the Track
Installing the track is crucial for smooth door operation. Follow these steps:
- Determine the location of the track. It should be positioned high enough to allow the doors to slide freely without obstruction.
- Use a pencil to mark the track's position on the cabinet top.
- Secure the track to the cabinet top using screws. Ensure the track is level and securely fastened.
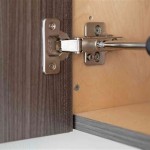
Step 4: Install the Rollers
The rollers are mounted to the doors and allow them to glide along the track. Follow these steps to install them:
- Attach the rollers to the back of the cabinet doors. Use the provided hardware and ensure the rollers are aligned correctly.
- Test the door's movement along the track. Adjust the roller position if needed for smooth sliding.
Step 5: Install the Handles
The handles are the final touch, allowing for easy door operation. Attach them securely using the provided hardware.
Step 6: Adjust and Finish
Once the door is installed, it is essential to make adjustments and finish the installation. Check if the doors slide smoothly and that they close properly. Tighten any loose screws, and apply a final touch of wood glue to secure the track if needed.
By following these steps, you can successfully install sliding kitchen cabinet doors. Remember to take your time, pay attention to detail, and ensure the hardware is properly installed for smooth and long-lasting operation.

An Easy Guide To Building Diy Sliding Doors For Cabinets Sawdust Girl

Sliding Cabinet Doors With Inset Track And Glides Sawdust Girl

Sliding Cabinet Doors With Inset Track And Glides Sawdust Girl

An Easy Guide To Building Diy Sliding Doors For Cabinets Sawdust Girl

An Easy Guide To Building Diy Sliding Doors For Cabinets Sawdust Girl

An Easy Guide To Building Diy Sliding Doors For Cabinets Sawdust Girl

An Easy Guide To Building Diy Sliding Doors For Cabinets Sawdust Girl

How To Make Sliding Cabinet Doors For Beginners Beginner Woodworking Basics

Diy Sliding Door For Kitchen Base Cabinet D A Santos
:strip_icc()/102326027-c240150e2d95420a85bc45f473f98644.jpg?strip=all "How To Install Soft Close Drawer Slides")
How To Install Soft Close Drawer Slides
Related Posts