How to Install Upper Kitchen Cabinets
Installing upper kitchen cabinets is a challenging but rewarding DIY project. With careful planning, the right tools, and some patience, you can successfully install your upper cabinets and transform your kitchen. This article will provide a step-by-step guide to installing upper kitchen cabinets, covering everything from preparation to finishing touches.
1. Planning and Preparation
Before you begin, it's crucial to have a clear plan and all the necessary materials. This includes:
- Cabinet Selection: Consider the size, style, and finish of your cabinets. Ensure they fit the available space and align with your desired design aesthetic.
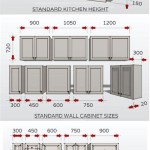
- Measuring: Accurately measure the wall space where the cabinets will be mounted. This includes determining the height, width, and depth of the area.
- Tools and Materials: Gather the essential tools such as a stud finder, level, tape measure, pencil, drill, screwdriver, saw, safety glasses, and safety gloves. You'll also need mounting hardware, like screws, anchors, and shims.
- Wall Preparation: Ensure the walls are smooth, clean, and free from debris. You may need to patch any cracks or holes and apply a primer for better adhesion.
2. Cabinet Installation
Follow these steps to install the upper cabinets:
- Locate Studs: Use a stud finder to locate the wall studs where the cabinets will be mounted. Mark the stud locations on the wall with a pencil.
- Determine Cabinet Placement: Based on the wall measurements and the cabinet dimensions, decide on the placement of each cabinet. Consider the layout and workflow of your kitchen.
- Install Cabinet Brackets: Mount the cabinet brackets to the wall, aligning them with the stud locations. Ensure the brackets are level using a level.
- Hang Cabinets: Carefully hang the cabinets onto the brackets. It's best to have a helper for this step. Ensure the cabinets are level and aligned with each other.
- Secure Cabinets: Secure the cabinets to the wall using screws. Drive the screws through the cabinet sides into the studs for maximum support.
- Space and Align Cabinets: Use shims to adjust the cabinets for proper spacing and alignment. Ensure there is a consistent gap between cabinets and the wall.
- Install Doors and Hardware: Install the cabinet doors and hardware according to the manufacturer's instructions. Ensure the doors are properly aligned and operate smoothly.
3. Finishing Touches
Once the cabinets are installed, there are a few finishing touches to consider:
- Caulking: Caulk the gaps between the cabinets and the walls, as well as between cabinets. This helps seal any gaps and creates a clean look.
- Backsplash: Install a backsplash behind the cabinets, if desired. This can protect the wall from splashes and adds a design element to your kitchen.
- Lighting: Install under-cabinet lighting to illuminate the countertops and make the kitchen more functional.
- Clean and Decorate: Clean the cabinets thoroughly and decorate them as desired. This may involve adding cabinet hardware, handles, or other decorative elements.
Installing upper kitchen cabinets is a major improvement project that can elevate your kitchen's functionality and style. By following these steps and paying close attention to detail, you can achieve excellent results and create a beautiful and practical kitchen space.

How To Install Upper Cabinets Like A Pro Cabinetselect Com

Here S How Install New Upper Kitchen Cabinets

How To Install Kitchen Cabinets Diy Family Handyman

How To Install Cabinets Like A Pro The Family Handyman

How To Install Upper Cabinets Like A Pro Cabinetselect Com

How To Install Upper Cabinets Like A Pro Cabinetselect Com

How To Install Kitchen Wall Cabinets Lowe S

Installing Framed Cabinets

Installing Kitchen Cabinets Momplex Vanilla Ana White

Kitchen Cabinet Installation
Related Posts