How to Level Kitchen Cabinets
Leveling kitchen cabinets is a crucial step in ensuring their proper installation and functionality. Uneven cabinets can lead to doors that don't close properly, drawers that stick, and an overall aesthetically unpleasing appearance. This article will guide you through the process of leveling kitchen cabinets effectively, addressing common issues and providing practical solutions.
1. Understanding the Importance of Leveling
Before embarking on the leveling process, it is essential to understand why it is so important. Kitchen cabinets need to be level for several reasons:
- Door and Drawer Functionality: Uneven cabinets can cause doors to sag or stick, making it difficult to open and close them. The same goes for drawers, which might bind or become difficult to slide in and out.
- Aesthetics: A level cabinet installation creates a clean, professional, and aesthetically pleasing look. Uneven cabinets can detract from the overall appearance of your kitchen.
- Structural Integrity: Proper leveling ensures the cabinets are uniformly supported, preventing them from shifting or becoming unstable over time.
- Countertop Support: If your countertop is directly attached to the cabinets, uneven cabinets can lead to an uneven countertop surface, potentially causing damage or instability.
While slight variations in cabinet alignment may be acceptable, significant discrepancies can lead to functional and aesthetic problems. Therefore, it is crucial to strive for a level installation.
2. Tools and Materials
Before you start leveling your cabinets, gather the necessary tools and materials:
- Level: Use a level with a long enough base to span the width of your cabinets. A 24-inch level is ideal for most applications.
- Shims: Wooden or plastic shims are used to adjust the height of the cabinets. Choose shims made from durable materials to ensure they can withstand the weight of the cabinets and their contents.
- Tape Measure: A tape measure is essential for measuring the height and width of the cabinets and for determining the required shim thickness.
- Pencil: Use a pencil to mark the areas where shims need to be placed.
- Hammer: A hammer is used to gently tap the shims into place.
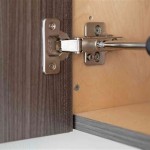
- Wrench: If the cabinets are mounted using adjustable screws, a wrench is needed to tighten them after leveling.
- Safety Glasses: Protect your eyes from dust and debris while working.
Having all the necessary tools and materials at hand will ensure a smooth and efficient leveling process.
3. Leveling Procedures
Follow these steps to level your kitchen cabinets:
- Check for Existing Level: Before you start, use a level to check if the cabinets are already level. If they are slightly off, you may be able to adjust them without using shims.
- Start with the Base Cabinets: Begin leveling your base cabinets, as these are the foundation for your entire kitchen cabinetry. Use a level to check the front, back, and sides of each cabinet.
- Place Shims: If the cabinets are not level, use shims to raise the low areas. Place the shims under the cabinet's feet or on the wall brackets, depending on the installation method.
- Check and Adjust: After placing the shims, check the level again and make further adjustments as needed. Use the hammer to tap the shims gently into position.
- Level Upper Cabinets: Once your base cabinets are level, move on to the upper cabinets. Follow the same procedure of using shims to raise the low areas until each cabinet is level.
- Tighten Screws: If the cabinets are mounted with adjustable screws, tighten them securely after leveling to ensure they are firmly in place.
Remember to check the level of the cabinets both horizontally and vertically. Ensure that all cabinets are level with one another to maintain a consistent line across the kitchen.
This comprehensive guide provides you with the knowledge and tools to successfully level your kitchen cabinets. By following these steps, you can ensure functionality, aesthetic appeal, and structural integrity for your cabinetry. Remember to take your time and use caution when working with tools and materials. If you are unsure about any aspect of the leveling process, consult with a professional for assistance.

How To Install Kitchen Cabinets Interiors

How To Install Base Cabinets Part 1 Of 4 Wmv

How To Level Base Cabinets Using Shims

How To Install Cabinets Like A Pro The Family Handyman

Level Up Your Kitchen Insider Secrets To Perfectly Leveled Cabinets

Cabinet Installation Kitchen Rta Cabinets Orange County Pre Made Whole Quartz Countertop Slab Prefab Granite

Install Cabinets Level

How To Level Cabinet Plinths The Fastest Easiest System With No Fuss Or Failure Guarantied

Multi Level Cabinets Edgewood Cabinetry

How To Paint Kitchen Cabinets In 7 Simple Steps
Related Posts