How to Lime Wash Oak Cabinets
Limewashing oak cabinets offers a unique and elegant way to transform your kitchen or bathroom. It creates a soft, airy, and slightly distressed look that complements various design styles, from farmhouse to contemporary. This technique involves applying a thin layer of limewash, a mixture of slaked lime and water, over the existing wood. The limewash adheres partially to the surface, revealing the wood's natural grain and creating a subtle, textured finish. This article will guide you through the process of limewashing oak cabinets, highlighting key steps and important considerations.
Preparing the Cabinets
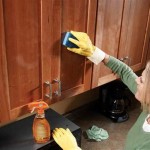
Before applying limewash, meticulous preparation is crucial for optimal results. First, remove all cabinet doors and hardware to ensure complete access to the surfaces. Thoroughly clean the cabinets with a degreaser to remove any dirt, grease, or residue. This step is essential for the limewash to adhere properly. Sanding the surfaces with fine-grit sandpaper will also improve the adhesion and create a smoother finish.
Next, fill any holes, dents, or imperfections with wood filler. Allow it to dry completely before sanding the surface smooth. This step helps to create a uniform base for the limewash and enhances the final look. Lastly, prime the cabinets with a high-quality primer designed for use with limewash. This primer acts as a bonding agent, ensuring the limewash adheres evenly and prevents the oak's natural tannins from bleeding through.
Applying the Lime Wash
Once the cabinets are prepped, you can begin applying the limewash. Choose a limewash specifically formulated for interior use and consider its coverage rate. Start by mixing the limewash according to the manufacturer's instructions. While applying the limewash, use a brush or a natural bristle roller. Apply thin coats, working in small sections. Allow each coat to dry completely before applying the next. The drying time may vary depending on the chosen limewash and the humidity levels.
Limewash is known for its translucent nature, allowing the natural grain of the oak to show through. To enhance this effect, consider applying multiple coats, working in different directions for each layer. Remember, the more coats you apply, the more opaque the finish will become. For a more distressed look, you can create subtle variations in texture by applying the limewash with a sponge or a rag. This technique will add a rustic charm to the cabinets.
Finishing Touches
After the limewash has dried completely, you can add a protective sealant to enhance the finish and ensure its durability. Apply a clear wax or polyurethane sealant with a brush or a cloth, making sure to cover all surfaces evenly. Allow the sealant to dry thoroughly before reattaching the cabinet doors and hardware.
To complete the transformation, you can consider updating the cabinet hardware. Replacing outdated handles or knobs with more modern options can further elevate the look. Additionally, consider adding accessories and decor that complement the new limewashed finish, such as rustic baskets, antique-inspired vases, or natural fiber mats. These touches will complete the overall aesthetic and create a cohesive and inviting atmosphere.
Key Considerations
Color and Transparency
Limewash is available in various shades, from white to gray or even tinted with pigments to achieve a desired color. Consider the existing décor and the overall mood you want to create when selecting the limewash color. Remember, limewash is naturally translucent, and its final appearance will depend on the number of coats applied and the underlying oak grain.
Maintenance
Limewash is generally low-maintenance, but it requires specific care. Avoid using harsh cleaners or abrasive scrubbing, as these can damage the delicate finish. Use a soft cloth and a mild soap solution for regular cleaning. To refresh the finish, you can reapply a thin layer of limewash periodically.
Ventilation
Limewash contains lime, which can create a slight odor during application and drying. Ensure proper ventilation by opening windows and using fans to minimize the odor and allow the limewash to dry effectively.

Limed Oak Cabinet Kitchens

Liming Wax On Oak Cabinets

Liming Wax On Oak Cabinets

How To Get A Limewash Effect On Kitchen Bunnings Work Community

How I Updated My Oak Cabinets Without Paint By Using Briwax Easy Budget Kitchen Makeover Only 24

Limed Oak Cabinet Kitchens

Diy Lime Wax On Honey Oak Cabinets

Just Like Magic Your Golden Oak Color Will Disappear

How To Stain Dark Or Yellow Kitchen Cabinets Lighter

How To Get A Rustic Bleached Wood Finish House Mix