How to Lime Wash Oak Cabinets: A Workspace Transformation
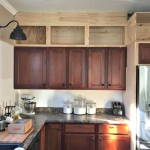
Oak cabinets, with their warm tones and durable nature, are a popular choice for workspaces. However, their rich color can sometimes feel heavy or overwhelming, especially in smaller areas. Lime washing is a technique that can transform these cabinets, giving them a soft, airy, and modern look while preserving their natural beauty. This process involves applying a thin layer of limewash, a paint mixture containing slaked lime, to the wood's surface. The result is a translucent finish that allows the wood grain to show through while creating a subtle, almost ethereal, whitewash effect.
Limewashing oak cabinets is a versatile and relatively straightforward project that can be tackled by DIY enthusiasts with some basic painting skills. While it requires careful preparation and attention to detail, the process itself is not overly complex. This guide will walk you through the steps involved in lime washing oak cabinets, providing tips and best practices for achieving a professional-looking finish.
Prepare the Cabinets for Limewashing
Before applying limewash, thorough preparation is crucial. This ensures that the paint adheres properly and that the final finish is smooth and even. The preparation process includes:
- Cleaning: Dust and grime can interfere with the limewash's adhesion. Clean the cabinets with a mild soap and water solution, paying close attention to any greasy areas. Allow them to dry completely before proceeding.
- Sanding: Sanding helps to smooth out any imperfections and create a surface that the limewash can grip. Use fine-grit sandpaper (120-180 grit) to lightly sand the cabinets, focusing on areas with raised grain or uneven surfaces. Wipe away any sanding dust with a tack cloth.
- Priming: For bare or previously stained oak cabinets, applying a primer is highly recommended. Primer creates a uniform surface that improves the limewash's adhesion and prevents uneven color absorption. Choose a primer specifically designed for wood and allow it to dry thoroughly before moving on to the next step.
Applying Limewash to Oak Cabinets
Once the cabinets are prepped, applying the limewash is the next stage. This process requires careful application to achieve a consistent and even finish:
- Choose the Right Limewash: Limewash comes in various formulations, each with its own properties. For oak cabinets, a water-based limewash is generally recommended. This type is easier to apply and clean up, and it dries quickly without releasing strong odors. Consider the desired level of opacity when choosing a limewash. Some formulations offer a more opaque finish that hides the wood grain to a greater extent.
- Application Techniques: Limewash can be applied using a brush, roller, or even a spray gun. Brushes allow for detailed application, while rollers provide faster coverage for larger areas. Spray guns offer the most even application, but require more expertise and proper ventilation. Choose the technique that suits your skills and project size.
- Layers and Drying Time: Typically, limewash is applied in thin, even coats. Apply the first coat in the direction of the wood grain. Allow it to dry completely before applying subsequent coats. The number of coats required depends on the desired level of opacity and the specific limewash formulation. Each coat should be thinner than the previous one to prevent the limewash from cracking.
Finishing Touches and Maintenance
After applying the final coat of limewash, it's important to seal the surface to protect it from stains and moisture. This also helps to enhance the durability and longevity of the finish:
- Sealing with Wax or Varnish: Choose a sealer compatible with limewash. Wax provides a natural and breathable finish, while varnish offers greater protection against water and stains. Apply the sealer according to the manufacturer's instructions, ensuring even coverage and allowing it to dry completely.
- Maintenance: Once the limewash is sealed, maintaining the cabinets is relatively simple. Regular dusting with a soft cloth is sufficient for everyday cleaning. Avoid harsh chemicals or abrasive cleaners, as they can damage the limewash finish. For tougher stains, use a mild soap and water solution, but test it on an inconspicuous area first.
Limewashing oak cabinets is a rewarding project that can transform the look and feel of your workspace. It adds a touch of sophistication and elegance while creating a lighter and more inviting atmosphere. Remember to follow the steps outlined above carefully to ensure a successful and durable finish. With proper preparation, application, and sealing, your workspace can achieve a chic, vintage-inspired aesthetic that enhances both style and functionality.

A Dream Trio Clean Lined Wooden Kitchen Satellite Laundry And Home Office In The Netherlands

The Complete List Of Supplies Needed To Paint Cabinets

Diy Your Own Built Ins Fusion Mineral Paint

How Do I Downplay Honey Oak Cabinets On A Budget

5 Easy Guides To Designing A Limewash Living Room

A Dream Trio Clean Lined Wooden Kitchen Satellite Laundry And Home Office In The Netherlands

Kitchen Of The Week Fieldstone And Oak On An Island In Ontario Remodelista

How To Do A Diy Faux Limewash Technique Step By Hometalk

Limewash Dresser

Specialty Finishes Nomad Painting
Related Posts