How To Make A Desk Out Of Kitchen Cabinets
Creating a custom desk offers a tailored workspace to suit individual needs and preferences. Repurposing kitchen cabinets provides an economical and aesthetically pleasing solution for building a functional and stylish desk. This approach allows for integrated storage, customizable layouts, and the opportunity to match existing décor. This article will detail the process of constructing a desk utilizing kitchen cabinets, covering planning, material selection, assembly, and finishing techniques.
Planning and Design
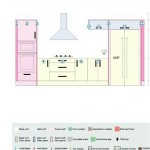
Before commencing construction, a comprehensive plan is crucial. This involves assessing the available space, determining the desired desk dimensions, and selecting the appropriate kitchen cabinets. Accurate measurements of the intended desk area are paramount. Consider the overall length, width, and height of the desk, ensuring it fits comfortably within the designated space and allows for ample legroom.
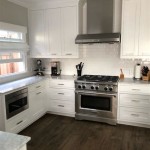
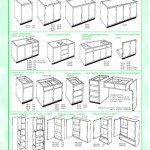
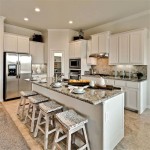
The selection of kitchen cabinets should align with both aesthetic preferences and functional requirements. Base cabinets are typically used for the desk's foundation, providing storage and support. Wall cabinets can be incorporated above the desk surface for additional storage, shelving, or display space. Consider the style, color, and material of the cabinets. Options range from traditional wood finishes to modern painted surfaces. Evaluate the condition of the cabinets if using reclaimed or used units, ensuring they are structurally sound and free from significant damage.
The layout of the desk should be carefully considered. Determine the placement of the cabinets, the configuration of drawers and shelves, and the overall arrangement of the workspace. Consider the ergonomic aspects of the design, ensuring the desk height is conducive to comfortable posture and minimizes strain. Drawing a sketch or using a design software program can help visualize the final product and identify potential issues before assembly.
The countertop material is another critical design element. Options include solid wood, laminate, butcher block, and even salvaged countertops. The choice of material will impact the desk's aesthetics, durability, and cost. Consider the weight-bearing capacity of the cabinets and select a countertop that provides adequate support and stability.
Material Selection and Preparation
Once the design is finalized, gather the necessary materials and tools. In addition to the kitchen cabinets and countertop, materials may include screws, wood glue, shims, construction adhesive, paint or stain, and hardware such as drawer pulls and knobs. Ensure all materials are of high quality to ensure the desk's longevity and structural integrity.
The selection of screws should be based on the material being joined. Wood screws are suitable for connecting cabinet sections and securing the countertop. The length of the screws should be appropriate for the thickness of the materials, preventing them from protruding through the surface. Construction adhesive can be used to reinforce joints and provide additional bonding strength.
Prepare the cabinets before assembly. This may involve cleaning the surfaces, repairing any minor damage, and applying a primer or base coat of paint. Remove any existing hardware, such as knobs or pulls, and fill any holes if new hardware will be used. Sanding the surfaces will ensure a smooth and even finish. If using reclaimed cabinets, thoroughly clean and sanitize them to remove any dirt, grime, or potential contaminants.
The countertop should be cut to the desired dimensions and prepared for installation. If using a solid wood countertop, sanding and sealing are essential to protect the wood from moisture and damage. Laminate countertops may require edge banding to provide a finished look and prevent chipping. Butcher block countertops should be oiled regularly to maintain their appearance and prevent cracking.
Assembly and Construction
The assembly process begins with positioning the cabinets according to the planned layout. Ensure the cabinets are level and flush with each other. Use shims to adjust the height of the cabinets if necessary, ensuring the desk surface will be even and stable. Secure the cabinets together using screws and wood glue. Drill pilot holes before inserting the screws to prevent the wood from splitting.
When attaching the countertop, apply a bead of construction adhesive to the top edges of the cabinets. Carefully position the countertop onto the cabinets, ensuring it is centered and aligned correctly. Secure the countertop to the cabinets using screws from underneath. The screws should be long enough to penetrate the countertop but not so long as to protrude through the top surface.
If incorporating wall cabinets above the desk, ensure they are securely mounted to the wall studs. Use appropriate hardware, such as screws and wall anchors, to provide adequate support. The height of the wall cabinets should be carefully considered to ensure they are within easy reach and do not obstruct the workspace.
Install any additional features, such as keyboard trays, cable management systems, or lighting fixtures. Keyboard trays can be attached to the underside of the desk surface, providing a convenient and ergonomic platform for typing. Cable management systems can help organize and conceal cords, creating a cleaner and more organized workspace. Lighting fixtures can be mounted above the desk to provide adequate illumination.
Finishing and Detailing
Once the desk is assembled, focus on finishing and detailing. This involves filling any gaps or imperfections with wood filler, sanding the surfaces smooth, and applying a final coat of paint or stain. Wood filler should be allowed to dry completely before sanding. Sanding should be done carefully to avoid damaging the surrounding surfaces.
Apply a primer before painting or staining to ensure proper adhesion and coverage. The choice of paint or stain will depend on the desired aesthetic. Consider using a durable and easy-to-clean finish, such as a semi-gloss or satin paint. Apply multiple coats of paint or stain, allowing each coat to dry completely before applying the next.
Install the hardware, such as drawer pulls and knobs. The hardware should complement the overall style of the desk and be easy to grip and use. Consider using matching hardware throughout the desk to create a cohesive look.
Add any final touches, such as decorative molding, edge trimming, or accent pieces. These details can enhance the desk's appearance and add a personal touch. Decorative molding can be applied to the edges of the countertop or cabinets to create a more refined look. Edge trimming can be used to protect the edges of the countertop from damage. Accent pieces can be added to personalize the desk and reflect individual style.
Addressing Potential Challenges
Numerous challenges may arise during the construction process. One common issue is ensuring the cabinets are level and plumb. Uneven floors can cause cabinets to wobble or tilt, affecting the stability of the desk. Use shims to level the cabinets and ensure they are securely anchored to the floor.
Another potential challenge is aligning the countertop correctly. Misalignment can result in gaps or overhangs, detracting from the desk's appearance. Measure carefully and use accurate cutting techniques to ensure the countertop fits perfectly. Clamps can be used to hold the countertop in place while securing it to the cabinets.
Working with reclaimed cabinets may present unique challenges. These cabinets may have pre-existing damage, such as scratches, dents, or water stains. Repair any damage before proceeding with the assembly process. Thoroughly clean and sanitize reclaimed cabinets to remove any dirt, grime, or potential contaminants.
Ensuring proper ventilation and dust control is crucial when sanding, painting, or staining. Work in a well-ventilated area and wear a dust mask to protect yourself from inhaling harmful particles. Use drop cloths to protect surrounding surfaces from paint or stain splatters. Dispose of waste materials properly according to local regulations.

How To Create A Diy Office Desk With Kitchen Cabinets

Diy Office Desk House Of Hawkes

Easy Diy Built In Desk Tutorial Home Office Design Space

How To Create A Diy Office Desk With Kitchen Cabinets

Craft Room Diy Desk Tutorial Hometalk

Diy Built In Desk Makeover With Crown Molding Tutorial The Inspired Work

Craft Room Desk Tutorial How To Nest For Less

Awesome Custom Diy Desk

Craft Desk From Kitchen Cabinets And Countertop Longer With More Workspace For John Built In Desks

Diy Resin Top Desk Centsational Style