How To Make A Kitchen Cabinet
Constructing a kitchen cabinet involves careful planning, precise measurements, and a methodical assembly process. A well-built cabinet enhances both the functionality and aesthetics of a kitchen. This article provides a comprehensive guide to creating a basic kitchen cabinet, focusing on essential techniques and practical considerations.
Planning and Design
Before commencing any physical construction, thorough planning and design are paramount. This phase establishes the cabinet's dimensions, material selection, and overall functionality. Initial considerations include the available space, desired storage capacity, and the existing kitchen layout. Accurate measurements of the designated area are crucial for ensuring a proper fit.
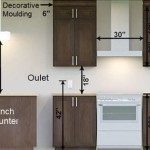
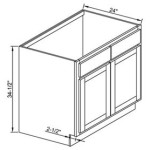
Detailed drawings or sketches should be created to visualize the cabinet's design and dimensions. These drawings should include precise measurements for all components, including the cabinet's height, width, and depth. The placement of shelves, drawers, and doors should also be indicated in the drawings. This visual representation serves as a blueprint for the entire construction process.
Material selection is another critical aspect of the planning phase. Common materials for kitchen cabinets include plywood, medium-density fiberboard (MDF), and solid wood. Plywood is a cost-effective option that offers good strength and stability. MDF provides a smooth surface ideal for painting and finishing. Solid wood offers a premium aesthetic and durability, but it is generally more expensive. The choice of material depends on budgetary constraints, desired aesthetic, and performance requirements.
Hardware selection, such as hinges, drawer slides, and knobs or pulls, should also be considered during the planning stage. The type and quality of hardware can significantly impact the cabinet’s functionality and longevity. Selecting durable and reliable hardware ensures smooth operation and minimizes the need for future repairs or replacements. A comprehensive materials list, including the quantity of each item, should be compiled to streamline the procurement process.
Construction Process
Once the planning phase is complete, the construction process can begin. This involves cutting the materials to the specified dimensions, assembling the cabinet components, and installing the hardware. Precision and accuracy are essential throughout this phase to ensure a structurally sound and aesthetically pleasing finished product.
The first step in the construction process is cutting the materials to the dimensions specified in the drawings. A table saw is typically used for making straight cuts, while a jigsaw or circular saw may be used for more intricate cuts. It is imperative to use accurate measuring tools and to cut the materials precisely to avoid any gaps or misalignments during assembly. Safety precautions, such as wearing safety glasses and using appropriate safety guards on power tools, should be observed at all times.
After the materials have been cut, the next step is to assemble the cabinet components. This typically involves joining the sides, top, bottom, and back of the cabinet using screws, nails, or wood glue. Clamps are often used to hold the components together while the adhesive dries, ensuring a strong and secure bond. The joints should be carefully aligned and flush to create a seamless appearance. The back of the cabinet can be attached using nails, screws, or staples. It provides structural support and helps to keep the cabinet square.
Shelves can be installed using adjustable shelf supports or by securing them directly to the cabinet sides with screws or nails. The spacing between shelves should be determined based on the types of items that will be stored in the cabinet. Drawer boxes can be constructed separately and then installed using drawer slides. The drawer slides should be properly aligned and securely attached to the cabinet sides to ensure smooth and effortless drawer operation. The cabinet doors can then be attached using hinges. The hinges should be properly aligned and adjusted to ensure that the doors open and close smoothly and evenly.
Finishing and Installation
The final stage involves finishing the cabinet and installing it in the kitchen. Finishing enhances the cabinet's appearance and protects it from moisture and wear. Installation requires careful alignment and secure attachment to the wall or floor.
Before applying any finish, the cabinet should be thoroughly sanded to create a smooth and even surface. Any imperfections, such as scratches or dents, should be filled with wood filler and sanded smooth. The cabinet should then be cleaned to remove any dust or debris. The choice of finish depends on the desired aesthetic and the type of material used to construct the cabinet. Common finishes include paint, stain, and varnish. Paint is a versatile option that can be used to create a wide range of colors and finishes. Stain enhances the natural grain of the wood and provides a rich, warm appearance. Varnish provides a durable and protective coating that resists scratches and water damage.
Multiple coats of finish may be required to achieve the desired look and level of protection. Each coat should be allowed to dry completely before applying the next. Sanding lightly between coats can help to create a smoother and more even finish. Once the finish has dried completely, the hardware, such as knobs or pulls, can be installed. The hardware should be carefully aligned and securely attached to the cabinet doors and drawers.
Before installing the cabinet, ensure the designated area is level and free of obstructions. The cabinet should be lifted into place and carefully aligned with the adjacent cabinets or walls. Shims can be used to level the cabinet if necessary. The cabinet should then be securely attached to the wall studs using screws. It is essential to use screws that are long enough to penetrate the wall studs and provide a secure hold. For upper cabinets, it is crucial to ensure that they are securely attached to the wall studs to prevent them from falling. Once the cabinet is installed, any gaps between the cabinet and the wall can be filled with caulk to create a seamless and professional finish.
Considerations for ensuring the longevity of a kitchen cabinet include maintaining a stable environment, avoiding excessive moisture exposure, and promptly addressing any damages or wear. Regular cleaning and inspection can help prevent potential issues and prolong the cabinet's lifespan. By following these guidelines, a durable and aesthetically pleasing kitchen cabinet can be constructed, enhancing both the functionality and visual appeal of the kitchen space.

How To Build Kitchen Cabinets Start Finish

How To Make Diy Kitchen Cabinets

Diy Kitchen Cabinets Made From Only Plywood
:max_bytes(150000):strip_icc()/CabinetsDwg1-606042c79d87434d89d04dd82d1c7028.png?strip=all "Make Cabinets The Easy Way")
Make Cabinets The Easy Way

How To Make Diy Kitchen Cabinets

How To Build Cabinets The Complete Guide Houseful Of Handmade

How To Build Kitchen Cabinets With Pictures Wikihow

21 Diy Kitchen Cabinets Ideas Plans That Are Easy To Build

Diy How To Make L Shaped Kitchen Hanging Cabinet

Build Your Own Cabinets Without Expensive Tools Houseful Of Handmade
Related Posts