How to Make a Kitchen Cabinet Drawer
Constructing a kitchen cabinet drawer involves a series of precise steps, from measuring and cutting the wood to assembling and installing the finished product. This detailed guide outlines the process for creating a functional and aesthetically pleasing drawer for kitchen cabinets, ensuring a smooth operation and long-lasting durability.
The materials required for this project include wood for the drawer box (typically plywood, hardwood, or a combination), wood glue, screws or nails, drawer slides, sandpaper, wood filler (optional), paint or stain (optional), and appropriate safety equipment, such as safety glasses and hearing protection. The tools needed are a measuring tape, a saw (table saw, circular saw, or hand saw), a drill or screwdriver, a square, clamps, a sander or sanding block, and a router or dado blade (optional, for creating grooves).
Prior to commencing the construction, careful planning and accurate measurements are crucial for ensuring a proper fit within the cabinet opening. The following sections detail each stage of the drawer-making process.
1. Planning and Measuring the Drawer
The first step is to accurately measure the cabinet opening where the drawer will be installed. Measure the width, height, and depth of the opening. It is important to take these measurements at multiple points, as cabinet openings may not be perfectly square. Use the smallest measurement for each dimension to ensure the drawer will fit without binding.
Determine the desired clearance for the drawer box inside the opening. Typically, a clearance of 1/8 inch on each side and at the top is sufficient. This allows for smooth operation and accounts for minor imperfections in the cabinet or drawer construction. Subtract this clearance from the width and height measurements of the cabinet opening to determine the external dimensions of the drawer box.
The depth of the drawer box is generally dictated by the type of drawer slides being used. Drawer slides are available in various lengths, and the chosen length should be shorter than the total depth of the cabinet opening to allow for space at the back. Consider the objects to be stored in the drawer when deciding on the appropriate drawer depth. Refer to the specifications of the selected drawer slides to determine the required drawer box depth.
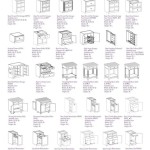
Once the external dimensions are calculated, determine the dimensions of each drawer box component: the front, back, sides, and bottom. The front and back pieces will have the same width, which is equal to the calculated width of the drawer box. The side pieces will have a length equal to the calculated depth of the drawer box. The bottom piece will have dimensions that fit within the assembled front, back, and side pieces, accounting for the method of joinery. The thickness of the wood used for the drawer box will also affect the bottom piece dimensions.
Create a detailed cutting list that specifies the dimensions and quantity of each piece required. This list serves as a reference during the cutting process and helps to minimize errors.
2. Cutting and Preparing the Wood
Using the cutting list, accurately cut the wood pieces for the drawer box. A table saw provides the most accurate and consistent cuts, but a circular saw or hand saw can also be used with careful attention to detail. Ensure that the cuts are square and precise, as any inaccuracies can affect the overall fit and function of the drawer.
After cutting the pieces, inspect them for any defects or imperfections. Replace any pieces with significant knots or blemishes that could compromise the structural integrity of the drawer. Lightly sand the edges of each piece to remove any splinters or burrs. This will make the assembly process easier and improve the overall finish of the drawer.
Prepare the pieces for joinery. The method of joining the drawer box components is a critical aspect of the construction process. Common joinery methods include butt joints with screws or nails, rabbet joints, dado joints, and dovetail joints. Each method offers varying levels of strength and aesthetic appeal. Butt joints are the simplest to execute but the weakest. Rabbet joints offer increased strength by providing a larger gluing surface. Dado joints are even stronger and help to align the pieces during assembly. Dovetail joints are the strongest and most aesthetically pleasing, but are also the most complex to create.
If using rabbet or dado joints, use a router or dado blade on a table saw to create the necessary grooves in the front, back, and side pieces. Ensure that the grooves are precisely aligned and sized to accommodate the thickness of the adjacent piece. For dovetail joints, specialized tools and techniques are required.
If the drawer bottom is to be inset into a groove, cut a groove along the inside of the front, back, and side pieces. This groove should be slightly wider than the thickness of the drawer bottom to allow for expansion and contraction of the wood.
3. Assembling the Drawer Box
With all the pieces cut and prepared, begin assembling the drawer box. Apply wood glue to the joining surfaces of the front, back, and side pieces. Use clamps to hold the pieces together while the glue dries. Ensure that the drawer box is square by measuring the diagonals – they should be equal. If necessary, adjust the clamps to correct any misalignments.
Reinforce the glue joints with screws or nails. Pre-drilling pilot holes is recommended to prevent the wood from splitting. Use screws or nails that are of appropriate length to penetrate the wood adequately without protruding from the other side. Space the screws or nails evenly along the joints to distribute the load and maximize strength.
If the drawer bottom is inset into a groove, slide the bottom piece into the grooves before the final side is attached. Apply glue to the edges of the bottom piece where it meets the front, back, and sides. Secure the final side piece with glue and screws or nails, ensuring that the drawer bottom is properly seated in the grooves.
After the glue has dried, remove the clamps and inspect the drawer box for any imperfections. Fill any gaps or cracks with wood filler. Sand the entire drawer box smooth, paying particular attention to the joints. Remove any excess glue or wood filler before sanding. Start with a coarse grit sandpaper and gradually move to a finer grit to achieve a smooth, even surface.
If desired, apply a finish to the drawer box. This could include paint, stain, or a clear coat. Follow the manufacturer's instructions for application and drying times. Apply multiple coats for added protection and durability. Lightly sand between coats to remove any imperfections and create a smooth finish.
4. Installing the Drawer Slides
The final step is to install the drawer slides. Drawer slides come in various types, including side-mount, bottom-mount, and center-mount. Side-mount slides are the most common and offer good stability and load-bearing capacity. Bottom-mount slides are less visible but may have a lower load capacity. Center-mount slides are typically used for smaller drawers.
Refer to the manufacturer's instructions for the specific drawer slides being used. Generally, the process involves attaching one part of the slide to the inside of the cabinet and the other part to the side of the drawer box. Ensure that the slides are aligned properly and securely fastened to both the cabinet and the drawer box. Use screws of the correct length to avoid protruding through the wood.
The position of the drawer slides will determine the vertical placement of the drawer within the cabinet opening. Measure carefully to ensure that the drawer is centered vertically and that there is adequate clearance at the top and bottom. Use a level to ensure that the slides are mounted horizontally, as any misalignment can cause the drawer to bind or operate unevenly.
Once the slides are installed, slide the drawer box into the cabinet to test the fit and operation. The drawer should slide smoothly and easily without binding or rubbing. If necessary, adjust the slides to correct any misalignments or binding. Fine adjustments can often be made by loosening the screws and slightly repositioning the slides.
Once the drawer is installed and operating smoothly, consider adding a drawer pull or knob to the front of the drawer. Choose a pull or knob that complements the style of the kitchen cabinets and is comfortable to grip. Drill holes in the drawer front according to the manufacturer's instructions and attach the pull or knob securely with screws.

How To Make Diy Kitchen Cabinet Drawers Love Renovations

How To Build Kitchen Cabinets Install Drawer Slides

Diy Base Cabinet With Drawers 8 Steps Pictures Instructables

Diy Pull Out Drawer Project Easy Steps Minimal Tools

How To Easily Add Drawers Kitchen Cabinets Small Stuff Counts

Easy To Extra Your Kitchen Storage Diy Under Cabinet Drawer Vadania Home Upgrader

How To Build A Cabinet Drawer The Easiest Way Possible Sawdust Girl

10 Tips And Tools For Building Better Cabinets

How To Make Simple Easy Sliding Shelves

How To Easily Add Pull Out Drawers A Kitchen Cupboard
Related Posts