How to Make a Kitchen Carcass
A kitchen carcass, also known as a kitchen cabinet box, is the fundamental structural element of your kitchen cabinets. It provides the framework that holds the doors, drawers, and shelves. Making your own kitchen carcasses allows for greater customization, cost savings, and a sense of accomplishment. This guide will provide a step-by-step process for crafting high-quality kitchen carcasses suitable for various cabinet types and designs.
1. Planning and Design
The first step is to meticulously plan and design your kitchen layout. This includes determining the dimensions, configuration, and functionality of each cabinet. Consider the following:
- Cabinet sizes: Measure the space available and determine the required cabinet dimensions. Standard kitchen cabinet depths range from 12 inches to 24 inches, while cabinet widths can vary depending on your needs.
- Cabinet types: Choose from various cabinet types, including base cabinets, wall cabinets, tall cabinets, and pantry cabinets. Each type serves different purposes and has specific design considerations.
- Materials: Select the appropriate materials for your kitchen carcasses. Plywood, medium-density fiberboard (MDF), and particleboard are commonly used. Plywood offers excellent durability and stability, while MDF and particleboard are more budget-friendly options.
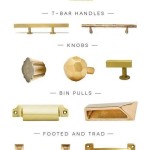
- Hardware: Determine the type of hardware you need for your cabinets, such as hinges, drawer slides, and door handles.
Create detailed drawings or use online software to visualize your kitchen design and ensure everything fits perfectly before moving on to construction.
2. Cutting and Assembly
Once you have finalized your design, it is time to cut and assemble the carcass components. This process involves precise measurements and careful execution.
- Cutting the panels: Cut the panels for your carcasses using a table saw, circular saw, or miter saw. Ensure the cuts are accurate and straight to maintain a professional appearance.
- Drilling pilot holes: Before assembling the panels, drill pilot holes slightly smaller than the screws you will be using. This prevents splitting the wood when screwing.
- Assembling the carcass: Use wood glue and screws to assemble the panels. Apply a thin layer of wood glue along the edges and secure the panels with screws driven into the pilot holes. Apply pressure to ensure a tight joint.
For additional strength, consider using pocket hole screws or dowel joints. Pocket holes are drilled at an angle, allowing screws to be driven into the panels without showing on the visible surfaces. Dowel joints create a strong and aesthetically pleasing connection.
3. Finishing Touches
After assembling the carcass, it is time to add finishing touches to enhance its look and functionality.
- Sanding and priming: Sand the carcass to smooth the surface and remove any imperfections. Apply a primer to create a uniform surface for painting or staining.
- Installing shelves and drawers: Install shelves and drawer components to organize the interior space. Ensure the shelf supports are securely attached and the drawers slide smoothly.
- Installing door and drawer fronts: Attach the door and drawer fronts using hinges and drawer slides. Check that the doors and drawers open and close smoothly without any obstructions.
- Finishing the carcass: Paint, stain, or apply a clear finish to the carcass based on your desired aesthetic. Ensure the finish is evenly applied for a professional look.
These finishing touches help create a functional and visually appealing kitchen cabinet. By taking the time to complete them, you will enhance the overall quality and longevity of your kitchen carcasses.
Creating your own kitchen carcasses requires a bit of time and effort. However, the satisfaction of crafting a custom and durable element for your kitchen is well worth it. With proper planning, precision, and attention to detail, you can build sturdy and aesthetically pleasing kitchen carcasses that will serve you for years to come.

Kitchen Base Cabinets 101 Ana White

How To Build Cabinets The Complete Guide Houseful Of Handmade

Diy Kitchen Cabinets Made From Only Plywood

22 Easy Diy Kitchen Cabinets With Free Step By Plans Building New

Three Ways To Build Diy Kitchen Cabinets Sawdust Girl

Making Kitchen Cabinets Part 1 Carcass

How To Build Base Cabinets The Complete Guide Houseful Of Handmade

Kitchen Cabinet Designs For Contemporary Cooking Spaces

Kitchen Cabinets The Engineer S Way Finewoodworking

17 Creative Diy Kitchen Cabinet Plans To Revive Your Insteading
Related Posts