How To Make Corner Cabinets Useful Materials In Revit Family
Corner cabinets present unique challenges in kitchen design. Often perceived as wasted space, careful planning and the utilization of Revit Family's robust tools can transform these awkward areas into valuable storage. Creating a versatile and functional corner cabinet family in Revit allows for efficient design, accurate visualization, and precise documentation within a Building Information Modeling (BIM) workflow. This article outlines the steps to create a useful corner cabinet family, maximizing storage potential and streamlining the design process.
Understanding Corner Cabinet Types
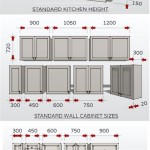
Before diving into Revit, understanding the types of corner cabinets is crucial. Common types include diagonal corner cabinets, blind corner cabinets, and corner susan cabinets. Each type has its advantages and disadvantages in terms of accessibility and storage capacity. Diagonal cabinets offer maximum storage but can be difficult to access items in the back. Blind corner cabinets are less expensive but often result in wasted space. Corner susan cabinets provide good accessibility but reduce overall storage volume due to the mechanism's footprint.
Selecting the appropriate corner cabinet type depends on the specific project needs and client preferences. Understanding the nuances of each type informs the creation of accurate and functional Revit families.
Creating the Basic Cabinet Structure in Revit
Begin by creating a new Revit family. Select the "Generic Model" template. This offers flexibility in building the cabinet from basic elements. Establish the cabinet's overall dimensions using extrusion tools. Create the cabinet's carcass by extruding profiles representing the sides, top, bottom, and back. Utilize parameters to control these dimensions, allowing for future adjustments and the creation of multiple cabinet sizes within a single family.
Precise modeling is crucial at this stage. Ensuring accurate dimensions and relationships between the different parts of the cabinet will be essential for creating a functioning and realistic model. Using reference planes and aligning elements carefully will contribute to the overall quality of the family.
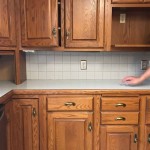
Adding Doors and Hardware
Once the cabinet carcass is complete, the next step involves adding doors and hardware. Use the "Door" family category to create and insert doors into the cabinet model. Leverage parameters to control the door swing, size, and material. This allows for flexibility in customizing the cabinet configuration based on specific project requirements. Incorporate hardware families like hinges and handles to enhance the model's realism and facilitate accurate scheduling and material takeoffs.
Pay close attention to the door's swing direction and clearance within the corner. This will ensure the cabinet functions correctly and avoids conflicts with other kitchen elements. Testing the door's movement within the Revit model can help identify and resolve potential issues early in the design process.
Implementing Shelves and Drawers
To maximize the corner cabinet's functionality, incorporate shelves and drawers. Utilize the "Shelf" and "Drawer" family categories within Revit. Use parameters to control the number, spacing, and dimensions of shelves and drawers. Consider incorporating adjustable shelf supports to provide users with greater flexibility in organizing the storage space. For corner susan cabinets, model the rotating hardware accurately, ensuring it interacts correctly with the shelves and cabinet walls.
Efficient shelf and drawer design is key to maximizing storage capacity. Considering the types of items typically stored in corner cabinets will inform the design and placement of shelves and drawers.
Creating Material Parameters
Assigning materials is crucial for visualization and scheduling. Create material parameters within the family editor, allowing users to change the cabinet's appearance and material properties within a project. This provides flexibility in adapting the cabinet to different design schemes and client preferences. Ensure the materials assigned are accurate representations of real-world materials, including their physical properties and appearance.
Proper material assignment contributes to accurate rendering and visualization, allowing designers and clients to better understand the finished product. It also facilitates accurate material takeoffs and cost estimations.
Testing and Refining the Family
Once the corner cabinet family is complete, thorough testing is essential. Load the family into a Revit project and place it in a typical corner configuration. Check for any interferences or conflicts with other elements. Test the door swing, drawer operation, and shelf placement to ensure everything functions as intended. Refine the family based on testing results, addressing any identified issues. This iterative process ensures the family is robust and reliable for use in projects.
Thorough testing and refinement are crucial steps in creating a high-quality Revit family. Addressing potential issues early in the process prevents costly rework later and ensures the family performs as expected in various project contexts.

A Step By Guide To Parametric Corner Cabinet In Revit

Change Material On Cabinet From Bimobjects Com Autodesk Community

How To Build A Corner Cabinet Wood Designer

Bim Objects Free Diagonal Corner Wall Cabinet With Doors Prepped For Glass 12 Deep Bimobject

Bim Objects Free Corner Base Cabinet 2087090 Aspekt Bimobject

Revit Content Kitchen

Easy Revit Cabinet Crown Molding Applying Technology To Architecture

Ep06 Sketching Cabinets In Revit Family Creation Tutorial

How To Build A Corner Cabinet Wood Designer

Revitcity Com How Do I Add A Countertop To The Base Cabinet Corner Unit Angled
Related Posts