How To Make Kitchen Cabinet Crown Molding
Crown molding is a decorative element that can be added to the top of kitchen cabinets to give them a more finished look. It is a relatively easy project to do yourself, and it can make a big difference in the overall appearance of your kitchen. Here are the steps on how to make kitchen cabinet crown molding:
1. Measure and Cut the Molding
The first step is to measure and cut the molding to the desired length. You will need a miter saw to make angled cuts, and a measuring tape and pencil to mark the cuts. Measure the length of the cabinet and add 1 inch for the miter cuts. Cut the molding at a 45-degree angle on both ends.
2. Attach the Molding to the Cabinet
Once the molding is cut to size, you can attach it to the cabinet. Use a brad nailer or a finishing nailer to secure the molding to the cabinet. Start by attaching the molding to the front of the cabinet, and then work your way around the sides and back. Make sure to countersink the nails so that they are not visible.
3. Fill the Nail Holes
Once the molding is attached, you will need to fill the nail holes. Use a wood filler that is the same color as the molding. Apply the wood filler to the nail holes with a putty knife, and then wipe away the excess. Allow the wood filler to dry according to the manufacturer's instructions.
4. Paint or Stain the Molding
If you want to paint or stain the molding, you can do so after the wood filler has dried. Use a paint or stain that is compatible with the type of molding you are using. Apply the paint or stain according to the manufacturer's instructions. Allow the paint or stain to dry completely before moving on to the next step.
5. Install the Molding
Once the paint or stain is dry, you can install the molding. Start by attaching the molding to the cabinet with a brad nailer or a finishing nailer. Make sure to countersink the nails so that they are not visible. Once the molding is attached, you can caulk the seams between the molding and the cabinet to create a watertight seal.
With these simple steps, you can easily make kitchen cabinet crown molding that will add a beautiful finishing touch to your kitchen.

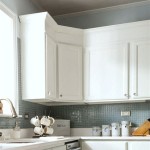
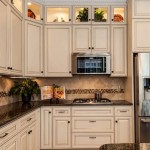
Diy Kitchen Cabinet Upgrade With Paint And Crown Molding

Diy Kitchen Cabinet Upgrade With Paint And Crown Molding

How To Install Crown Molding On Cabinets Young House Love

Kitchen Cabinet Crown Molding Reality Daydream

Adding Crown Moulding To Wall Kitchen Cabinets Momplex Vanilla Ana White

How To Add Crown Molding Kitchen Cabinets Abby Organizes

Cabinet Crown Molding Rogue Engineer

Installing Kitchen Cabinet Crown Molding

Diy Kitchen Cabinet Upgrade With Paint And Crown Molding

How To Install Crown Molding On Kitchen Cabinets Sawdust Girl
Related Posts