How To Make Kitchen Cabinets Look Antique White
Achieving an antique white finish on kitchen cabinets can transform a space, lending it a sense of timeless elegance and character. This aesthetic is highly desirable, as it evokes a feeling of warmth and history, often associated with established homes and classic design. The process involves several steps, from proper preparation to the application of specialized finishing techniques, each crucial to achieving the desired aged appearance.
Before embarking on this project, it’s important to understand the different methods available. Some approaches focus on distressing the paint to reveal the underlying wood, while others utilize glazes and tinted topcoats to create subtle variations in color and depth. The choice of method often depends on the existing cabinet finish, the type of wood used, and the level of antiquing desired. It's advisable to practice techniques on a test piece of wood before committing to the entire project. This minimizes potential errors and ensures the desired effect is achieved.
Preparing the Cabinets for Painting
Proper preparation is arguably the most critical step in achieving a professional-looking antique white finish. Neglecting this stage can lead to paint adhesion problems, uneven surfaces, and ultimately, a less-than-satisfactory result. The preparation process typically involves cleaning, sanding, and priming the cabinets.
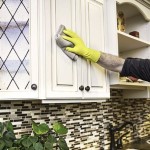
The first step is to thoroughly clean the cabinets to remove any grease, dirt, or grime. This can be accomplished using a degreasing cleaner specifically designed for kitchen surfaces. Avoid using harsh chemicals that could damage the existing finish. Scrub all surfaces, paying particular attention to areas around handles and hinges, which tend to accumulate grease. Rinse the cabinets thoroughly with clean water and allow them to dry completely.
Once the cabinets are clean and dry, the next step is to sand them. Sanding creates a slightly rough surface that allows the primer and paint to adhere properly. Use a medium-grit sandpaper (around 120-grit) to lightly sand all surfaces. Focus on removing any gloss from the existing finish. For cabinets with heavily textured surfaces or intricate details, consider using an orbital sander with a fine-grit sandpaper to avoid damaging the wood. After sanding, remove all dust with a tack cloth or a vacuum cleaner with a brush attachment. It is imperative to remove all remnants of the sanding process as imperfections will show through the paint.
After sanding, priming is essential. Primer provides a uniform base for the paint, improves adhesion, and helps to block stains from bleeding through. Choose a high-quality primer specifically designed for wood cabinets. Apply the primer in thin, even coats, using a brush or a sprayer. Allow the primer to dry completely according to the manufacturer's instructions. Once the primer is dry, lightly sand it with a fine-grit sandpaper (around 220-grit) to create an even smoother surface. Again, remove all dust thoroughly before proceeding to the next step.
Applying the Antique White Paint
Selecting the right type of paint is paramount when aiming for an antique white finish. Consider using a high-quality acrylic latex paint specifically formulated for cabinets and trim. These paints are durable, washable, and provide a smooth, even finish. Choose a shade of antique white that complements the existing décor of the kitchen. Paint swatches are readily available at most paint stores, allowing for comparison and evaluation under different lighting conditions.
Before applying the paint, ensure the work area is well-ventilated and protected with drop cloths or plastic sheeting. Use painter's tape to mask off any areas that should not be painted, such as walls, countertops, and hardware. Apply the paint in thin, even coats, using a brush, roller, or sprayer. If using a brush, choose a high-quality brush with synthetic bristles to minimize brushstrokes. If using a roller, choose a foam roller designed for smooth surfaces. If using a sprayer, follow the manufacturer's instructions for thinning the paint and adjusting the spray pattern. Avoid applying too much paint in one coat, as this can lead to drips and runs.
Allow each coat of paint to dry completely before applying the next coat. Refer to the paint manufacturer's instructions for recommended drying times. Lightly sand the paint between coats with a fine-grit sandpaper (around 320-grit) to remove any imperfections and create a smoother surface. This step is particularly important if applying multiple coats of paint. Remove all dust thoroughly before applying the next coat.
Typically, two to three coats of paint are required to achieve full coverage and a uniform finish. Once the final coat of paint is dry, carefully remove the painter's tape. Allow the paint to cure completely before reinstalling the hardware and using the cabinets. Curing times can vary depending on the type of paint used, but typically range from several days to a week.
Creating the Antique Effect: Distressing, Glazing, and Topcoats
The true transformation to an antique white finish lies in the application of techniques that simulate aging and wear. Several methods can be employed, including distressing, glazing, and applying tinted topcoats. Each approach offers a unique aesthetic, allowing for customization based on personal preferences.
Distressing involves physically removing small amounts of paint to reveal the underlying wood or primer. This can be achieved using various tools, such as sandpaper, steel wool, or a putty knife. Focus on areas that would naturally experience wear and tear, such as edges, corners, and around hardware. Apply light pressure and avoid removing too much paint, as this can result in an unnatural look. The goal is to create subtle imperfections that suggest years of use. After distressing, use a tack cloth to remove any dust or debris.
Glazing involves applying a thin layer of tinted glaze over the painted surface. The glaze seeps into the crevices and details of the cabinet, creating depth and highlighting the texture. Choose a glaze color that complements the antique white paint. Common choices include brown, umber, and black. Apply the glaze with a brush or a rag, and then immediately wipe it off with a clean rag. The amount of glaze that remains on the surface will determine the intensity of the effect. Experiment with different application techniques to achieve the desired look. For example, stippling the glaze with a brush can create a textured effect, while wiping it off in a specific direction can accentuate the grain of the wood.
Applying a tinted topcoat is another way to add depth and warmth to the antique white finish. A tinted topcoat is a clear coat that has been mixed with a small amount of pigment. This pigment adds a subtle tint to the paint, creating a softer, more aged look. Choose a tint color that complements the antique white paint, such as brown or sepia. Apply the tinted topcoat in thin, even coats, using a brush or a sprayer. Allow each coat to dry completely before applying the next coat. Lightly sand the topcoat between coats with a fine-grit sandpaper to remove any imperfections and create a smoother surface. Two to three coats of tinted topcoat are typically required to achieve the desired effect.
After applying the distressing, glazing, or tinted topcoat, it is important to protect the finish with a clear topcoat. A clear topcoat will seal the paint and glaze, making them more durable and resistant to scratches and stains. Choose a high-quality clear topcoat specifically designed for cabinets and trim. Apply the clear topcoat in thin, even coats, using a brush or a sprayer. Allow each coat to dry completely before applying the next coat. Lightly sand the topcoat between coats with a fine-grit sandpaper to remove any imperfections and create a smoother surface. Two to three coats of clear topcoat are typically required to provide adequate protection. Once the final coat of clear topcoat is dry, allow it to cure completely before reinstalling the hardware and using the cabinets.
The ultimate success of an antique white kitchen cabinet refinishing project depends on meticulous attention to detail, patience, and a willingness to experiment with different techniques. By following these guidelines, a homeowner can achieve a professional-looking finish that enhances the beauty and value of their kitchen.

Antique White Kitchen Cabinets Are What Many Homeowners Look For Gec Cabinet Depot

Painting Kitchen Cabinets Antique White Pictures Ideas

Antique White Kitchen Cabinets 6 Top Design Ideas

Rescuing And Reviving A Glazed Distressed Kitchen Bella Tucker

3 Timeless Antique White Kitchen Cabinet Designs Cabinetcorp

Distressed Kitchen Cabinets How To Distress Your

The Best Antique White Paint For Kitchen Cabinets And Other Colors Too Jennifer Rizzo

How To Glaze Kitchen Cabinets Diyer S Guide Bob Vila

The Best Antique White Paint For Kitchen Cabinets And Other Colors Too Jennifer Rizzo

Why Antique White Kitchen Cabinets Might Not Be The Best Choice In 2024
Related Posts