How to Make Kitchen Kickboards: A Comprehensive Guide
Kitchen kickboards, also known as toe kicks, are essential elements of any well-designed kitchen. They serve both functional and aesthetic purposes, protecting the base of your cabinets from damage, hiding unsightly plumbing and electrical lines, and providing a seamless transition between your cabinets and the floor.
Making kitchen kickboards is a relatively simple project that can be completed in a few hours with the right tools and materials. Here's a comprehensive guide to help you get started:
Materials You'll Need:
- Plywood or MDF (Medium-Density Fiberboard)
- Wood glue
- Nails or screws
- Primer and paint (optional)
Tools You'll Need:
- Measuring tape or ruler
- Pencil
- Jigsaw or circular saw
- Hammer or drill
- Sandpaper or sanding block
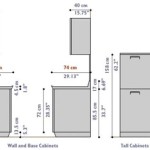
Step 1: Measure and Mark the Kickboards
Start by measuring the length of the base of your cabinets. Mark this measurement on your plywood or MDF sheet. Next, determine the height of your kickboards. Standard kickboard height is 3.5 inches, but you can adjust this based on your preferences or the height of your cabinets.
Step 2: Cut the Kickboards
Use your jigsaw or circular saw to cut the kickboards to the desired length and height. Be sure to wear safety glasses when operating power tools.
Step 3: Assemble the Kickboards
Apply a thin layer of wood glue to the edges of the kickboards and press them together. Use nails or screws to secure the kickboards in place.
Step 4: Sand and Finish the Kickboards
Sand the kickboards smooth using a sandpaper or sanding block. Remove any dust or debris with a damp cloth.
Step 5: Prime and Paint (Optional)
If desired, apply a coat of primer to the kickboards and allow it to dry. Then, paint the kickboards using your preferred color and finish.
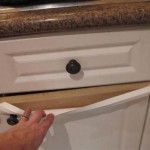
Step 6: Install the Kickboards
Place the kickboards along the base of your cabinets and secure them using nails or screws through the pre-drilled holes.
Tips for Success:
- Use a level to ensure that your kickboards are installed evenly.
- Caulk the joints between the kickboards and the floor to prevent water damage.
- Consider adding a kickboard trim piece for a more decorative touch.
- For a more durable finish, use exterior-grade paint or a polyurethane coating.

Kickboards Old Or New School Mdc Furniture Design

Kick Off How To Make The Most Of Kitchen Kickboards Houzz

How To Make The Most Of Your Kitchen Kickboards Houzz

Not All Kickboards Are Equal Rod S Kitchens

How To Diy Your New Kitchen Kickboards The Door Company

How To Fit Kitchen Plinths Halman Thompson

Diy Kitchen Kickboard Drawers Genius Storage Solution

Fitting A Kitchen Plinth The Carpenter S Daughter

Kitchen Kickboards Taken Fron The Renovation Series

How To Make The Most Of Your Kitchen Kickboards Houzz
Related Posts