How to Make Your Own Kitchen Cabinets
Embarking on a kitchen remodel is a fantastic way to enhance the heart of your home, and creating bespoke cabinets can be a deeply rewarding project. While it may seem daunting, building your kitchen cabinets offers a unique opportunity to achieve a perfect fit and create a personalized space reflecting your style and needs. This guide will provide you with the necessary steps and insights to successfully craft high-quality kitchen cabinets.
1. Planning and Design
The foundation of any successful cabinet-making project lies in meticulous planning and thoughtful design. This stage sets the tone for the entire project and helps ensure a smooth, efficient execution. Here are crucial steps to consider:
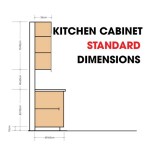
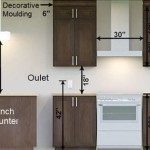
- Measure and Sketch: Accurate measurements are paramount. Measure the space where your cabinets will be installed, including wall dimensions, existing fixtures, and any obstacles. Sketch your design, noting the layout, sizes, and desired features of each cabinet.
- Choose Cabinet Styles: Determine the cabinet styles, such as base cabinets, wall cabinets, corner cabinets, and pantry cabinets. Consider the desired door and drawer styles, and whether to include decorative elements like crown molding or raised panels.
- Select Materials: Opt for quality plywood or solid wood for longevity and durability. Consider the type of wood based on your aesthetic preferences and budget. For example, maple and cherry offer classic elegance, while oak and birch are more cost-effective alternatives.
- Hardware and Finishes: Decide on the hardware, such as hinges, pulls, and knobs, and choose finishes that complement the overall design. Consider staining or painting to achieve the desired look.
- Draw a Detailed Plan: Incorporate the chosen materials, dimensions, and design elements into a detailed plan. This plan will serve as your blueprint throughout the construction process.
2. Building the Cabinet Boxes
Once the plan is finalized, the construction phase begins. The cabinet box is the core structure, so it's crucial to ensure accuracy and sturdiness. Follow these steps:
- Cut the Wood: Using a table saw or circular saw, cut the plywood or solid wood according to the dimensions outlined in your plan. Double-check the measurements to ensure accuracy.
- Assemble the Box: Align the cut pieces and secure them using pocket-hole screws, dowels, or corner blocks. These methods create durable, concealed joints. Apply wood glue to reinforce the joints.
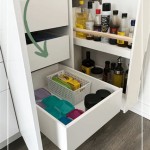
- Add Shelves and Drawer Slides: Cut and install shelves according to your plan. For drawers, install drawer slides securely to ensure smooth operation.
- Reinforce and Brace: Consider adding additional bracing to large cabinet boxes for stability and strength. Use 1x2 or 1x4 wood strips to reinforce the sides and back.
3. Doors and Drawer Fronts
The doors and drawer fronts are integral to the aesthetic appeal of your cabinets. Pay attention to detail, ensuring precise cuts and a professional finish.
- Cut and Shape: Cut the doors and drawer fronts to the desired size and shape. You can use a table saw, jig saw, or router for intricate shaping and molding.
- Add Molding: If desired, apply molding to the edges of the doors and drawer fronts for visual interest and added durability.
- Attach the Hardware: Once the doors and drawer fronts are assembled, install hinges and drawer pulls according to the manufacturer's instructions. Ensure that the hardware is positioned evenly and securely.
- Finish the Doors: Stain, paint, or apply a clear coat to the doors and drawer fronts. Let the finish dry completely before proceeding.
4. Installation and Finishing Touches
The final stage involves installing the cabinets and adding the finishing touches to complete your personalized project.
- Prepare the Walls: Ensure the walls are smooth and level for a clean installation. You may need to use shims or adjust the cabinet placement slightly to achieve a perfect fit.
- Install the Cabinets: Attach the cabinets to the walls using screws, brackets, or cleats. Securely fasten them for stability.
- Attach Doors and Drawers: Hang the doors and install the drawer fronts onto the cabinet boxes. Test the operation of each door and drawer to ensure they are smooth and functional.
- Add Countertop and Backsplash: Install the countertop and backsplash, ensuring a seamless transition with the cabinets.
- Install Lighting: Add under-cabinet lighting or overhead lighting to enhance the functionality and aesthetics of your kitchen.

Build Your Own Cabinets Without Expensive Tools Houseful Of Handmade

How To Build Cabinets The Complete Guide Houseful Of Handmade

Diy Kitchen Cabinets Made From Only Plywood

How To Build Cabinets The Complete Guide Houseful Of Handmade

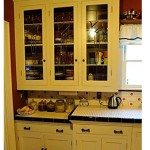
How To Build Your Own Vintage Style Cabinets Daniel Kanter

Diy Budget Open Kitchen Cabinet You Can Build In A Weekend The Ponds Farmhouse

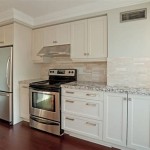
How To Diy Build Your Own White Country Kitchen Cabinets

Diy Kitchen Cabinets Made From Only Plywood

Diy Budget Open Kitchen Cabinets Build Your Own In A Weekend

How To Diy Build Your Own White Country Kitchen Cabinets
Related Posts