DIY Kitchen Cabinet Pull-Out Drawers: A Comprehensive Guide
Pull-out drawers are a great way to maximize storage space and improve the functionality of your kitchen cabinets. They provide easy access to items that are often difficult to reach, such as pots and pans, spices, and pantry staples. Installing pull-out drawers can be a relatively simple DIY project, and it's a great way to update your kitchen without breaking the bank.
Materials You'll Need:
- Cabinet slides (full extension preferred)
- Drawer box (pre-assembled or DIY)
- Drawer front
- Screws
- Optional: Drawer runners and knobs or handles
Tools You'll Need:
- Screwdriver
- Drill
- Measuring tape
- Level
- Pencil
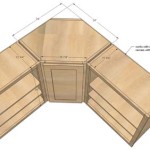
Step 1: Measure and Mark the Cabinet
Start by measuring the width and depth of your cabinet. Mark the center of the cabinet on both the top and bottom edges. These marks are where your cabinet slides will be attached.
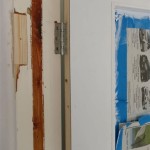
Step 2: Install the Cabinet Slides
Attach the cabinet slides to the sides of the cabinet, aligning the center of the slides with the marks you made in Step 1. Make sure the slides are level and secure them with screws.
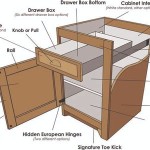
Step 3: Build the Drawer Box
If you're using a pre-assembled drawer box, skip this step. If you're building your own drawer box, follow these steps:
- Cut four pieces of wood to the desired width and depth of your drawer.
- Assemble the drawer box by attaching the sides to the front and back pieces using wood glue and screws.
Step 4: Attach the Drawer Front
Align the drawer front with the front of the drawer box and attach it using wood glue and screws. Make sure the drawer front is flush with the top and bottom edges of the drawer box.
Step 5: Install the Drawer Runners (Optional)
If desired, you can add drawer runners to the bottom of the drawer box. These runners will help the drawer slide more smoothly and prevent it from sagging.
Step 6: Attach the Knobs or Handles (Optional)
If desired, you can add knobs or handles to the drawer front for a more finished look. Measure and mark the desired location for the knobs or handles and attach them using screws.
Step 7: Install the Drawer
Insert the drawer into the cabinet, making sure the slides slide smoothly. Adjust the slides as needed to ensure the drawer opens and closes easily.
Tips:
- Use full-extension slides for maximum access to the drawer contents.
- Make sure the drawer box is a snug fit in the cabinet to prevent it from rattling.
- Add drawer organizers to keep your drawers neat and tidy.
- If you're not comfortable installing the drawers yourself, consider hiring a professional cabinetmaker.

Diy Pull Out Cabinet Drawers Love Renovations

How To Make Pull Out Shelves For Kitchen Cabinets Ron Hazelton

Diy Pull Out Cabinet Drawers Love Renovations

Diy Pull Out Cabinet Drawers Love Renovations

Diy Pull Out Drawer Storage Sawdust 2 Stitches

Pin On Kitchen Organization

Diy Pull Out Drawer Storage Sawdust 2 Stitches

Easy Pull Out Drawers For Kitchen Cabinets

Build Pull Out Shelves For Kitchen Cabinets

Kitchen Organization Pull Out Shelves In Pantry Remodelando La Casa
Related Posts