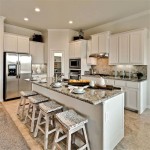
How To Make Your Old Kitchen Cabinets Look New
Kitchen cabinets often bear the brunt of daily wear and tear. They are subjected to spills, splatters, fingerprints, and fading, leaving them looking tired and outdated. Instead of opting for a costly kitchen remodel, revitalizing existing cabinets offers an economical and environmentally sound alternative. This article provides a comprehensive guide on how to refresh and rejuvenate old kitchen cabinets, extending their lifespan and breathing new life into the heart of the home.
Key Point 1: Thorough Preparation and Cleaning
The foundation for a successful cabinet makeover lies in meticulous preparation. This stage involves a comprehensive cleaning process, addressing any existing damage, and ensuring a smooth surface ready for subsequent treatments.
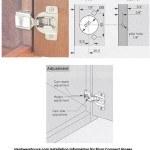
Begin by removing all hardware, including knobs, handles, hinges, and any decorative elements. This step simplifies the cleaning and refinishing process and allows for easier access to all cabinet surfaces. Store the hardware in labeled bags to ensure easy reinstallation. Consider replacing dated hardware with new styles to further enhance the updated look of the cabinets.
Next, thoroughly clean the cabinets using a degreasing cleaner specifically designed for kitchen environments. This will remove accumulated grease, grime, and food splatters. A mixture of warm water and mild dish soap may suffice for lightly soiled cabinets. For stubborn stains, a specialized degreaser or a solution of baking soda and water can be applied. Use a non-abrasive sponge or cloth to avoid scratching the cabinet surfaces. Pay particular attention to areas around the stove and sink, where grease and moisture tend to accumulate.
After cleaning, inspect the cabinets for any damage, such as chips, scratches, or dents. Fill minor imperfections with wood filler, following the manufacturer's instructions. Allow the filler to dry completely and then sand it smooth using fine-grit sandpaper. For significant damage, consider consulting a professional for repair.
Sanding is an essential step in preparing the cabinets for painting or staining. Sanding removes the existing finish, creating a textured surface that allows the new finish to adhere properly. Use medium-grit sandpaper (around 120-grit) to remove the bulk of the old finish, followed by fine-grit sandpaper (around 220-grit) to smooth the surface. Ensure even sanding across all cabinet surfaces. For cabinets with intricate details, consider using a sanding sponge or detail sander to access hard-to-reach areas. Remember to wear a dust mask to protect against inhaling sanding dust.
Finally, thoroughly wipe down the cabinets with a tack cloth to remove any remaining sanding dust. This step is crucial for ensuring a smooth and flawless finish. A vacuum cleaner with a brush attachment can also be used to remove dust from crevices and corners.
Key Point 2: Refinishing Techniques: Painting and Staining
Once the cabinets are properly prepared, the next step is to choose a refinishing technique that aligns with the desired aesthetic and functional requirements. Painting and staining are two common methods, each offering distinct advantages and considerations.
Painting: Painting provides an opportunity to completely transform the appearance of the cabinets by introducing new colors and finishes. Choose a high-quality paint specifically designed for kitchen cabinets. Acrylic latex paints are a popular choice due to their durability, ease of application, and low VOC (volatile organic compounds) content. Alkyd paints offer excellent durability and a smooth finish but require more meticulous application and longer drying times.
Apply a primer before painting to improve adhesion, prevent bleed-through from underlying stains, and create a uniform surface for the paint. Choose a primer that is compatible with the chosen paint type. Apply the primer in thin, even coats using a brush, roller, or sprayer. Allow the primer to dry completely according to the manufacturer's instructions.
Apply two coats of paint, allowing each coat to dry completely before applying the next. Use a high-quality brush or roller to achieve a smooth and even finish. For a professional-looking result, consider using a paint sprayer. A paint sprayer provides excellent coverage and a uniform finish, but it requires proper technique and masking to prevent overspray. When spraying, ensure proper ventilation and wear a respirator.
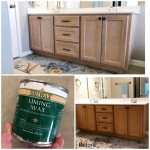
Staining: Staining enhances the natural beauty of the wood grain while adding color and depth. Choose a stain that complements the existing décor and provides the desired level of coverage. Oil-based stains offer excellent penetration and durability, while water-based stains are easier to clean up and have lower VOCs.
Before staining, apply a wood conditioner to ensure even stain absorption and prevent blotching. Apply the wood conditioner according to the manufacturer's instructions. Allow the conditioner to dry completely before applying the stain.
Apply the stain in thin, even coats using a brush, cloth, or foam applicator. Wipe off any excess stain immediately to prevent the stain from becoming too dark or uneven. Allow the stain to dry completely according to the manufacturer's instructions. Apply a second coat of stain if desired to achieve a deeper color.
After painting or staining, apply a clear topcoat to protect the finish and enhance its durability. Polyurethane is a popular choice for kitchen cabinets due to its resistance to moisture, scratches, and chemicals. Apply the topcoat in thin, even coats using a brush, roller, or sprayer. Allow the topcoat to dry completely according to the manufacturer's instructions. For added protection, apply two or three coats of topcoat.
Key Point 3: Addressing Specific Cabinet Styles and Materials
Kitchen cabinets are constructed from a variety of materials and come in various styles, each requiring specific considerations during the refinishing process. Understanding the nuances of different cabinet types is essential for achieving optimal results.
Solid Wood Cabinets: Solid wood cabinets are generally considered the most durable and versatile option. They can be painted, stained, or refinished multiple times. When refinishing solid wood cabinets, pay close attention to the grain direction when sanding to avoid scratching the wood. Use a wood filler that matches the wood species to repair any damage. With proper preparation, solid wood cabinets can retain their beauty and value for many years.
Veneer Cabinets: Veneer cabinets consist of a thin layer of wood veneer applied to a substrate, such as particleboard or MDF (medium-density fiberboard). Veneer cabinets are less durable than solid wood cabinets and require more careful handling during the refinishing process. Avoid excessive sanding, as this can damage or remove the veneer. When painting veneer cabinets, use a primer that is specifically designed for use on veneer. If the veneer is damaged or peeling, consider replacing it or consulting a professional for repair.
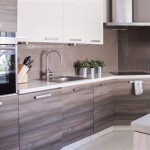
Laminate Cabinets: Laminate cabinets are constructed from a plastic laminate adhered to a substrate. Laminate cabinets are typically less expensive than solid wood or veneer cabinets and are relatively easy to clean. However, laminate is not easily refinished. Painting laminate cabinets requires specialized primers and paints designed to adhere to non-porous surfaces. Staining laminate cabinets is generally not recommended, as the laminate will not absorb the stain. Consider applying a peel-and-stick vinyl covering designed to mimic wood or other materials as an alternative to painting.
Shaker Style Cabinets: Shaker style cabinets are characterized by their simple, clean lines and recessed panel doors. These cabinets are well-suited for both painting and staining. When painting Shaker style cabinets, pay attention to the edges of the recessed panels to ensure even coverage. When staining Shaker style cabinets, use a gel stain to prevent the stain from running into the recessed areas.
Raised Panel Cabinets: Raised panel cabinets feature doors with a raised center panel, adding depth and dimension. These cabinets are often more ornate than Shaker style cabinets and require more careful attention during the refinishing process. When painting raised panel cabinets, use a brush with angled bristles to reach the intricate details. When staining raised panel cabinets, use a stain that complements the wood species and highlights the raised panel design.
By understanding the specific characteristics of different cabinet styles and materials, homeowners can tailor their refinishing techniques to achieve a professional-looking and long-lasting result. Proper preparation, careful selection of refinishing products, and attention to detail are essential for transforming old kitchen cabinets into a rejuvenated focal point of the home.

How To Make Old Cabinets Look New With Paint

25 Easy Ways To Update Kitchen Cabinets

How To Make Old Cabinets Look New With Paint

Kitchen Cabinet Makeover 101 Make Your Cabinets Look New Again Allen Brothers Painting

25 Easy Ways To Update Kitchen Cabinets

40 Easy Diys That Will Significantly Upgrade Your Home Selbstgebaute Küchenschränke Küchenrenovierung Zuhause

How To Update Your Kitchen Cabinets Without Replacing Them Real Estate U S News

How To Paint Kitchen Cabinets Like The Pros

25 Easy Ways To Update Kitchen Cabinets

Make An Old Kitchen Look New Again By Refinishing The Cabinets Seattle Times
Related Posts