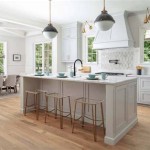
How to Paint Cream Kitchen Cabinets With a Glaze
Painting kitchen cabinets with a glaze can add a sophisticated and elegant touch to your kitchen. Glazing involves applying a semi-transparent glaze over the painted cabinets, creating a subtle yet noticeable depth and dimension. Here's a step-by-step guide to help you achieve a professional-looking glazed finish on your cream kitchen cabinets.
Materials You'll Need:
- Cream paint
- Clear glaze
- Paint brushes and sponges
- Sandpaper (120- and 220-grit)
- Tack cloth
- Clean rags
Step 1: Prepare the Cabinets
Remove all hardware from the cabinets. Clean the surfaces thoroughly with a degreaser to remove any dirt, grease, or oil. Sand the cabinets lightly with 120-grit sandpaper to create a smooth surface for the paint to adhere to. Wipe down the cabinets with a tack cloth to remove any sanding dust.
Step 2: Paint the Cabinets
Apply two even coats of cream paint to the cabinets, allowing each coat to dry completely before applying the next. Use a brush for intricate areas and a roller for larger surfaces. Sand the cabinets lightly with 220-grit sandpaper between coats to ensure a smooth finish.
Step 3: Create the Glaze
Mix clear glaze with a small amount of cream paint, approximately 1 part glaze to 2 parts paint. Stir until well combined. The consistency should be thick enough to hold its shape, but thin enough to apply easily.
Step 4: Apply the Glaze
Dip a clean sponge or brush into the glaze and lightly dab it onto the painted cabinets. Work in small sections, blending the glaze as you go. Avoid applying too much glaze, as it can create a streaky or uneven finish.
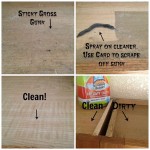
Step 5: Remove Excess Glaze
Immediately after applying the glaze, wipe it off with a clean rag or sponge. This will create a subtle sheen and remove any excess glaze. Work quickly to prevent the glaze from drying on the surface.
Step 6: Repeat Steps 4 and 5
Repeat steps 4 and 5 until you have glazed the entire cabinet surface. Allow the glaze to dry completely, which may take several hours or overnight.
Step 7: Apply a Topcoat (Optional)
If desired, you can apply a clear topcoat over the glaze to protect it and enhance its durability. Use a brush or sprayer to apply a thin, even coat. Allow the topcoat to dry completely before reinstalling the cabinet hardware.
Tips:
- Experiment with different glaze colors and consistencies to achieve the desired effect.
- Test the glaze on a small inconspicuous area before applying it to the entire cabinet.
- Work in a well-ventilated area and wear a mask when applying the glaze.
- Allow ample drying time between each step to ensure a durable finish.
- Clean your brushes and sponges thoroughly after each use.
With careful preparation and attention to detail, you can achieve a stunning glazed finish on your cream kitchen cabinets. The subtle depth and dimension it adds will create a timeless and elegant aesthetic that will transform your kitchen.

How To Glaze Kitchen Cabinets Diyer S Guide Bob Vila

How To Glaze Kitchen Cabinets

How To Glaze Cabinets At Home With The Barkers

Rescuing And Reviving A Glazed Distressed Kitchen Bella Tucker

How To Glaze Cabinets At Home With The Barkers

How To Glaze Cabinets Like A Pro

How To Glaze Kitchen Cabinets Diyer S Guide Bob Vila

Rescuing And Reviving A Glazed Distressed Kitchen Bella Tucker

2 The Magic Brush Inc Jennifer Allwood Decorative Painter Diy Business Coach Glazed Kitchen Cabinets Painting New

The 16 Best Wall Colors To Update Cream Cabinets Trim Kylie M Interiors
Related Posts