How to Paint Glazed Cabinets
Glazed cabinets add an elegant touch to any kitchen or bathroom, bringing a sense of sophistication and depth to the space. The process of painting glazed cabinets involves two key steps: applying a base coat of paint and then adding a glaze, which is a translucent layer that creates highlights and shadows. The final result is a beautiful, multi-dimensional finish that enhances the overall design of the cabinets.
This guide provides a step-by-step process for achieving flawlessly painted glazed cabinets. It covers the necessary materials, preparations, techniques, and tips for successful painting. Whether you are a seasoned DIYer or a beginner, this guide will equip you with the knowledge and confidence to tackle this project.
Preparing the Cabinets
Proper preparation is crucial for a successful glazed cabinet paint job. Begin by removing all hardware, such as knobs, handles, and hinges. This allows access to all surfaces for proper cleaning and priming. Thoroughly clean the cabinets using a mild soap and water solution to remove dust, grease, and any other residue. Ensure the cabinets are completely dry before proceeding to the next step.
Sanding is essential for creating a smooth and even surface for the paint to adhere to. Use fine-grit sandpaper (120-grit or finer) to lightly sand the cabinets. This helps to remove any imperfections, create a better surface for the primer, and ensure the even application of paint. After sanding, wipe down the cabinets with a tack cloth to remove any dust particles.
Priming the cabinets is a crucial step in preparing them for painting. A good primer helps create a smooth and uniform surface, prevents the base coat from reacting with the underlying material, and ensures better paint adhesion. Choose a primer specifically designed for cabinet surfaces, ensuring it is compatible with the paint you will use.
Applying the Base Coat
Once the primer is dry, you can start applying the base coat. Choose a high-quality paint designed for cabinet surfaces, ensuring it is compatible with the glaze you plan to use. When selecting a color, consider the overall design theme of your kitchen or bathroom and choose a shade that complements the existing décor.
Apply the base coat using a high-quality brush or sprayer. Start with thin and even coats, allowing each coat to dry completely before applying the next. Two to three coats of paint are typically sufficient, but adjust as needed for desired coverage. Apply the paint in a smooth and consistent manner, avoiding streaks or drips.
After applying the base coat, allow it to dry completely. This is crucial for allowing the paint to cure properly and ensure the glaze adheres well. The drying time will vary depending on the paint type and environmental conditions. Allow at least 24 hours for the base coat to cure before moving on to the glazing process.
Glazing Technique
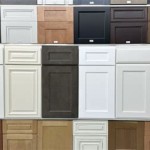
Glazing is the final step in creating the desired effect on your cabinets. Glazes are translucent, allowing the base coat color to show through while adding depth and dimension. They come in various colors, including white, black, and various shades of gray. The choice of glaze color depends on the desired effect and the overall design of the cabinets.
Begin by applying a thin layer of glaze to the cabinets. You can use a brush, sponge, or rag, depending on your preference. Apply the glaze in a thin, even layer, ensuring to cover all surfaces. Avoid applying too much glaze, as this can create a thick and uneven finish. After applying the glaze, allow it to dry slightly before wiping away excess glaze with a clean cloth.
The amount of glaze you remove will determine the final effect. Wiping away more glaze will result in a lighter and more subtle effect, while leaving more glaze will create a darker and more dramatic look. Experiment with different techniques and amounts of glaze to achieve the desired effect.
Once the glaze is dry, you can repeat the process as needed to achieve the desired level of depth and shading. Allow the glaze to dry completely before applying any topcoat or sealant.
Final Touches
After the glaze has dried completely, you can apply a topcoat or sealant to protect the painted surface and enhance its durability. A clear polyurethane sealant is recommended for cabinets, as it provides a durable, water-resistant finish that protects the paint from scratches and wear. Apply the sealant with a brush or sprayer in thin and even layers, allowing each layer to dry completely before applying the next.
Once the sealant is dry, you can reattach the hardware to the cabinets. This can be done using screws or glue, ensuring a secure fit. Make sure to clean up any excess glue or sealant and allow it to dry completely before using the cabinets.
With the glaze and sealant applied, your cabinets should have a stunning, multi-dimensional finish that adds elegance and sophistication to your kitchen or bathroom. Proper preparation and attention to detail in each step can ensure a beautiful and long-lasting result that you will enjoy for years to come.

How To Glaze Cabinets At Home With The Barkers

How To Glaze Kitchen Cabinets

How To Glaze Cabinets At Home With The Barkers

How To Glaze Cabinets At Home With The Barkers

Rescuing And Reviving A Glazed Distressed Kitchen Bella Tucker

How To Glaze Cabinets At Home With The Barkers

How To Glaze Cabinets At Home With The Barkers

What Is Cabinet Glazing Bella Tucker

How To Glaze Kitchen Cabinets

How To Paint Maple Kitchen Cabinets Step By Painting Tutorial
Related Posts