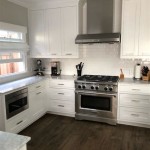
How To Paint Inside Old Kitchen Cabinets Without Sanding Them
Painting the interior of old kitchen cabinets can freshen up a kitchen space and improve storage functionality. Often, the prospect of extensive sanding deters individuals from undertaking this project. Fortunately, it is possible to paint inside old kitchen cabinets without sanding, although proper preparation is crucial for achieving a durable and aesthetically pleasing finish. This article outlines a comprehensive method for painting kitchen cabinet interiors without sanding, emphasizing surface preparation, appropriate product selection, and application techniques.
Key Point 1: Thorough Cleaning and Degreasing
The initial step in preparing kitchen cabinets for painting, especially cabinets that have been in use for an extended period, is a comprehensive cleaning process. Over time, kitchen cabinets accumulate grease, food splatters, dust, and general grime. These contaminants will prevent paint from adhering properly to the surface, leading to peeling, chipping, and an unsatisfactory final result. Cleaning and degreasing are paramount to a successful no-sand paint job.
The first step involves removing all items from the cabinets. Emptying the cabinets provides unobstructed access to all surfaces and prevents paint from getting on stored items. This also allows for a thorough inspection of the cabinet interior, identifying areas with particularly stubborn stains or grime buildups.
Next, use a vacuum cleaner with a brush attachment to remove loose dust, crumbs, and debris from the interior surfaces. Pay particular attention to corners, edges, and any crevices where dirt may accumulate. A handheld vacuum cleaner is often the most convenient option for this task due to its maneuverability in confined spaces.
Following vacuuming, the primary cleaning and degreasing process should begin. A suitable cleaning solution is essential. Trisodium Phosphate (TSP) is a powerful degreaser traditionally used for cleaning surfaces before painting. However, TSP can be harsh and may require careful handling and disposal. A safer and more environmentally friendly alternative is a phosphate-free cleaner specifically formulated for degreasing kitchen surfaces. These cleaners are readily available at most hardware stores and home improvement centers.
Prepare the cleaning solution according to the manufacturer's instructions. Typically, this involves diluting the cleaner with water in a bucket or spray bottle. Apply the cleaning solution to the interior surfaces of the cabinets using a sponge or microfiber cloth. For stubborn grease or grime, allow the cleaner to dwell on the surface for a few minutes before wiping it away. Use a scrub brush or abrasive pad for particularly difficult areas, but exercise caution to avoid damaging the cabinet finish.
Once the cabinets have been thoroughly cleaned and degreased, rinse them with clean water using a separate sponge or cloth. It is crucial to remove all traces of the cleaning solution, as any residue can interfere with paint adhesion. After rinsing, dry the cabinets thoroughly with clean towels. Allow the cabinets to air dry completely before proceeding to the next step.
Key Point 2: Applying a Liquid Deglosser or Bonding Primer
Since the objective is to paint without sanding, it's necessary to create a surface that paint can effectively grip. This is achieved through chemical means, either using a liquid deglosser or a bonding primer. Both options offer distinct benefits and drawbacks that should be considered based on the specific characteristics of the cabinets and the desired outcome.
A liquid deglosser, also known as a surface prep product, is a chemical solution that softens and dulls the existing glossy finish on the cabinets. This process creates a slightly textured surface that paint can adhere to more effectively. Liquid deglossers are typically applied with a clean cloth, wiping the surfaces in a uniform direction. The deglosser will evaporate quickly, leaving behind a slightly roughened surface ready for painting. It is important to follow the manufacturer's instructions carefully regarding application and drying time. Using rubber gloves and working in a well-ventilated area is also important.
The primary advantage of using a liquid deglosser is its speed and simplicity. It is a relatively quick and easy process compared to sanding, and it avoids the creation of dust, making cleanup much easier. However, liquid deglossers may not be suitable for all types of cabinet finishes. They are generally most effective on glossy or semi-gloss surfaces. If the cabinets have a very durable or resistant finish, a deglosser alone may not provide sufficient adhesion. Furthermore, some liquid deglossers can have strong odors and require careful ventilation.
An alternative to a liquid deglosser is a bonding primer. Bonding primers are specifically formulated to adhere to a variety of surfaces, including those that are typically difficult to paint, such as laminate, melamine, and varnished wood. These primers create a strong bond between the existing surface and the new paint, ensuring long-lasting adhesion. Bonding primers are typically applied with a brush or roller, like regular paint.
When selecting a bonding primer, look for a product that is specifically labeled for use on glossy or non-porous surfaces. These primers often contain special additives that enhance adhesion and prevent peeling. Apply the primer according to the manufacturer's instructions, ensuring that all surfaces are evenly coated. Allow the primer to dry completely before applying the topcoat of paint. Drying times can vary depending on the type of primer and environmental conditions.
One advantage of using a bonding primer is its versatility. It can be used on a wider range of cabinet finishes compared to a liquid deglosser. Additionally, some bonding primers offer other benefits, such as stain blocking and mildew resistance. However, applying a bonding primer generally requires more time and effort than using a liquid deglosser. It also adds an extra coat to the overall paint job, which can slightly alter the final appearance.
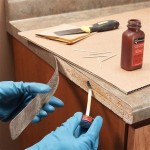
Before deciding which approach best suits the project, test a small, inconspicuous area with either the liquid deglosser or the bonding primer to ensure compatibility and desired results. This test will help determine the product that provides the best adhesion and overall finish for the particular cabinets.
Key Point 3: Selecting and Applying the Appropriate Paint
Choosing the right type of paint is crucial for a successful no-sand painting project. The paint needs to adhere well to the primed or deglossed surface and withstand the wear and tear of daily use. Consider the durability, ease of application, and aesthetic qualities of different paint options. Acrylic latex paints are generally a good choice for interior cabinets due to their durability, low odor, and easy cleanup. However, for cabinets that experience heavy use or exposure to moisture, consider using an enamel paint designed for cabinets and furniture. These paints offer enhanced durability and resistance to chipping and scratching.
Before painting, protect the surrounding areas by laying down drop cloths or plastic sheeting to prevent paint splatters. Use painter's tape to mask off any areas that should not be painted, such as the edges of the cabinet frame or the interior walls of the kitchen. Ensure the tape is applied firmly to create a clean, crisp line.
Apply the paint in thin, even coats using a high-quality brush or roller. Avoid applying too much paint at once, as this can lead to drips, runs, and uneven drying. For large, flat surfaces, a small foam roller can provide a smooth, uniform finish. For corners, edges, and detailed areas, use a brush with synthetic bristles designed for use with latex paints.
Allow each coat of paint to dry completely before applying the next coat. Drying times can vary depending on the type of paint and environmental conditions. Refer to the manufacturer's instructions for recommended drying times. Typically, two coats of paint are sufficient to achieve full coverage and a durable finish. However, if the cabinets are a dark color or the paint is a light color, a third coat may be necessary.
After the final coat of paint has dried completely, carefully remove the painter's tape. Use a utility knife to score along the edge of the tape before peeling it off to prevent the paint from chipping or peeling. Inspect the painted surfaces for any imperfections, such as drips, runs, or missed spots. Touch up these areas with a small brush and allow the touch-up paint to dry completely.
Once the paint has fully cured, which can take several days, reinstall the hardware and replace the items in the cabinets. To protect the newly painted surfaces, consider using shelf liners or mats to prevent scratches and spills. Regularly clean the cabinets with a mild soap and water solution to maintain their appearance and prevent the buildup of grime.
The success of this project hinges on careful surface preparation, proper product selection, and meticulous application techniques. When executed correctly, painting kitchen cabinet interiors without sanding can transform the aesthetic of a kitchen space and extend the life of existing cabinetry.

How To Paint Laminate Cabinets Without Sanding The Palette Muse

The Easy Way To Paint Kitchen Cabinets No Sanding Building Bluebird

Prep And Paint Cabinets Without Sanding

Paint Kitchen Cabinets Without Sanding Six Simple Steps

How To Paint Unfinished Cabinets Houseful Of Handmade

Paint Kitchen Cabinets Without Sanding Six Simple Steps

How To Paint Cabinets Without Sanding The Easy Way Kitchen

How To Paint Fake Wood Kitchen Cabinets Simple Made Pretty 2025

Prep And Paint Cabinets Without Sanding

How To Paint Stained Cabinets Without Sanding Valspar Bonding Primer Is It Worth
Related Posts