How To Paint Kitchen Cabinets On A Budget
Updating kitchen cabinets can significantly transform the appearance of a kitchen, often making it feel brand new. However, a full cabinet replacement can be a costly endeavor. Painting existing cabinets offers a budget-friendly alternative that can achieve a similar aesthetic upgrade with careful planning and execution.
This article details a step-by-step guide to painting kitchen cabinets on a budget, outlining the necessary preparations, materials, and techniques to achieve a professional-looking finish without excessive expenditure. The approach focuses on cost-effective methods without compromising the quality and durability of the painted surface.
1. Planning and Preparation: Minimizing Costs Through Efficiency
Effective planning is crucial for minimizing both material waste and potential errors, factors that directly impact the overall cost of the project. Before commencing any physical work, a thorough assessment of the existing cabinets is essential.
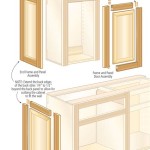
Begin by evaluating the condition of the cabinets. Identify any areas with significant damage, such as deep scratches, dents, or warped surfaces. Addressing these issues before painting will ensure a smoother, more uniform finish. Minor imperfections can often be rectified with wood filler, while more extensive damage might require professional repair, though this can increase the budget.
Next, determine the type of paint best suited for the cabinet material. Laminate, wood, or metal cabinets each require specific primers and paints to ensure proper adhesion and longevity. Researching the appropriate paint types beforehand can prevent costly mistakes and the need for re-application.
Create a detailed material list, specifying the quantity of each item required. Precise calculations of paint volume, primer needs, and the amount of sandpaper will prevent overspending on unnecessary materials. Consider purchasing materials in bulk, where applicable, to take advantage of discounts offered on larger quantities.
Gather necessary tools and equipment. While some tools, such as paintbrushes and rollers, may need to be purchased, consider borrowing or renting items like sanders if their use is infrequent. This can significantly reduce upfront costs. Evaluate what tools are already available and in good working order to avoid duplicate purchases.
Proper protection of the surrounding work area is also paramount. Use drop cloths to cover floors and countertops, preventing paint splatters and potential damage that would require costly repairs. Masking tape should be applied to edges and surfaces that are not to be painted, ensuring clean lines and preventing paint bleed.
Develop a work plan outlining the sequence of steps, including timelines for each stage. This helps maintain momentum and prevents delays that could lead to increased costs due to extended project duration.
2. Painting Process: Employing Cost-Effective Techniques for Optimal Results
The painting process involves several key steps, each contributing to the overall quality and durability of the finished product. Implementing cost-effective techniques at each stage can significantly impact the final outcome and minimize expenses.
Begin by removing all hardware from the cabinets, including knobs, pulls, hinges, and latches. Store these items in labeled bags to ensure easy reinstallation. If the existing hardware is dated or damaged, consider replacing it with budget-friendly options to further enhance the updated look of the cabinets.
Thoroughly clean the cabinet surfaces to remove grease, dirt, and grime. Use a degreasing cleaner specifically designed for kitchen surfaces. This will ensure proper adhesion of the primer and paint. Inadequate cleaning can lead to paint peeling and necessitate costly rework.
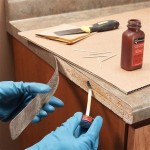
Sanding is a critical step in preparing the cabinets for painting. Use medium-grit sandpaper to lightly sand the surfaces, creating a slightly roughened texture that promotes better adhesion. Avoid excessive sanding, as this can damage the cabinet surfaces. For glossy surfaces, consider using a liquid deglosser instead of sanding, as this can be a more efficient and cost-effective alternative.
Apply a primer coat specifically formulated for the cabinet material. Primer serves as a bonding agent between the cabinet surface and the paint, ensuring proper adhesion and preventing paint from being absorbed into the cabinet material. Choose a high-quality primer that offers good coverage and durability. Opt for a tinted primer that closely matches the paint color to reduce the number of paint coats required.
Once the primer is dry, apply the first coat of paint. Use a high-quality brush or roller designed for smooth finishes. Apply the paint in thin, even coats, avoiding drips and runs. Allow the paint to dry completely before applying the second coat. Consider using a paint sprayer for a smoother, more professional finish. While a sprayer can be an initial investment, it can save time and paint in the long run, especially for larger projects. If renting a sprayer, ensure it is properly cleaned and maintained to avoid malfunctions and additional rental costs.
After the first coat has dried, lightly sand the surface with fine-grit sandpaper to remove any imperfections and create a smoother base for the second coat. This will result in a more even and professional-looking finish.
Apply the second coat of paint, using the same technique as the first coat. Ensure complete coverage and allow the paint to dry thoroughly. Depending on the paint type and color, a third coat may be necessary to achieve desired opacity and uniformity.
Consider applying a clear topcoat to protect the painted surface from scratches, stains, and wear. This is particularly important for kitchen cabinets, which are subject to frequent use and cleaning. Choose a durable, water-based topcoat that is resistant to yellowing. Matte or satin finishes are often preferred for kitchen cabinets, as they are easier to clean and maintain compared to high-gloss finishes.
3. Material Selection: Opting for Affordable and Durable Options
The choice of materials directly impacts both the cost and the longevity of the painted cabinet finish. Selecting affordable yet durable options is crucial for staying within budget without sacrificing quality.
Paint is a primary expense in cabinet painting. Consider using latex or acrylic-based paints, which are generally more affordable than oil-based paints and offer good durability and ease of cleaning. Research different paint brands and compare prices to find the best value for money. Look for paints that offer good coverage, durability, and resistance to stains and scratches. Consult with a paint specialist at a local hardware store to get recommendations on the best paint options for your specific needs and budget.
Primer is another essential material. Choose a primer specifically designed for the cabinet material, such as wood, laminate, or metal. Opt for a high-quality primer that offers good adhesion and coverage. Consider using a tinted primer that closely matches the paint color to reduce the number of paint coats required. Compare prices of different primer brands to find the most affordable option that meets your needs.
Sandpaper is necessary for preparing the cabinet surfaces for painting. Purchase sandpaper in bulk to save money. Choose different grits of sandpaper, including medium-grit for initial sanding and fine-grit for smoothing the surface after each coat of paint. Consider using sanding sponges, which are more durable and easier to handle than traditional sandpaper sheets.
Brushes and rollers are essential tools for applying paint. Invest in high-quality brushes and rollers that will provide a smooth, even finish. Choose brushes and rollers that are specifically designed for the type of paint you are using. Clean your brushes and rollers thoroughly after each use to extend their lifespan. Consider purchasing a brush and roller cleaning kit to make cleaning easier and more efficient.
Masking tape and drop cloths are necessary for protecting the surrounding work area. Purchase masking tape in bulk to save money. Choose a high-quality masking tape that will adhere well to surfaces and prevent paint bleed. Use drop cloths to cover floors, countertops, and other surfaces to protect them from paint splatters. Consider using reusable canvas drop cloths, which are more durable and environmentally friendly than disposable plastic drop cloths.
Wood filler is used to repair any imperfections in the cabinet surfaces. Choose a wood filler that is easy to apply and sand. Consider using a paintable wood filler that will blend seamlessly with the paint color.
Cleaning supplies, such as degreasing cleaner and rags, are necessary for preparing the cabinet surfaces for painting. Use a degreasing cleaner specifically designed for kitchen surfaces. Purchase cleaning supplies in bulk to save money.
By carefully selecting affordable and durable materials, homeowners can successfully paint their kitchen cabinets on a budget without compromising the quality and longevity of the finished product.

Step By How To Paint Kitchen Cabinets Like A Pro And On Budget The American Patriette

How To Paint Kitchen Cabinets Budget Friendly Makeover

How To Paint Kitchen Cabinets Budget Friendly Makeover

Tips On How To Paint Kitchen Cabinets Cherished Bliss

Budget Kitchen Renovation With Diy Shaker Painted Cabinets I

How To Paint Kitchen Cabinets In 7 Simple Steps

Plum Pretty Decor Design Co Painted Kitchen Cabinets Budget Makeover Part 2 Paint Process

20 Diy Painted Kichen Cabinet Ideas A Cultivated Nest

How To Make Old Cabinets Look New With Paint

Plum Pretty Decor Design Co Painted Kitchen Cabinets Budget Makeover Part 1 Materials Prep
Related Posts