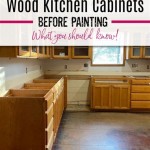
How To Paint Kitchen Cabinets That Aren't Wood
Many kitchens today feature cabinets constructed from materials other than solid wood. These cabinets, often made of laminate, MDF (Medium-Density Fiberboard), or thermofoil, present unique challenges when painting. While traditional wood painting techniques can sometimes be adapted, specific preparation and application methods are crucial for achieving a durable and aesthetically pleasing finish. This article outlines the process of painting kitchen cabinets made from non-wood materials, emphasizing the necessary steps for success and preventing common pitfalls.
Before beginning, it is essential to identify the material composing the cabinets. Laminate cabinets typically have a smooth, shiny surface that resembles wood grain or a solid color. MDF cabinets are characterized by their uniform density and lack of grain. Thermofoil cabinets have a vinyl coating heat-sealed onto an MDF core. Each of these materials reacts differently to paint and requires slightly adjusted preparation techniques.
Essential Preparation: Cleaning, Sanding, and Priming
Proper preparation is the foundation of a successful cabinet painting project, especially with non-wood materials. A thorough cleaning is the first step. Use a degreasing cleaner specifically designed for kitchen surfaces to remove grease, grime, and food residue. TSP (Trisodium Phosphate) diluted in water is a common and effective option, but it's crucial to follow the manufacturer's instructions and wear appropriate protective gear, including gloves and eye protection. Rinse the cabinets thoroughly with clean water after cleaning to remove any remaining residue. Let the cabinets dry completely before proceeding.
Sanding is crucial for creating a surface to which paint can adhere. Non-wood materials often have slick surfaces that prevent paint from bonding properly. For laminate and thermofoil cabinets, use 120-grit sandpaper to lightly scuff the surface. The goal is not to remove the existing finish entirely but to create microscopic scratches that provide "tooth" for the primer. Avoid excessive sanding, which can damage the underlying material. MDF cabinets are generally more porous than laminate or thermofoil, but light sanding with 180-grit sandpaper is still recommended to smooth any imperfections and ensure proper primer adhesion. After sanding, remove all sanding dust with a tack cloth or a vacuum cleaner with a brush attachment.
Priming is perhaps the most critical step when painting non-wood cabinets. A high-quality bonding primer is essential for creating a strong base for the paint. Bonding primers are formulated to adhere to slick surfaces and provide a better surface for the paint to grab on to. Choose a primer specifically designed for laminate, MDF, or other non-wood surfaces. Apply the primer in thin, even coats using a high-quality brush, roller, or paint sprayer. Multiple thin coats are better than one thick coat, as thick coats can lead to drips and runs. Allow the primer to dry completely according to the manufacturer's instructions before proceeding to the next step. Some primers may require light sanding after drying to ensure a smooth surface. Follow the primer manufacturer's recommendations.
Choosing the Right Paint and Application Techniques
Selecting the appropriate paint is as important as the preparation. Acrylic latex paint is generally recommended for kitchen cabinets due to its durability, ease of cleaning, and low VOC (Volatile Organic Compounds) content. Oil-based paints offer a harder, more durable finish but are more difficult to work with, require more cleanup, and have higher VOC levels. Consider the pros and cons of each type before making a decision. For optimal results, choose a paint specifically formulated for cabinets and trim. These paints are designed to withstand the wear and tear of daily use and provide a smooth, even finish.
The sheen of the paint is another critical factor to consider. Semi-gloss and gloss finishes are popular choices for kitchen cabinets because they are durable and easy to clean. However, they also tend to highlight imperfections. Satin and eggshell finishes offer a softer look and are more forgiving of imperfections, but they may not be as durable or easy to clean. Choose a sheen that balances aesthetics with practicality. It is also possible to use a matte sheen, but that requires a good topcoat.
Application techniques significantly impact the final result. Whether using a brush, roller, or paint sprayer, thin, even coats are key. Using a brush can be effective for detailed areas and edges, but it can also leave brushstrokes. High-quality brushes designed for smooth finishes are recommended. Rollers provide a smooth, even finish on larger surfaces but may not be suitable for intricate details. Use a high-density foam roller designed for cabinets and trim. Paint sprayers offer the most professional-looking finish, providing a smooth, even coat with minimal effort. However, they require proper setup, masking, and ventilation. Back-brushing or back-rolling after spraying can help to eliminate drips and runs and ensure even coverage. For all methods, allow each coat of paint to dry completely before applying the next. Lightly sand between coats with fine-grit sandpaper (220-grit or higher) to remove any imperfections and create a smooth surface for the next coat.
Addressing Specific Cabinet Types: Laminate, MDF, and Thermofoil
While the general principles of preparation and painting apply to all non-wood cabinets, there are specific considerations for each material type. Laminate cabinets, with their smooth, non-porous surfaces, require particularly thorough preparation. In addition to degreasing and sanding, consider using a liquid deglosser to further remove any residual sheen. A bonding primer formulated for laminate surfaces is essential for proper adhesion.
MDF cabinets are more porous than laminate and thermofoil, but they are also more prone to swelling if exposed to excessive moisture. Avoid using water-based cleaners directly on MDF, and apply primer and paint in thin, even coats to minimize moisture absorption. When sanding MDF, use a fine-grit sandpaper (180-grit or higher) to avoid damaging the surface. Pay particular attention to the edges of MDF cabinets, as they are more susceptible to chipping and damage. Seal the edges thoroughly with primer and paint to protect them from moisture.
Thermofoil cabinets present unique challenges due to the vinyl coating. The thermofoil can be prone to peeling and bubbling, especially in areas exposed to heat and moisture, such as around the stove or sink. Before painting thermofoil cabinets, inspect them carefully for any signs of damage. If the thermofoil is peeling or bubbling, it may be necessary to remove it entirely before painting. This can be a time-consuming and labor-intensive process, but it is often the only way to ensure a durable and long-lasting finish. When painting thermofoil cabinets, use a flexible primer and paint that can withstand temperature fluctuations. Avoid using dark colors, as they absorb more heat and can cause the thermofoil to bubble.
Regardless of the cabinet material, it is always recommended to test the chosen primer and paint in an inconspicuous area before painting the entire cabinet. This will allow one to assess the adhesion, color, and finish and make any necessary adjustments before investing significant time and effort. The test area should be prepared and painted according to the same procedures that will be used for the entire project.
When painting cabinet doors and drawers, it is generally easier to remove them from the cabinet frames. This allows access to all surfaces and prevents drips and runs. Label each door and drawer before removing it to ensure that it is reinstalled in the correct location. Remove all hardware, such as knobs and pulls, before painting. Fill any holes with wood filler if desired, and sand smooth before priming. Consider using a paint-safe tape to mask off any areas that one does not want to paint, such as the inside of drawers or cabinet frames. This ensures clean, crisp lines and a professional-looking finish.
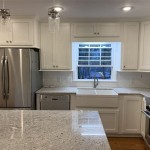
After the paint has dried completely, reinstall the hardware and reattach the doors and drawers to the cabinet frames. Inspect the finished cabinets for any imperfections, such as drips, runs, or uneven coverage. Touch up any areas as needed. Allow the paint to cure completely according to the manufacturer's instructions before using the cabinets. Curing can take several days or even weeks, depending on the type of paint and the environmental conditions. Avoid placing heavy objects on the cabinets or subjecting them to excessive wear and tear during the curing period. Properly painted and cured non-wood cabinets can provide years of beauty and functionality.

How To Paint Kitchen Cabinets Like The Pros

Avoid These Mistakes How To Paint Cabinets That Are Already Painted Grace In My Space

How To Paint Kitchen Cabinets A Step By Guide Confessions Of Serial Do It Yourselfer

How To Paint Kitchen Cabinets Like The Pros

How To Paint Your Cabinets In A Weekend Without Sanding Them Chris Loves Julia

How To Paint Unfinished Cabinets Houseful Of Handmade

How To Paint Kitchen Cabinets The Love Notes Blog

How To Paint Laminate Kitchen Cabinets Perfect Finish Tips

Psst It S Not Actually Wood How To Paint Cabinets Look Like

How To Paint Pressed Wood Kitchen Cabinets Choice Cabinet
Related Posts