How to Paint Kitchen Cabinets With a Roller: A Comprehensive Guide
Repainting kitchen cabinets is a budget-friendly way to transform the look of your kitchen. Using a roller to paint your cabinets is a great option for achieving a smooth and even finish. Here's a step-by-step guide to help you paint your kitchen cabinets like a pro using a roller:
Materials You'll Need:
- Clean cloths or rags - Degreaser - Sandpaper or sanding sponge - TSP cleaner - Painter's tape - Paint stirrer - Paint tray - High-quality roller and roller cover - Paintbrush - Cabinet paint - Primer (optional but recommended)
Step-by-Step Instructions:
1. Preparation
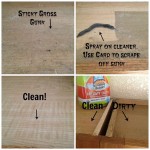
Start by thoroughly cleaning your cabinets with a degreaser to remove grease and grime. Then, sand the cabinet surfaces lightly using sandpaper or a sanding sponge to create a slightly rough surface for better paint adhesion. Wipe away any dust or debris with a clean cloth.
2. Taping and Priming (Optional)
Use painter's tape to protect your hardware, countertops, and backsplash from paint. If desired, apply a coat of primer to help the paint adhere better and provide better coverage. Allow the primer to dry completely before proceeding.
3. Choose the Right Supplies
Select a high-quality roller with a nap that is appropriate for the texture of your cabinets (typically around 1/2 inch). Use a paint tray that is large enough to comfortably accommodate the roller.
4. Mixing and Pouring Paint
Stir the paint thoroughly before pouring it into the paint tray. Do not overfill the tray; only fill it about halfway to avoid drips.
5. Rolling Technique
Start by cutting in around the edges of the cabinet doors and frames using a paintbrush. Then, use the roller to apply the paint in long, even strokes, starting from the top and working your way down. Apply thin, even coats, and avoid overloading the roller with paint.
6. Remove Tape and Trim
Once the paint has dried to the touch, carefully remove the painter's tape. Use a small paintbrush to touch up any areas that may have been missed or where the tape pulled off some of the paint. Allow the paint to dry completely before reinstalling the cabinet doors and hardware.
Tips for a Professional Finish:
- Use a high-quality roller and paint to ensure a smooth and durable finish. - Allow each coat of paint to dry completely before applying the next to prevent runs and drips. - Take your time and apply the paint in even, consistent strokes. - If necessary, use a second coat of paint for full coverage.
Conclusion:
Painting kitchen cabinets with a roller can be a rewarding DIY project that can transform the look of your kitchen. By following these steps carefully and using quality materials, you can achieve a professional-looking finish that will last for years to come.

The Best Paint Rollers For Cabinets Jenna Sue Design

The Best Paint Roller For A Smooth Finish On Cabinets And Furniture

How To Paint Kitchen Cabinets Budget Friendly Makeover

Should I Use A Brush Or Roller To Paint Cabinets Upvc Sprayers

How To Paint Kitchen Cabinets Tips For A Smooth Finish West Magnolia Charm

Hand Painting Or Spraying Cabinets What Is Better Porch Daydreamer

The Best Paint Rollers For Cabinets Jenna Sue Design

The Easy Way To Paint Your Kitchen Cabinets More Mrs E

What You Need To Know Before Painting Cabinets The Palette Muse

How To Paint Kitchen Cabinets In 7 Simple Steps
Related Posts