How to Paint your Kitchen Cupboards: A step-by-step guide to stunning before and afters
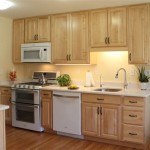
Thinking about breathing new life into your kitchen? Painting your cabinets may just be the perfect solution. A fresh coat of paint can transform your kitchen from drab to fab in just a few days. But it's not as simple as slapping on a layer of latex and calling it a day. There are a few essential steps that you need to follow to ensure that your painted kitchen cabinets look amazing and last for years to come.
Here's a step-by-step guide to painting your kitchen cupboards, along with before-and-after pictures to show you how to do it right.
Materials you'll need:
- Cleaning solution
- Sandpaper
- Putty knife
- Primer
- Paint
- Polyurethane
- Paintbrushes
- Paint roller
- Drop cloths
Step 1: Clean and prepare the cabinets
The first step is to thoroughly clean your cabinets to remove any grease or dirt. You can do this with a cleaning solution made from warm water and dish soap. Once the cabinets are clean, you'll need to sand them lightly with sandpaper to create a smooth surface for the paint to adhere to.
Step 2: Repair any damage
If your cabinets have any damage, such as dents or scratches, you'll need to repair them before you paint. You can use a putty knife to fill in any dents, and then sand it smooth once it's dry.
Step 3: Primer the cabinets
Priming your cabinets is an important step in the painting process. Primer helps create a surface that the paint will adhere to, and it also helps prevent the paint from peeling or chipping. Apply a thin coat of primer to your cabinets using a paintbrush or paint roller, and let it dry completely.
Step 4: Paint the cabinets
Now it's time to paint your cabinets! You can use any type of paint you like, but latex paint is a good option for kitchen cabinets. Apply a thin, even coat of paint to your cabinets using a paintbrush or paint roller. Let the first coat dry completely, then apply a second coat.
Step 5: Protect the finish
Once the paint is dry, you'll need to protect the finish by applying a coat of polyurethane. Polyurethane is a clear finish that will help protect your cabinets from scratches and wear. Apply a thin, even coat of polyurethane to your cabinets using a paintbrush or paint roller, and let it dry completely.
Step 6: Enjoy your new kitchen!
Once your cabinets are dry, you can reattach the doors and hardware, and enjoy your new kitchen! Painting your kitchen cabinets is a great way to update the look of your kitchen without breaking the bank. And with a little bit of elbow grease, you can have a kitchen that looks like new.

15 Diy Kitchen Cabinet Makeovers Before After Photos Of Cabinets

9 Inspiring Kitchen Cabinet Makeovers Before And After Remodel Small Builder Grade Renovation

20 Pictures Of Before And After Kitchen Makeovers With Cost Painting Cabinets

How To Paint Kitchen Cabinets So They Look Amazing And Last Weekend Diy Projects

How To Paint Kitchen Cabinets The Love Notes Blog

How To Paint Laminate Kitchen Cabinets Perfect Finish Tips

Diy Painting Your Kitchen Cabinets The Right Way

How To Paint Kitchen Cabinets The Right Way Created Home

Painted Kitchen Cabinet Ideas And Makeover Reveal The Polka Dot Chair

Kitchen Cabinet Colors Before After The Inspired Room
Related Posts