How to Paint Kitchen Cupboards Grey
Transforming your kitchen with a fresh coat of grey paint on your cupboards can be a stylish and affordable update. Whether you're aiming for a modern, sophisticated look or a cozy and inviting ambiance, grey offers a versatile palette to complement various décor styles.
Preparing the Cupboards
Before diving into painting, it's crucial to prepare your cupboards to ensure a smooth and long-lasting finish. Begin by removing all doors and hardware. Clean the cupboards thoroughly with a degreaser to remove dirt, grease, and grime. Allow them to dry completely before proceeding.
If your cupboards have any imperfections or uneven surfaces, repair them using wood filler or spackling paste. Sand the repaired areas smooth to create an even base for painting.
Choosing the Right Paint
Selecting the appropriate paint is paramount. Opt for a durable and moisture-resistant paint specifically designed for kitchen use. Consider the sheen you desire. A semi-gloss or satin finish offers a balance of durability and sheen, providing a polished look without being overly reflective.
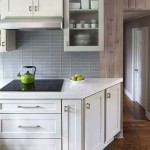
As for the shade of grey, the options are endless. Warm greys with brown undertones can create a cozy atmosphere, while cool greys with blue or green undertones impart a modern and sleek touch. Experiment with sample colors to determine the perfect shade for your kitchen.
Painting the Cupboards
Start painting the cupboards with a high-quality paintbrush or roller. Use light, even strokes and apply two thin coats, allowing each coat to dry completely before applying the next. Pay special attention to edges, corners, and crevices to ensure thorough coverage.
For a flawless finish, lightly sand the surface between coats using fine-grit sandpaper. This eliminates any brush marks or imperfections, resulting in a smooth and professional-looking paint job.
Reassembling the Cupboards
Once the paint is completely dry, reassemble the cupboards by attaching the doors, hardware, and any other components. Ensure all screws and hinges are properly tightened for a secure fit. Clean any paint remnants from the hardware to maintain a polished appearance.
Allow the cupboards to cure for the recommended time specified by the paint manufacturer. This allows the paint to fully harden, ensuring its durability and longevity.
Tips for a Professional Finish
For a professional-looking finish, consider these additional tips:
- Use a primer to seal the surface and improve paint adhesion.
- Remove any paint drips or splatters immediately using a damp cloth.
- Protect your work area with drop cloths or plastic sheeting.
- Allow ample drying time between coats to prevent smudging.
- Consider using a clear topcoat to add an extra layer of protection and sheen.

Before After Grey Kitchen Makeover Diy Cabinets Remodel Small Home Decor

How To Paint Kitchen Cabinets

How To Paint Kitchen Cabinets

Should I Paint My Kitchen Cabinets Lily Ann

These Gray Kitchen Cabinets Offer A Neutral Twist Bob Vila

Kitchen Cupboard Paint

Top 10 Gray Cabinet Paint Colors Grey Kitchen Designs Cabinets Makeover Painted

How To Paint Kitchen Cabinets

Gray Painted Oak Cabinets And Kitchen Makeover Tuesday Treasures Funcycled

The 4 Best Gray Greige Colours Kitchen Cabinets Bathroom Vanities Kylie M Interiors