How to Paint Oak Kitchen Cabinets Colors
Painting oak kitchen cabinets represents a significant undertaking, but one that can dramatically transform the aesthetics of a kitchen without the expense of a full remodel. Oak, known for its prominent grain, requires careful preparation and specific techniques to achieve a smooth, modern finish. The color selection process is equally crucial, influencing the overall feel of the kitchen and its compatibility with existing décor.
This article provides a comprehensive guide to painting oak kitchen cabinets, covering preparation, painting techniques, and color considerations. By following these steps, homeowners can achieve a professional-looking result that revitalizes their kitchen space.
Step 1: Thorough Preparation is Key
Proper preparation forms the foundation for a successful painting project. Without thorough preparation, the paint finish may be uneven, prone to chipping, or fail to adhere correctly to the oak surface. This section outlines the essential steps involved in preparing oak cabinets for painting.
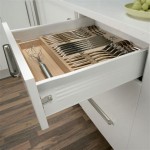
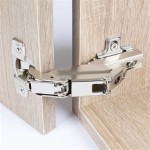
Removing Hardware: Begin by removing all cabinet doors and drawers. Label each door and drawer location with painter's tape to ensure correct reinstallation later. Remove all hardware, including hinges, knobs, and pulls. Store the hardware in a safe place. Consider replacing the hardware to further update the look of the cabinets. Replacing hardware, even if the style is similar, can make the finished result feels more polished.
Cleaning: Thoroughly clean all cabinet surfaces with a degreasing cleaner, such as TSP (trisodium phosphate) or a TSP substitute. Greasy residue and accumulated grime can prevent paint from adhering properly. Follow the cleaner's instructions carefully and wear appropriate protective gear, such as gloves and eye protection. Rinse the cabinets thoroughly with clean water and allow them to dry completely before proceeding to the next step.
Sanding: Sanding is crucial for creating a smooth surface and enhancing paint adhesion. Use a medium-grit sandpaper (120-150 grit) to lightly sand all cabinet surfaces. Focus on smoothing any existing imperfections and rough areas. For cabinets with a very glossy finish, a coarser grit may be necessary initially. After the initial sanding, switch to a finer grit sandpaper (220 grit) to refine the surface and remove any sanding marks. Remember to sand in the direction of the wood grain whenever possible. Vacuum up the sanding dust, then wipe down the cabinets with a tack cloth to remove any remaining residue. Pay particular attention to getting dust out of the grain of the oak.
Priming: Priming is an essential step, especially when painting oak cabinets. A high-quality primer seals the wood, blocks tannins that can bleed through the paint, and provides a uniform surface for the paint to adhere to. Opt for an oil-based or stain-blocking primer specifically designed for wood. Apply the primer in thin, even coats using a brush, roller, or sprayer. Allow the primer to dry completely according to the manufacturer's instructions. After the primer has dried, lightly sand the surface with a fine-grit sandpaper (220-320 grit) to create an even smoother base for the paint. Clean the surface thoroughly with a tack cloth.
Step 2: Selecting the Right Paint and Applying It Effectively
The choice of paint and the application technique significantly impact the final appearance and durability of the painted cabinets. This section explores the factors to consider when selecting paint and the best practices for applying it.
Choosing the Right Paint: Select a high-quality paint specifically formulated for cabinets and interior woodwork. Acrylic latex paints are a popular choice due to their durability, ease of cleaning, and low VOC (volatile organic compounds) content. Alkyd paints, also known as oil-based paints, offer excellent durability and a smooth, hard finish, but they require more effort to clean up and have higher VOC levels. Consider a paint with a satin or semi-gloss sheen for cabinets, as these finishes are easier to clean and more resistant to stains and scratches. Avoid matte finishes, as they tend to show more dirt and are harder to wipe clean.
Paint Application Techniques: There are several methods for applying paint to cabinets, each with its own advantages and disadvantages. Brushing is the most traditional method and is suitable for smaller projects or intricate details. Use a high-quality brush with synthetic bristles for latex paints and natural bristles for oil-based paints. Apply the paint in thin, even strokes, following the direction of the wood grain. Rolling is a faster method for covering large, flat surfaces. Use a small, high-density foam roller for the smoothest finish. Apply the paint in thin, even coats, overlapping each stroke slightly. Spraying is the most efficient method for achieving a smooth, professional-looking finish. Use a paint sprayer specifically designed for paint application. Thin the paint according to the manufacturer's instructions and apply it in thin, even coats, overlapping each stroke slightly. Regardless of the application method, multiple thin coats are preferable to one thick coat, as they result in a more durable and even finish.
Sanding Between Coats: After each coat of paint has dried completely, lightly sand the surface with a fine-grit sandpaper (320-400 grit) to smooth any imperfections and create a better surface for the next coat. Clean the surface thoroughly with a tack cloth before applying the next coat of paint. This step is crucial for achieving a smooth, professional-looking finish.
Applying a Topcoat (Optional): A topcoat can provide additional protection and durability to the painted cabinets, especially in high-use areas. Consider applying a clear polyurethane or acrylic topcoat in a satin or matte finish. Apply the topcoat in thin, even coats, following the manufacturer's instructions. Lightly sand the surface with a fine-grit sandpaper before applying the final coat of topcoat.
Step 3: Color Considerations for Oak Cabinets
The color choice plays a significant role in the overall aesthetic of the kitchen and should be carefully considered. The prominent grain of oak can affect how certain colors appear, making it important to select colors that complement the wood's natural characteristics.
White and Off-White: White and off-white colors are popular choices for painting oak cabinets, as they create a bright and clean look. However, the grain of the oak can be more visible beneath lighter colors. Consider using a high-quality primer and multiple coats of paint to minimize the visibility of the grain. Off-white shades, such as cream or ivory, can add warmth and depth to the kitchen, while still maintaining a light and airy feel.
Gray: Gray is a versatile color that can complement a variety of kitchen styles. Light grays can create a sophisticated and modern look, while darker grays can add drama and depth. When choosing a gray paint color for oak cabinets, consider the undertones of the gray. Cool grays with blue or green undertones can create a contemporary feel, while warm grays with yellow or beige undertones can complement the warmth of the oak.
Blue and Green: Blue and green are calming and inviting colors that can create a serene atmosphere in the kitchen. Light blues and greens can create a fresh and airy feel, while darker blues and greens can add drama and sophistication. When choosing a blue or green paint color for oak cabinets, consider the existing décor of the kitchen. Complementary colors can create a harmonious and balanced look.
Darker Colors: Painting oak cabinets in darker colors, such as navy, black, or charcoal gray, can create a dramatic and luxurious look. However, darker colors can also make the kitchen feel smaller and darker. It is important to carefully consider the existing lighting and décor of the kitchen before choosing a dark paint color. Darker colors may require more coats of paint to achieve full coverage and minimize the visibility of the oak grain.
Testing Paint Colors: Before committing to a specific paint color, it is advisable to test it on a small, inconspicuous area of the cabinets. This will allow one to see how the color looks in the kitchen's lighting and how it complements the existing décor. Paint a sample piece of the cabinet and allow it to dry completely before evaluating the color. Consider viewing the sample at different times of the day to see how the color changes in different lighting conditions.
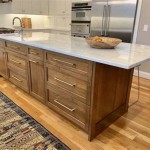
Consider the Overall Style: The color choice should align with the overall stylistic direction of the kitchen. A modern kitchen might benefit from sleek, neutral tones, while a more traditional kitchen could accommodate warmer, richer colors. The color of the countertops, backsplash, and flooring should also be taken into account to create a cohesive and harmonious design.
By carefully considering these factors and following the outlined steps, homeowners can successfully paint their oak kitchen cabinets and achieve a beautiful and updated kitchen space.

Color Palette To Go With Oak Kitchen Cabinet Line For Those Colors Wall Paint Living Room

Tips Tricks To Paint Honey Oak Kitchen Cabinets Cottage Living And Style

Diy Painted Oak Kitchen Cabinets Makeover

Paint Colors To Go With Honey Oak Trim Cabinets West Magnolia Charm

The Best Paint Colours For Your Oak And Maple Cabinetry Kitchen Wall Colors Cabinets

Tips Tricks For Painting Oak Cabinets Evolution Of Style

Gray Painted Oak Cabinets And Kitchen Makeover Tuesday Treasures Funcycled
:strip_icc()/101671998-27cdf40f639448d0a56ff6c7eab609d7.jpg?strip=all "Expert Tips For Painting Oak Cabinets")
Expert Tips For Painting Oak Cabinets

11 Most Fabulous Kitchen Paint Colors With Oak Cabinets Combinations You Must Know Honey Eclectic And Backsplash

Paint Colors That Go With Oak Cabinets Julie Blanner
Related Posts