How to Paint Oak Kitchen Cabinets With Chalk
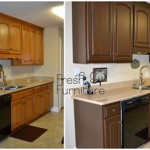
Are you looking to give your kitchen a fresh new look but don't want to spend a lot of money? Painting your oak kitchen cabinets is a great way to update your kitchen's style without breaking the bank. And with the right preparation and materials, you can achieve a professional-looking finish that will last for years to come.
In this article, we'll walk you through the step-by-step process of how to paint oak kitchen cabinets with chalk paint. We'll cover everything from preparing your cabinets to applying the paint and finishing touches.
Materials You'll Need
- Chalk paint
- Paint primer
- Sandpaper
- Tack cloth
- Paintbrush
- Roller
- Painter's tape
- Drop cloths
Step-by-Step Instructions
1. Prepare Your Cabinets
The first step is to prepare your cabinets for painting. This involves cleaning them thoroughly, sanding them lightly, and removing any hardware.
- Clean your cabinets with a mixture of warm water and dish soap. Be sure to wipe them down thoroughly to remove any dirt or grease.
- Once your cabinets are clean, sand them lightly with sandpaper. This will help to create a smooth surface for the paint to adhere to.
- Finally, remove any hardware from your cabinets, such as handles and knobs.
2. Prime Your Cabinets
Once your cabinets are prepared, it's time to prime them. Primer helps to create a smooth, even surface for the paint to adhere to. It also helps to prevent the paint from chipping or peeling.
- Apply a coat of paint primer to your cabinets using a paintbrush or roller. Be sure to apply the primer evenly and allow it to dry completely before moving on to the next step.
3. Apply the Chalk Paint
Now it's time to apply the chalk paint. Chalk paint is a type of paint that is made from chalk, water, and pigment. It is a popular choice for painting cabinets because it is easy to apply and dries to a matte finish.
- Apply a coat of chalk paint to your cabinets using a paintbrush or roller. Be sure to apply the paint evenly and allow it to dry completely before moving on to the next step.
4. Finish Your Cabinets
Once your cabinets are painted, it's time to finish them. This involves adding any finishing touches, such as hardware or a clear coat.
- If you want to add hardware to your cabinets, now is the time to do it. Simply drill holes in the cabinets and attach the hardware.
- If you want to protect your cabinets from wear and tear, you can apply a clear coat. Clear coats are available in both matte and glossy finishes.

Painting Kitchen Cabinets With Chalk Paint Simply Today Life

Chalk Painted Kitchen Cabinets Two Years Later Our Storied Home

Painting Kitchen Cabinets With Chalk Paint Simply Today Life

Why I Repainted My Chalk Painted Cabinets Sincerely Sara D Home Decor Diy Projects

How To Paint Your Kitchen Cabinets With Chalk Dwell Beautiful

Kitchen Cabinet Makeover With Chalk Paint Decorative By Annie Sloan

Painting Over Oak Cabinets Without Sanding Or Priming Hometalk

How To Paint Fake Wood Kitchen Cabinets Simple Made Pretty 2024

Why I Repainted My Chalk Painted Cabinets Sincerely Sara D Home Decor Diy Projects

Chalk Painted Kitchen Cabinets
Related Posts

