How To Paint Old Wood Cabinets: A Comprehensive Guide
Painting old wood cabinets offers a cost-effective and impactful way to revitalize a kitchen or bathroom without the expense of a complete remodel. A fresh coat of paint can transform dated or worn cabinetry, injecting new life and style into a space. However, achieving a professional and durable finish requires careful preparation, proper techniques, and quality materials. This article provides a comprehensive guide to painting old wood cabinets, outlining each step of the process from initial assessment to final coat, ensuring a successful and long-lasting outcome.
Assessment and Preparation: Setting the Stage for Success
Before commencing any painting project, a thorough assessment of the existing cabinets is essential. This involves identifying any damage, such as chips, cracks, or water stains, that need repair. Examine the existing finish: is it peeling, glossy, or otherwise compromised? The type and condition of the existing finish will influence the subsequent preparation steps. Furthermore, consider the type of wood the cabinets are made from. Certain wood types may require specific primers or paints to ensure proper adhesion and prevent bleed-through.
Proper preparation is arguably the most critical aspect of painting old wood cabinets. Skimping on this stage can lead to peeling paint, uneven finishes, and ultimately, a less-than-desirable result. The preparation process typically involves the following steps:
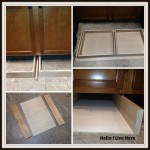
1. Removal and Organization: Begin by removing all cabinet doors, drawers, and hardware (knobs, pulls, hinges). Label each door and drawer with a corresponding number and mark the cabinet frame it belongs to. This system ensures each piece is reinstalled in its original location, preventing any fitting issues. Store the hardware in labeled bags to keep everything organized.
2. Cleaning: Years of grease, grime, and dust can accumulate on kitchen cabinets. Thorough cleaning is crucial for paint adhesion. Use a degreasing cleaner specifically formulated for kitchen cabinets, following the manufacturer's instructions. For particularly stubborn grease, a solution of trisodium phosphate (TSP) can be used, but exercise caution and wear appropriate protective gear (gloves and eye protection) as TSP is a strong alkaline cleaner. Rinse the cabinets thoroughly with clean water and allow them to dry completely before proceeding.
3. Repairing Damage: Address any imperfections identified during the initial assessment. Fill cracks and chips with wood filler, allowing it to dry completely according to the product instructions. Once dry, sand the filled areas smooth, blending them seamlessly with the surrounding surface. For more significant damage, such as loose joints or warped panels, consider consulting a professional carpenter for repair.
4. Sanding: Sanding creates a slightly textured surface that promotes paint adhesion. For cabinets with a glossy finish, sanding is particularly important to dull the sheen. Use a medium-grit sandpaper (120-150 grit) to gently sand all surfaces of the cabinets and doors. Focus on removing any existing imperfections and creating a uniform texture. After sanding, use a fine-grit sandpaper (220 grit) to smooth the surface and remove any remaining sanding marks. Remember to sand in the direction of the wood grain to avoid scratching. Vacuum up the sanding dust and wipe down all surfaces with a tack cloth to ensure a clean, dust-free surface.
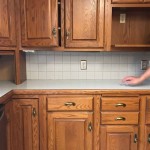
5. Masking and Protection: Protect surrounding areas from paint splatters by masking off countertops, walls, and flooring with painter's tape and drop cloths. Cover any areas of the cabinet frames that you do not want to paint, such as the interior of cabinets or the back panels.
Priming: Establishing a Solid Foundation
Priming is an essential step in painting old wood cabinets, particularly if the cabinets have been previously stained or painted with a dark color. Primer serves several important functions:
Blocking Stains and Tannins: Wood can contain tannins, which can bleed through the paint and discolor the finish. Primer acts as a barrier, preventing these tannins from reaching the surface of the paint. Similarly, primer can block existing stains from showing through the new paint.
Improving Adhesion: Primer creates a more receptive surface for the paint to adhere to, resulting in a more durable and long-lasting finish. It provides a uniform surface for the paint to grip, preventing chipping and peeling.
Providing a Uniform Color Base: Primer helps to conceal the existing color of the cabinets, creating a uniform base for the new paint. This is particularly important when painting dark cabinets with a lighter color.
When selecting a primer, opt for a high-quality product specifically formulated for wood. Oil-based primers are excellent for blocking stains and providing superior adhesion, but they require proper ventilation and cleanup with mineral spirits. Water-based primers are a more environmentally friendly option and are easier to clean up with soap and water. However, they may not be as effective at blocking stains as oil-based primers. Shellac-based primers are another option, known for their excellent stain-blocking properties and quick drying time.
Apply the primer in thin, even coats using a high-quality brush or roller. Allow the primer to dry completely according to the manufacturer's instructions before proceeding to the next step. Lightly sand the primed surface with fine-grit sandpaper (220 grit) to smooth any imperfections and create an even surface for the paint. Remove any sanding dust with a tack cloth.
Painting: Achieving a Professional Finish
The final step in painting old wood cabinets is applying the paint. Choosing the right paint is crucial for achieving a durable and aesthetically pleasing finish. Consider the following factors when selecting a paint:
Durability: Kitchen and bathroom cabinets are subject to frequent use and exposure to moisture and cleaning products. Choose a paint that is durable and resistant to scratches, chips, and stains. Acrylic latex paints are a popular choice for cabinets due to their durability, ease of application, and low odor.
Finish: The paint finish will affect the overall look and feel of the cabinets. Semi-gloss and gloss finishes are more durable and easier to clean, making them a good choice for high-traffic areas like kitchens. However, they may also highlight imperfections in the cabinet surface. Satin and eggshell finishes offer a softer look and are more forgiving of imperfections, but they may not be as durable or easy to clean. Matte finishes are generally not recommended for cabinets as they are not as durable and can be difficult to clean.
Color: Choose a color that complements the overall décor of the room. Consider the existing color scheme of the walls, countertops, and flooring. Lighter colors can brighten up a space, while darker colors can add drama and sophistication.
Apply the paint in thin, even coats using a high-quality brush or roller. A brush is best for painting intricate details and corners, while a roller is ideal for painting large, flat surfaces. Use a brush with synthetic bristles for water-based paints and a brush with natural bristles for oil-based paints. Apply the paint in the direction of the wood grain to avoid brushstrokes. Allow each coat of paint to dry completely according to the manufacturer's instructions before applying the next coat. Two coats of paint are typically sufficient for achieving full coverage and a durable finish.
Lightly sand the painted surface with fine-grit sandpaper (320-400 grit) between coats to smooth any imperfections and create an even surface for the next coat of paint. Remove any sanding dust with a tack cloth. Once the final coat of paint has dried completely, apply a clear topcoat for added protection and durability. Choose a topcoat that is compatible with the type of paint you used. Apply the topcoat in thin, even coats using a brush or roller, following the manufacturer's instructions. Allow the topcoat to dry completely before reassembling the cabinets.
Reassembly and Final Touches: Completing the Transformation
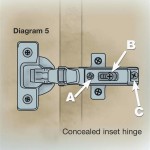
Once the paint and topcoat have completely dried, carefully reassemble the cabinets. Reattach the hardware (knobs, pulls, hinges) using the labeled bags and markings from the initial removal process. Ensure that all doors and drawers are properly aligned and function smoothly. If necessary, adjust the hinges to achieve proper alignment.
Inspect the finished cabinets for any imperfections, such as drips, runs, or missed spots. Touch up any imperfections with a small brush and the same paint used for the main coats. Clean up any paint splatters or drips on surrounding surfaces. Once all the final touches have been completed, step back and admire the transformed cabinets. The result should be a fresh, updated look that enhances the overall aesthetic of the room.
Properly painted old wood cabinets can last for many years with proper care and maintenance. Regularly clean the cabinets with a mild soap and water solution. Avoid using harsh chemicals or abrasive cleaners, as these can damage the paint finish. Promptly wipe up any spills or stains to prevent them from setting in. With proper care, the newly painted cabinets will continue to look beautiful for years to come.

The Best Way To Paint Kitchen Cabinets No Sanding Palette Muse

How To Paint Old Kitchen Cabinets Save Yourself 1 000s Builds By Maz

How To Paint Grainy Oak Cabinets And Get A Smooth Finish

Avoid These Mistakes How To Paint Cabinets That Are Already Painted Grace In My Space

How To Paint Kitchen Cabinets From A Diyer Who Has Done It 3 Times

Painting Kitchen Cabinets With A Sprayer Lemon Thistle

Diy How To Paint Cabinets Without Sanding Vlog

The Easy Way To Paint Your Kitchen Cabinets More Mrs E

Painting Oak Cabinets Transform Your Kitchen

How To Paint Laminate Cabinets Without Sanding The Palette Muse
Related Posts