How to Paint Old Wooden Kitchen Doors
Painting old wooden kitchen doors is a cost-effective method to revitalize a kitchen's appearance without undergoing a complete renovation. This project, while requiring time and effort, is achievable for most homeowners with basic DIY skills. Successful execution relies on meticulous preparation, proper application techniques, and using appropriate painting products. The following details provide a comprehensive guide to painting old wooden kitchen doors, covering each step from initial assessment to final finishing.
Assessment and Preparation
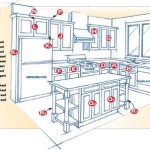
Before commencing any painting, a thorough assessment of the existing doors is essential. This evaluation determines the extent of preparation required and helps identify any potential challenges. Begin by examining the doors for signs of damage, such as cracks, dents, scratches, or warping. Note the type and condition of the existing finish. Is it a smooth, glossy paint, a textured varnish, or a heavily applied stain? The existing finish dictates the necessary preparation steps, including the type of cleaning solutions and sanding necessary.
Remove the doors from their hinges. This facilitates easier access to all surfaces and allows for more even paint application. Label each door and its corresponding hinge location to ensure proper reinstallation. Remove all hardware, including knobs, handles, and hinges. Store these items securely to prevent loss or damage. Consider replacing old or damaged hardware to further enhance the updated look of the kitchen.
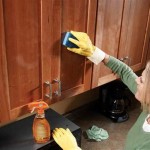
Cleaning is the next critical step. Use a degreasing cleaner to remove grease, grime, and food residue that accumulate in a kitchen environment. Trisodium phosphate (TSP) solutions are effective for this purpose, but it is crucial to follow safety precautions, including wearing gloves and eye protection. Rinse the doors thoroughly with clean water and allow them to dry completely before proceeding. If the existing finish is glossy, scuff-sanding is necessary to create a surface for the new paint to adhere to. Use a medium-grit sandpaper (120-180 grit) to lightly sand the entire surface. This roughens the surface, allowing the primer to properly bond. Vacuum away the sanding dust, then wipe the doors down with a tack cloth to remove any remaining particles.
Addressing any damage, such as cracks or dents, is crucial before painting. Use wood filler to repair these imperfections. Apply the filler according to the manufacturer's instructions, ensuring it is level with the surrounding surface. Once the filler is dry, sand it smooth using fine-grit sandpaper (220 grit) to blend it seamlessly with the door. Prime the filled areas to ensure uniform paint adhesion and color consistency. Mask off any areas that are not to be painted, such as glass panels or decorative trim. Use painter's tape specifically designed for delicate surfaces to prevent damage to the existing finish.
Priming and Painting
Priming is a crucial step in achieving a professional-looking and durable paint finish. Primer creates a uniform surface for the paint to adhere to, blocks stains from bleeding through, and enhances the paint's durability. Choose a primer specifically designed for wood surfaces. Oil-based primers offer excellent adhesion and stain-blocking properties, while water-based primers are easier to clean up and have lower VOC (volatile organic compounds). Apply the primer in thin, even coats using a high-quality brush, roller, or paint sprayer. Allow the primer to dry completely according to the manufacturer's instructions. Lightly sand the primed surface with fine-grit sandpaper (220 grit) to remove any imperfections and create an even smoother surface for the paint.
Selecting the right paint is vital. Consider the durability, finish, and ease of cleaning. Semi-gloss or gloss paints are popular choices for kitchen cabinets due to their resistance to moisture and ease of cleaning. Acrylic or enamel paints are suitable options. Acrylic paints are water-based, dry quickly, and are low in VOCs. Enamel paints provide a harder, more durable finish. Apply the paint in thin, even coats, allowing each coat to dry completely before applying the next. Multiple thin coats are preferable to one thick coat, as this minimizes the risk of drips and runs. Use a high-quality brush, roller, or paint sprayer for application. For brushes, choose synthetic bristles for water-based paints and natural bristles for oil-based paints. For rollers, use a short-nap roller for a smooth finish. A paint sprayer provides the most even and professional-looking finish, but requires practice and proper setup. Maintain a wet edge to prevent lap marks. This involves overlapping each stroke slightly with the previous one while the paint is still wet. This ensures a seamless and uniform finish.
Allow the paint to dry completely between coats, following the manufacturer's recommendations. Drying times can vary depending on the type of paint, humidity, and temperature. After each coat has dried, inspect the doors for any imperfections, such as drips, runs, or brush marks. Lightly sand these imperfections with fine-grit sandpaper (220 grit) and touch up the affected areas with paint. Apply a second coat of paint using the same techniques as the first. If necessary, apply a third coat for optimal coverage and durability.
Hardware and Reinstallation
Once the paint has completely dried and cured, reinstall the hardware (knobs, handles, and hinges). Clean the hardware thoroughly before reinstallation. If desired, replace the old hardware with new hardware to complement the updated look of the kitchen doors. Reattach the hinges to the doors and the cabinet frames. Ensure the doors are properly aligned and swing smoothly. Adjust the hinges as needed to achieve proper alignment. Use shims if necessary to correct any gaps or unevenness. Tighten all screws securely to prevent the doors from sagging or shifting. If any screw holes are stripped, use wood glue and toothpicks to fill the holes before re-inserting the screws. This will provide a more secure hold.
After reinstallation, inspect the doors for any touch-ups needed. Use a small brush to touch up any areas where the paint is scratched or chipped. Clean the painted surfaces with a mild soap and water solution to remove any dust or fingerprints. Avoid using harsh chemicals or abrasive cleaners, as these can damage the paint finish. Allow the paint to fully cure before using the doors heavily. Curing times can vary depending on the type of paint, but typically take several days to a few weeks. Avoid slamming the doors during the curing period to prevent damage to the paint finish.
Regular maintenance will help to keep the painted kitchen doors looking their best. Clean the doors regularly with a mild soap and water solution. Wipe up spills and splatters immediately to prevent staining. Avoid using harsh chemicals or abrasive cleaners. Periodically inspect the doors for any signs of damage, such as scratches, chips, or cracks. Touch up any damaged areas promptly to prevent further deterioration. By following these steps, homeowners can successfully paint their old wooden kitchen doors, transforming the look of their kitchen and adding value to their home.

Avoid These Mistakes How To Paint Cabinets That Are Already Painted Grace In My Space

How To Paint Kitchen Cabinets Forbes Home

Kitchen Spray Painting The Facelift Company

How To Paint Kitchen Cabinets In 7 Simple Steps

How To Paint Laminate Cabinets Without Sanding The Palette Muse

How To Paint Oak Cabinets And Hide The Grain Tutorial

How To Paint Kitchen Cabinets Houzz

Should I Paint Or Refinish My Kitchen Cabinets

How To Paint Your Old Kitchen Cabinets Lowe S

My Painted Cabinets Two Years Later The Good Bad Ugly
Related Posts