How To Paint Over Stained Wood Cabinets
Painting stained wood cabinets can transform a kitchen or bathroom, providing a fresh, updated look without the expense of replacing the entire cabinetry. While the process requires careful preparation and execution, the reward is a significantly modernized space. The success of the project hinges on thorough cleaning, proper sanding, priming, and the application of durable paint. The following outlines the steps necessary to achieve a professional-looking, long-lasting painted finish on stained wood cabinets.
Before commencing the project, ensure that you have all the necessary materials and tools. This includes but is not limited to: degreaser, TSP (trisodium phosphate) cleaner or substitute, sanding blocks or an orbital sander with varying grits (120, 220), tack cloth, primer specifically formulated for cabinets (oil-based or a high-adhesion acrylic latex), paint suitable for cabinets (acrylic latex or alkyd enamel), paintbrushes (angled for trim work), rollers (foam or microfiber with a short nap), paint trays, plastic sheeting or drop cloths, painter's tape, screwdriver or drill for removing hardware, and safety glasses and a dust mask.
Preparation is Paramount: Cleaning and Sanding
The initial stage of painting stained wood cabinets is thorough preparation, focusing on cleaning and sanding. This step is critical for creating a surface that will properly accept the primer and paint, ensuring adhesion and preventing peeling or chipping in the future.
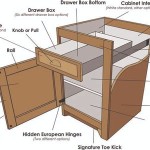
Begin by completely emptying the cabinets and removing all doors and drawers. Label each door and drawer with a corresponding number and location on the cabinet frame. This meticulous labeling ensures accurate reinstallation after painting. Remove all hardware, including knobs, pulls, and hinges. Store these components in labeled bags or containers to avoid confusion during reassembly. If you intend to replace the hardware, now is the time to select and acquire the new pieces.
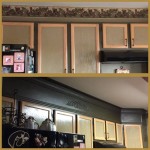
Next, thoroughly clean the cabinets. Kitchen cabinets, in particular, tend to accumulate grease, grime, and food splatters over time. Begin with a degreasing cleaner to remove heavy buildup. Follow this with a solution of TSP (or a TSP substitute) mixed with water, according to the manufacturer's directions. TSP is a powerful cleaner that effectively removes remaining grease, dirt, and wax. Wear gloves and eye protection when using TSP, and ensure proper ventilation in the workspace. Scrub all cabinet surfaces, both inside and out, with a sponge or cloth. Rinse thoroughly with clean water and allow the cabinets to dry completely before proceeding to the next step.
Once the cabinets are dry, proceed with sanding. The goal of sanding is not to completely remove the existing stain or finish, but rather to create a slightly roughened surface that the primer can adhere to. Start with 120-grit sandpaper to break down the existing finish. For flat surfaces, use an orbital sander for efficiency. For corners, edges, and detailed areas, use a sanding block or sandpaper folded to fit the contours. Sand all surfaces lightly and evenly, paying attention to areas that may have a particularly glossy or slick finish.
After the initial sanding with 120-grit sandpaper, switch to 220-grit sandpaper to smooth the surface and remove any scratches left by the coarser grit. This step is crucial for achieving a professional, smooth finish. Again, sand all surfaces lightly and evenly. Once sanding is complete, use a tack cloth to remove all sanding dust. A tack cloth is a sticky cloth specifically designed to pick up fine dust particles. Ensure that all surfaces are completely free of dust before moving on to priming. Failure to remove all dust will result in a bumpy, uneven finish.
Protect surrounding surfaces with plastic sheeting or drop cloths. Use painter's tape to mask off any areas that you do not want to paint, such as walls, countertops, or backsplashes. Proper masking will ensure clean, crisp lines and prevent paint from getting on unwanted surfaces.
Priming for Adhesion and a Uniform Finish
Priming is arguably the most important step in painting stained wood cabinets. Primer serves several critical functions: it seals the existing finish, provides a uniform surface for the paint to adhere to, and prevents bleed-through from the stain. Using a high-quality primer specifically formulated for cabinets is essential for achieving a durable and long-lasting finish.
There are two primary types of primer suitable for painting stained wood cabinets: oil-based primer and high-adhesion acrylic latex primer. Oil-based primers are known for their excellent sealing properties and their ability to block stain bleed-through. However, they require mineral spirits for cleanup and emit strong odors. High-adhesion acrylic latex primers are water-based, making them easier to clean up and having lower VOCs (volatile organic compounds). These primers are also more flexible than oil-based primers, which can be beneficial in areas with high humidity or temperature fluctuations. Select a primer based on your specific needs and preferences, considering factors such as odor, cleanup, and performance requirements.
Apply the primer in thin, even coats using a combination of a paintbrush and a roller. Use a high-quality angled brush for corners, edges ,and detailed areas. Use a foam or microfiber roller with a short nap for flat surfaces. Apply the primer in the direction of the wood grain, ensuring that all surfaces are completely covered. Avoid applying the primer too thickly, as this can lead to drips, runs, and an uneven finish.
Allow the primer to dry completely according to the manufacturer's instructions. Drying times can vary depending on the type of primer, humidity, and temperature. Once the primer is dry, inspect the surface for any imperfections, such as drips, runs, or uneven areas. Lightly sand any imperfections with 220-grit sandpaper to create a smooth, uniform surface. Remove all sanding dust with a tack cloth before proceeding to the next coat of primer.
For cabinets with a particularly dark or heavily stained finish, or if you are using a light-colored paint, consider applying a second coat of primer. The second coat of primer will provide additional sealing and prevent stain bleed-through. Allow the second coat of primer to dry completely before proceeding to painting. After the second coat is dry, inspect the surface and lightly sand any imperfections. Remove all sanding dust with a tack cloth.
Maintaining a clean workspace is crucial during the priming process. Cover all surfaces with plastic sheeting or drop cloths to protect them from primer splatters. Wear safety glasses and a dust mask to protect your eyes and lungs from primer fumes and dust particles. Ensure proper ventilation in the workspace to minimize exposure to primer fumes.
Applying the Paint: Achieve a Durable, Professional Finish
After the cabinets have been properly cleaned, sanded, and primed, the final step is to apply the paint. Choosing the right paint and applying it correctly are essential for achieving a durable, professional-looking finish that will withstand daily use.
Select a paint specifically formulated for cabinets. Acrylic latex and alkyd enamel paints are both excellent choices for cabinets. Acrylic latex paints are water-based, making them easy to clean up and having lower VOCs. They are also durable, chip-resistant, and available in a wide range of colors and sheens. Alkyd enamel paints are oil-based, offering a harder, more durable finish than acrylic latex paints. They are also more resistant to scratches and stains. However, alkyd enamel paints require mineral spirits for cleanup and emit stronger odors. Consider the factors such as durability, ease of use, and environmental impact when selecting the paint.
Apply the paint in thin, even coats using a combination of a paintbrush and a roller. Use a high-quality angled brush for corners, edges, and detailed areas. Use a foam or microfiber roller with a short nap for flat surfaces. Apply the paint in the direction of the wood grain, ensuring that all surfaces are completely covered. Avoid applying the paint too thickly, as this can lead to drips, runs, and an uneven finish.
Allow the first coat of paint to dry completely according to the manufacturer's instructions. Drying times can vary depending on the type of paint, humidity, and temperature. Once the first coat of paint is dry, lightly sand the surface with 220-grit sandpaper to smooth out any imperfections and create a better surface for the second coat. Remove all sanding dust with a tack cloth before proceeding to the second coat of paint.
Apply a second coat of paint using the same techniques as the first coat. The second coat of paint will provide additional coverage, durability, and a more uniform finish. Allow the second coat of paint to dry completely before handling the cabinets. After the second coat is dry, inspect the surface for any imperfections and touch up any areas as needed.
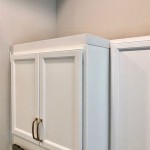
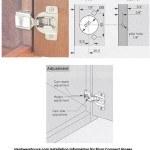
Once the paint has completely dried and cured, reinstall the hardware and reattach the doors and drawers to the cabinet frames. Use the labels that you created earlier to ensure that each door and drawer is reinstalled in its correct location. Adjust the hinges as needed to ensure that the doors and drawers are properly aligned and operate smoothly.
Clean up your workspace and dispose of any paint, primer, and cleaning supplies properly. Allow the paint to fully cure for several days before using the cabinets extensively. Curing allows the paint to harden and become more resistant to scratches and stains.

Can I Paint Over Stained Wood Williams Painting

Steps In Painting Kitchen Cabinets That Are Stained Restoring

Paint Over Stain Or Not To How Decide Porch Daydreamer

Cabinet Refinishing Guide

Can I Paint Over Stained Wood Williams Painting

Yes You Can Use Chalk Paint Over Stain Porch Daydreamer

Avoid These Mistakes How To Paint Cabinets That Are Already Painted Grace In My Space

Yes Paint Over Stained Wood Without Sanding Porch Daydreamer

Yes Paint Over Stained Wood Without Sanding Porch Daydreamer

How To Paint Wood Furniture Without Sanding In 2024 Grace My Space
Related Posts