How to Paint Over Varnished Kitchen Units: A Step-by-Step Guide
Are your kitchen units looking a little tired and outdated? If so, painting them is a great way to give them a new lease of life and update the look of your kitchen without spending a fortune. However, if your units are varnished, you'll need to take a few extra steps before you start painting to ensure that the paint adheres properly and lasts for a long time.
Materials you'll need:
- Sandpaper (120-grit and 220-grit)
- Tack cloth
- Degreaser
- Primer
- Paint
- Brush or roller
- Optional: Paint sprayer
Step 1: Prepare the units
The first step is to prepare the units for painting. This involves sanding them down to remove the varnish and create a smooth surface for the paint to adhere to. Start by sanding the units with 120-grit sandpaper. This will remove most of the varnish. Then, switch to 220-grit sandpaper and sand the units again to smooth out the surface.
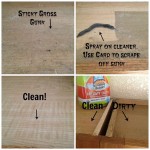
Once you've sanded the units, wipe them down with a tack cloth to remove any dust. Then, degrease the units with a degreaser. This will remove any grease or oil from the surface, which could prevent the paint from adhering properly.
Step 2: Prime the units
Once the units are clean and dry, it's time to prime them. Primer helps to create a smooth surface for the paint to adhere to and helps to prevent the paint from peeling or chipping. Apply a coat of primer to the units using a brush or roller. Allow the primer to dry completely before moving on to the next step.
Step 3: Paint the units
Now it's time to paint the units. You can use any type of paint you like, but it's important to choose a paint that is specifically designed for kitchen use. This type of paint is more durable and can withstand the heat and moisture of a kitchen environment.
Apply two coats of paint to the units, allowing each coat to dry completely before applying the next. If you're using a brush, be sure to brush in the direction of the grain. If you're using a roller, use light, even strokes.
Step 4: Finish the units
Once the paint is dry, you can finish the units by applying a clear coat of polyurethane. This will help to protect the paint and give the units a glossy finish.
Allow the polyurethane to dry completely before using the units. Once the polyurethane is dry, your newly painted kitchen units will be ready to enjoy!

Avoid These Mistakes How To Paint Cabinets That Are Already Painted Grace In My Space

How To Paint Kitchen Cabinets The Love Notes Blog

How To Paint Veneer Cabinets For A Long Lasting Finish Anika S Diy Life

How To Paint Kitchen Cabinets A Step By Guide Confessions Of Serial Do It Yourselfer

How To Paint Kitchen Cabinets Without Sanding Sustain My Craft Habit

How To Paint Kitchen Cabinets In 7 Simple Steps

Tips On How To Paint Kitchen Cabinets Cherished Bliss

How To Paint Kitchen Cupboard Doors The Hub

How To Repaint Kitchen Cabinets Painted By Kayla Payne

Painted Kitchen Cabinets One Year Later The Palette Muse
Related Posts