How to Paint Kitchen Cabinets: A Comprehensive Guide
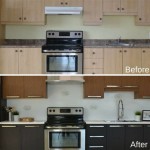
Painting kitchen cabinets is a cost-effective way to refresh the look of a kitchen without undertaking a full remodel. A well-executed paint job can transform outdated or worn cabinets into a stylish and modern feature. This guide provides a detailed walkthrough of the process, encompassing preparation, painting techniques, and essential considerations for achieving a professional-looking finish.
The success of any cabinet painting project hinges on meticulous preparation. Rushing this stage often leads to unsatisfactory results, including uneven paint application, poor adhesion, and a finish that doesn't stand the test of time. Proper preparation involves thorough cleaning, sanding, priming, and creating a suitable workspace. It is an investment that pays off in the long run, ensuring a durable and aesthetically pleasing outcome.
Key Point 1: Thorough Preparation is Paramount
The initial step involves removing all hardware, including knobs, pulls, hinges, and any other decorative elements. Store these items in a labeled container to prevent loss or confusion during reassembly. Carefully inspect each cabinet door and drawer front for any damage, such as dents, scratches, or loose veneer. These imperfections require repair before painting to ensure a smooth and even surface.
Cleaning is a crucial aspect of surface preparation. Grease, grime, and food splatters are common in kitchens and can compromise paint adhesion. Use a degreasing cleaner specifically designed for kitchen surfaces. TSP (trisodium phosphate) is a powerful cleaning agent, but it requires careful handling and rinsing. Alternatively, a mixture of warm water and dish soap can be effective for removing lighter grime. Rinse the surfaces thoroughly with clean water and allow them to dry completely.
Sanding creates a slightly textured surface that allows the primer and paint to adhere properly. Use a medium-grit sandpaper (120-180 grit) to lightly scuff the existing finish. Avoid sanding too aggressively, as this can damage the underlying wood or veneer. For cabinets with a glossy finish, consider using a deglosser in addition to sanding. A deglosser chemically etches the surface, further improving paint adhesion. Pay particular attention to edges and corners, as these areas are prone to chipping.
After sanding, thoroughly remove all dust particles. Use a vacuum cleaner with a brush attachment to remove larger debris, followed by a tack cloth to pick up any remaining dust. A tack cloth is a slightly sticky cloth that effectively captures fine dust particles. Repeat this process as needed to ensure a completely clean and dust-free surface.
Priming is an essential step, particularly for cabinets made of wood, MDF (medium-density fiberboard), or laminate. Primer seals the surface, prevents the existing finish from bleeding through, and provides a uniform base for the paint. Choose a primer specifically designed for the type of cabinet material. Oil-based primers are generally suitable for wood, while latex primers are often used for MDF and laminate. Apply the primer in thin, even coats, allowing each coat to dry completely before applying the next. Lightly sand the primed surface with fine-grit sandpaper (220 grit) to create an even smoother surface for painting.
Finally, create a well-ventilated workspace before beginning the painting process. Cover the surrounding surfaces with drop cloths to protect them from paint splatters. Adequate ventilation is crucial for both safety and drying time. Open windows and use fans to circulate air. If working indoors, consider using a respirator to protect yourself from paint fumes.
Key Point 2: Selecting the Right Paint and Tools
Choosing the right paint and tools is critical for achieving a durable and professional-looking finish. Consider the type of cabinet material, the desired aesthetic, and the level of durability required. There are several types of paint suitable for kitchen cabinets, each with its own advantages and disadvantages.
Acrylic latex paint is a popular choice for kitchen cabinets due to its durability, ease of application, and low VOC (volatile organic compounds) content. Acrylic latex paint dries quickly, is easy to clean up with soap and water, and is available in a wide range of colors and finishes. It is particularly well-suited for cabinets made of MDF or laminate.
Oil-based paint provides a harder, more durable finish than acrylic latex paint. It is highly resistant to scratches and stains, making it a good choice for high-traffic areas. However, oil-based paint has a longer drying time, a stronger odor, and requires mineral spirits for cleanup. It is generally recommended for wood cabinets that require superior durability.
Alkyd paint is a hybrid of oil-based and latex paint. It combines the durability of oil-based paint with the ease of application and cleanup of latex paint. Alkyd paint is a good compromise between the two, offering a durable finish with a more user-friendly application process.
Consider the paint sheen when choosing a paint for kitchen cabinets. High-gloss paint is the most durable and easiest to clean, but it can also highlight imperfections in the surface. Semi-gloss paint offers a good balance between durability and aesthetics, providing a slightly glossy finish that is easy to clean without being overly reflective. Satin paint has a softer, more matte finish that is less reflective but also less durable. Matte paint is the least durable option and is not typically recommended for kitchen cabinets.
In addition to paint, you will need the right tools to apply it effectively. High-quality paintbrushes and rollers are essential for achieving a smooth, even finish. Use a paintbrush with synthetic bristles for acrylic latex paint and a paintbrush with natural bristles for oil-based paint. Choose a roller with a short nap (1/4 inch or 3/8 inch) for smooth surfaces and a roller with a longer nap (1/2 inch or 3/4 inch) for textured surfaces. A paint sprayer can be used to apply paint quickly and evenly, but it requires more skill and preparation than using a brush and roller.
Other essential tools include: paint trays, painter's tape, sanding blocks, putty knives, and drop cloths. Painter's tape is used to mask off areas that you don't want to paint, such as walls and countertops. Sanding blocks are used to sand the primer and paint between coats. Putty knives are used to fill in any imperfections in the surface. And drop cloths are used to protect the surrounding surfaces from paint splatters.
Key Point 3: Proper Painting Techniques for a Professional Finish
Applying the paint in thin, even coats is key to achieving a smooth, professional-looking finish. Avoid applying the paint too thickly, as this can lead to drips, runs, and an uneven texture. Apply several thin coats instead of one thick coat, allowing each coat to dry completely before applying the next.
When using a paintbrush, apply the paint in long, even strokes, following the grain of the wood. Avoid overloading the brush with paint, as this can cause drips and runs. Wipe off any excess paint on the edge of the paint can or paint tray. Use a technique called "laying off" to smooth out the paint and eliminate brushstrokes. After applying the paint, lightly drag the brush across the surface in the same direction, using very little pressure.
When using a roller, apply the paint in a "W" or "M" pattern, overlapping each stroke slightly. Avoid pressing down too hard on the roller, as this can cause the paint to squeeze out and create an uneven finish. Use a technique called "tipping off" to smooth out the paint and eliminate roller marks. After applying the paint, lightly roll the roller across the surface in the same direction, using very little pressure.
A paint sprayer can be used to apply paint quickly and evenly, but it requires more skill and preparation than using a brush and roller. Before using a paint sprayer, be sure to read the manufacturer's instructions carefully. Practice spraying on a piece of scrap wood or cardboard before applying the paint to the cabinets. Hold the sprayer at a consistent distance from the surface and move it in a smooth, even motion, overlapping each stroke slightly. Avoid spraying too much paint in one area, as this can cause drips and runs.
Allow each coat of paint to dry completely before applying the next. Drying times will vary depending on the type of paint, the temperature, and the humidity. Refer to the manufacturer's instructions for specific drying times. Lightly sand the painted surface with fine-grit sandpaper (220 grit) between coats to create an even smoother surface.
After applying the final coat of paint, carefully remove the painter's tape. Use a utility knife to score the edge of the tape before removing it, to prevent the paint from peeling off with the tape. Allow the paint to cure completely before reassembling the cabinets. Curing times will vary depending on the type of paint, but typically take several days or even weeks.
Reinstall the hardware, using the labeled container to ensure that each piece is placed in the correct location. Clean the hardware before reinstalling it, if necessary. Inspect the painted surfaces for any imperfections, such as drips, runs, or uneven areas. Touch up any imperfections with a small brush.
Finally, clean up the workspace and dispose of any paint cans, brushes, and rollers properly. Store any leftover paint in a tightly sealed container in a cool, dry place.
By following these steps and paying attention to detail, anyone can paint their kitchen cabinets and achieve a professional-looking finish. The project involves investing time and effort, but ultimately results in a significant enhancement to the kitchen's aesthetic appeal and overall value.

How To Paint Kitchen Cabinets The Love Notes Blog

How To Paint Kitchen Cabinets In 7 Simple Steps

How To Paint Kitchen Cabinets Forbes Home

Painted Kitchen Cabinets One Year Later The Palette Muse

How To Paint Kitchen Cabinets

Avoid These Mistakes How To Paint Cabinets That Are Already Painted Grace In My Space

How To Paint Kitchen Cabinets In Four Easy Steps For An Unbeatable Finish Express Co

How To Paint Inside Kitchen Cabinets Let S Furniture
How To Paint Kitchen Cabinets In 7 Simple Steps

Step By How To Paint Your Kitchen Cabinets
Related Posts