How to Paint Wood Kitchen Cabinets White
Painting wood kitchen cabinets white can dramatically transform the look and feel of your kitchen. It can brighten up the space, create a fresh and modern aesthetic, and make your kitchen appear larger. However, painting cabinets can be a time-consuming project that requires meticulous preparation and careful execution. This article provides a comprehensive guide on how to paint wood kitchen cabinets white, ensuring a professional and long-lasting finish.
1. Preparation is Key
Proper preparation is crucial for achieving a high-quality paint job. Before starting, carefully remove all cabinet doors and drawers, ensuring that you label each piece for easy reassembly. Next, remove all hardware, including hinges, knobs, and pulls. This allows for even paint coverage and prevents damage to the hardware during the painting process.
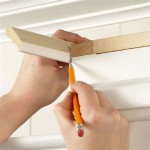
Thoroughly clean the cabinets using a degreaser to remove any grease, grime, or sticky residues. Sand the surface to create a smooth base for the paint to adhere to. Start with a coarse-grit sandpaper (80-120 grit) to remove any imperfections and then use a finer-grit sandpaper (150-220 grit) to smooth out the surface. Sand lightly in the direction of the wood grain to avoid scratches. After sanding, wipe down the cabinets with a tack cloth to remove any dust particles.
If the cabinets have a glossy finish, it's important to prime them before painting. Primer helps the paint adhere properly and provides a smooth, even surface. Choose a primer specifically designed for cabinets and apply it evenly using a brush or roller. Allow the primer to dry completely before proceeding to the next step.
2. Choosing the Right Paint
When choosing paint for your kitchen cabinets, opt for a high-quality, durable enamel paint designed for cabinets. Enamel paints are known for their hard, chip-resistant finish and are an excellent choice for high-traffic areas like kitchens. Look for a paint with a low VOC (volatile organic compound) content for better indoor air quality.
Consider the sheen level of the paint. A semi-gloss or satin finish offers a durable and easy-to-clean surface while reflecting some light for a brighter appearance. A matte finish provides a softer look but may be more prone to showing fingerprints and scuffs.
3. Applying the Paint
For optimal results, apply the paint in thin, even coats. Use a high-quality brush or roller specifically designed for painting cabinets. Avoid using a brush with natural bristles, as these can leave behind bristles in the paint. If using a roller, choose a synthetic nap roller cover that is appropriate for the paint's viscosity.
Start by painting the edges and corners of the cabinets with a brush. Then, use a roller to cover the larger surfaces. Apply the paint in long, smooth strokes, avoiding drips or runs. Allow each coat to dry completely before applying the next one. Typically, two coats of paint are recommended for full coverage and durability.
To achieve a professional finish, consider using a paint sprayer. However, this requires more setup and cleanup. If using a sprayer, ensure you use a high-quality paint sprayer that is designed for cabinet painting and use a fine-mist setting for smooth, even application.
4. Finishing Touches
Once the paint has dried completely, carefully reattach the hinges, knobs, and pulls. If any paint has gotten on the hardware, clean it gently with a damp cloth.
If desired, consider applying a sealant to protect the paint finish from scratches and moisture. Polyurethane or acrylic sealant are popular choices. Apply the sealant evenly, following the manufacturer's instructions.

How To Paint Kitchen Cabinets White In 5 Days For 150 The Nutritionist Reviews

Pros And Cons Of Painting Kitchen Cabinets White De Manor Farm By Laura Janning

Painting White Kitchen Cabinets To Look Like Wood Repainting Makeover
How To Paint Fake Wood Kitchen Cabinets Simple Made Pretty 2024

Painting Your Kitchen Cabinets White

How To Paint Kitchen Cabinets The Right Way Created Home

How To Paint Oak Cabinets And Hide The Grain Tutorial

Tips Tricks To Paint Honey Oak Kitchen Cabinets Cottage Living And Style

Painting Kitchen Cabinets With Chalk Paint Simply Today Life

How To Paint Cabinets The Right Way Flooring Girl
Related Posts