How to Put Kitchen Cabinets Up: A Comprehensive Guide
Installing kitchen cabinets is a crucial step in renovating or building a functional and aesthetically pleasing kitchen. While it may seem like a daunting task, with proper planning and execution, it can be achieved with precision and ease. Here's a comprehensive guide to help you put kitchen cabinets up like a pro:
1. Preparation
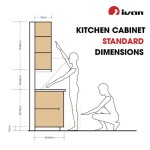
Before you start, make sure you have all the necessary tools and materials. You'll need a level, drill, hammer, screwdriver, measuring tape, wood screws, wall anchors, and of course, your kitchen cabinets. Ensure your cabinets are the correct size for your kitchen and the wall studs are properly spaced to support them.
2. Establish Reference Lines
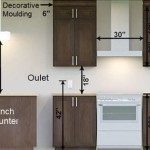
Start by establishing a level reference line along the wall where the bottom edges of the cabinets will be placed. Use a level and a pencil to mark this line accurately. This will serve as a guide for aligning the bottom of all your cabinets.
3. Install Wall Supports
Next, you'll need to install wall supports, also known as cleats. These cleats will provide additional support for your cabinets, especially for taller or heavier ones. Secure the cleats to the wall studs using wood screws. The distance between the cleats should match the spacing of the cabinet mounting holes.
4. Hang the Base Cabinets
Now it's time to hang the base cabinets. Place the first cabinet against the wall, ensuring it's aligned with your reference line. Use a level to check if it's level. Secure the cabinet to the cleats using wood screws. Repeat this process for each base cabinet.
5. Install the Wall Cabinets
With the base cabinets in place, you can move on to installing the wall cabinets. Use a helper or a cabinet lift to lift and position the cabinets onto the wall supports. Secure them to the studs using wall anchors and screws. Make sure the cabinets are level and aligned before tightening the screws fully.
6. Install Crown Molding and Trim
Once the cabinets are securely installed, you can add crown molding or decorative trim to enhance the aesthetics of your kitchen. This step is optional but can add a sophisticated touch to the overall design.
7. Install Hardware
Finally, install the cabinet doors and drawer fronts. Ensure they open and close smoothly. Add handles, knobs, or pulls to complete the look. Double-check that all the screws and hardware are securely tightened.
Conclusion
Installing kitchen cabinets requires precision and attention to detail. By following these steps, you can ensure a sturdy and visually appealing installation. Remember to measure carefully, use proper support, and be patient throughout the process. With a bit of effort, you'll have a beautiful and functional kitchen that you can enjoy for years to come.

Genius Diy Raising Kitchen Cabinets And Adding An Open Shelf The Crazy Craft Lady

Extending Kitchen Cabinets Up To The Ceiling Thrifty Decor Diy And Organizing

How To Install Kitchen Cabinets Diy Family Handyman

How To Extend Cabinets The Ceiling On A Budget

Extending Kitchen Cabinets To Ceiling American Wood Reface

Tall Kitchen Cabinets How To Add Height The Honeycomb Home

10 Simple Ideas To Update Your Kitchen Cabinets Jenna Sue Design

How I Closed The Space Above My Cabinets A Erfly House

Tall Ceiling Kitchen Cabinet Options Centsational Style

How To Raise Your Kitchen Cabinets The Ceiling Wildfire Interiors
Related Posts


