How to Put New Doors on Kitchen Cabinets
Replacing kitchen cabinet doors is a cost-effective way to revitalize your kitchen's appearance. It can transform the space with minimal effort and expense compared to a full remodel. This guide will outline the steps involved in replacing kitchen cabinet doors. Let's dive into the process.
Step 1: Planning and Preparation
Before embarking on the project, meticulous planning is crucial. Begin by evaluating your current cabinet doors. Examine for any damage, such as scratches, chips, or warping. Note the dimensions of the doors, including the height, width, and thickness. Also, consider the style and material you desire for the new doors. Measure the cabinet openings to ensure proper fit.
Next, gather the necessary tools and materials. This includes a tape measure, level, pencil, screwdriver, drill, saw, sandpaper, wood filler, primer, paint or stain, hinges, and cabinet door hardware.
Step 2: Removing the Old Doors
The first step is to remove the old cabinet doors. To start, remove any handles or knobs. Then, carefully detach the hinges from the cabinet frame and the door. Be sure to note the location of the hinges on the door and frame, as this will be important when reinstalling the new doors.
If the hinges are attached with screws, simply unscrew them. If they are pinned, use a small hammer and a nail punch to remove the pin. Be careful not to damage the cabinet frame or the door.
Step 3: Installing the New Doors
Now, it's time to install the new doors. If the new doors are pre-hinged, skip to step 4. If not, attaching hinges to the doors is the next step. Use a pencil to mark the hinge locations on the new doors. Ensure that the hinges are positioned in the same location on both the new and old doors. Attach the hinges using the appropriate screws.
Next, align the new door with the cabinet opening ensuring it is level and plumb. Attach the new door to the cabinet frame by aligning and screwing in the hinges. If necessary, use shims to adjust the door's position. Once the hinges are attached, close the door to ensure smooth operation.
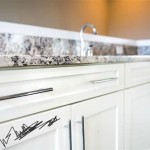
Step 4: Installing the Hardware
After securing the doors to the cabinets, install new hardware such as handles, knobs and pulls. Use a pencil to mark the location of the hardware on each door. Drill pilot holes for the screws using a drill. Attach the hardware to the doors using the appropriate screws provided.
Step 5: Finishing Touches
Once the doors are installed and the hardware is in place, it's time to add the finishing touches. If you are painting or staining the doors, apply a primer first. Then, paint or stain the doors according to your chosen color or finish. Allow sufficient drying time between coats.
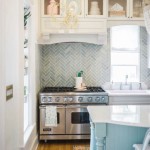
After the paint or stain has dried, clean the doors and cabinet frames with a damp cloth to remove any dust or debris. Step back and admire your revitalized kitchen cabinets.

Reface Or Replace Your Kitchen Units Dream Doors

How Can I Change The Look Of My Kitchen Cabinet Doors Now

How To Add Glass Cabinet Doors Confessions Of A Serial Do It Yourselfer

5 Tips For Installing Diy Cabinet Doors Now

Reface Or Replace Your Kitchen Units Dream Doors

Replace Your Kitchen Cabinet Doors

10 Simple Ideas To Update Your Kitchen Cabinets Jenna Sue Design

Can I Just Replace The Doors On My Cabinets Redo

Replacing Kitchen Cabinet Doors Before And After Crafty Little Gnome

Reface Or Replace Your Kitchen Units Dream Doors
Related Posts