How to Put Trim on Top of Kitchen Cabinets
Adding trim to the top of kitchen cabinets is a great way to enhance the overall design of your kitchen. It creates a clean and polished look, adds visual interest, and can even help to conceal imperfections in the cabinetry. While it may appear daunting, installing trim on top of cabinets is a manageable DIY project with the right tools, materials, and steps.
Prepare the Area
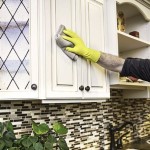
Before you start installing trim, it’s important to prepare the area. This involves clearing the space around the cabinets and ensuring that the surface is clean and free of debris. You may need to remove cabinet doors and drawer fronts for easier access.
Next, measure the length of each section you’ll be trimming. Take into account any existing crown molding or other architectural elements. If there are any gaps or inconsistencies, you may need to use filler strips to create a smooth surface for the trim.
Choose the Right Trim
The type of trim you choose will depend on the style and aesthetic of your kitchen. Some popular options include:
- Crown molding: This traditional style is often used to crown the tops of cabinets and create a classic look.
- Casing molding: This simpler trim is used to frame doors and windows, and can also be used to create a neat finish around the cabinets.
- Picture frame molding: This style adds a decorative touch with its raised borders and can be used to create a framed effect around the cabinets.
- Chair rail molding: This horizontal trim is often found along the walls, but can also be used to create a horizontal line above the cabinets.
When choosing trim, consider the size, shape, and profile. Keep the existing architectural elements in mind and select a trim that complements the overall style. You may find it helpful to browse online resources or visit your local home improvement store for inspiration.
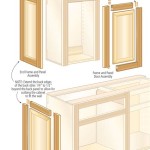
Install the Trim
Once you’ve chosen the type of trim and gathered all the necessary materials, you can start installing it. The installation process will vary slightly depending on the specific type of trim you choose, but the general steps include:
- Cut the trim to size: Using a miter saw or hand saw, cut the trim pieces to the desired lengths. Ensure accurate measurements for a seamless finish.
- Secure the trim with adhesive: Apply a bead of construction adhesive along the back edge of each trim piece. For extra support, use construction adhesive on the sides as well.
- Position the trim: Carefully position the trim on top of the cabinets, ensuring it’s level and aligned. You may use a level to ensure accuracy.
- Attach with nails or screws: Once the trim is in place, secure it with nails or screws, depending on the material and weight of the trim. These fasteners should be driven in at an angle, going through the trim and into the cabinet.
- Caulk the joints: Once all the trim pieces are secured, caulk the joints to create a seamless finish. Apply caulk along the edges and seams, making sure to smooth it out with your finger or a damp cloth.
- Paint or stain the trim: Finish the project by painting or staining the trim to match your kitchen’s decor. Ensure the paint or stain is compatible with the material of the trim.
Tips for Success
Here are some additional tips for a successful trim installation:
- Plan ahead: Before you start, take the time to carefully plan the layout and measurements. This will help to ensure a clean and consistent finish.
- Use a level: To ensure that the trim is straight and level, use a level throughout the installation process.
- Pre-drilling: Before driving in nails or screws, pre-drill pilot holes to prevent the wood from splitting.
- Clean up as you go: Regularly clear away sawdust and other debris, especially before applying caulk or paint.
- Be patient: Take your time and focus on each step to ensure a professional-looking finish.
Adding trim to the top of your kitchen cabinets can significantly elevate the design and create a more polished look. With careful planning, the right tools, and a bit of patience, you can confidently take on this DIY project and enjoy a beautiful and personalized kitchen.

Adding Crown Molding To Kitchen Cabinets Young House Love

Diy Kitchen Cabinet Upgrade With Paint And Crown Molding

Closing The Space Above Kitchen Cabinets Remodelando La Casa

Adding Height To The Kitchen Cabinets Tempting Thyme

Diy Kitchen Cabinet Upgrade With Paint And Crown Molding

Install Trim Above Cabinets Madness Method Kitchen Cabinet Crown Molding

Adding Moldings To Your Kitchen Cabinets Remodelando La Casa

How To Add Crown Molding Kitchen Cabinets Abby Organizes

Adding Moldings To Your Kitchen Cabinets Remodelando La Casa

Adding Crown Molding To Kitchen Cabinets Young House Love
Related Posts