Redoing Kitchen Cabinets with Contact Paper: A Comprehensive Guide
Transforming kitchen cabinets without breaking the bank is possible with contact paper. This versatile material offers a budget-friendly and stylish solution to upgrade your kitchen décor. Here's a detailed guide to help you redo your kitchen cabinets with contact paper:
Preparation:
Before you begin, it's crucial to prepare your cabinets. Clean them thoroughly with a degreaser to remove any grease or debris. Sand any rough surfaces to ensure a smooth application of the contact paper. Additionally, ensure the cabinet doors and drawer fronts are flat and free of dents.
Choosing the Right Contact Paper:
The selection of contact paper is vast, with various colors, patterns, and finishes available. Choose a design that complements your kitchen's style and décor. Consider the durability and water-resistance of the contact paper, especially if your cabinets are frequently exposed to moisture.
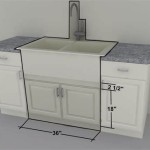
Measuring and Cutting:
Measure the surface of each cabinet door or drawer front accurately. Allow for an extra inch of contact paper on all sides for trimming. Mark the measurements on the back of the contact paper and use a sharp utility knife or scissors to cut out the pieces.
Applying the Contact Paper:
Start by peeling back a small section of the backing paper from the top edge of the contact paper. Align the top edge with the top edge of the cabinet door or drawer front. Gradually peel away the backing paper as you smooth the contact paper down, using a squeegee or a clean cloth to remove any air bubbles.
Trimming and Finishing:
Once the contact paper is applied, carefully trim the excess around the edges using a sharp utility knife or blade. For a professional-looking finish, use a heat gun or blow dryer to gently heat the edges of the contact paper and seal them into place.
Hardware:
If you need to replace or add hardware to your cabinets, do so after applying the contact paper. Drill pilot holes through the contact paper and install the handles or knobs securely.
Additional Tips:
- Use a spray bottle filled with a mixture of water and a few drops of dish soap to moisten the contact paper slightly, making it easier to adjust and prevent bubbles.
- If you make a mistake, don't panic. Gently peel back the contact paper and reapply it.
- For high-traffic areas, consider applying a clear sealant over the contact paper to protect it from wear and moisture.
By following these steps, you can redo your kitchen cabinets with contact paper and achieve a stylish and budget-friendly update. With its ease of application and wide range of designs, contact paper offers an accessible way to transform the look of your kitchen without a major remodel.

How To Update Cabinets Using Contact Paper Al Kitchen Makeover Cover Apartment

I Used Contact Paper On My Whole Kitchen Makeover And Al S Part 2

How To Make Over A Kitchen With Contact Paper Covering Cabinets Countertops And Appliances

Transform Your Kitchen With Contact Paper For Countertops Cabana State Of Mind

Temporary Contact Paper Kitchen Cabinet Decorations Pink Stripey Socks

How To Update Cabinets With Contact Paper The Handyman S Daughter

When Your Landlord Says Paint Is Out Of The Question Try Contact Paper For Cabinets Domino

Kitchen Makeover Under 30 Diy Al Friendly

How To Make Over A Kitchen With Contact Paper Covering Cabinets Countertops And Appliances Cover Wallpaper For

Diy Kitchen Cabinet Makeover For Ers Stars Streetlights
Related Posts