How to Redo Your Own Kitchen Cabinets: A Comprehensive Guide
Kitchen cabinets are a defining feature of any kitchen, influencing both its aesthetic appeal and functional efficiency. Over time, cabinets can become worn, outdated, or simply no longer aligned with evolving design preferences. Rather than undertaking a complete kitchen remodel, redoing existing cabinets presents a cost-effective and less disruptive alternative to refresh the space. This article details the process of redoing kitchen cabinets, providing guidance on preparation, methods, and considerations.
The decision to redo kitchen cabinets often stems from several factors. Budgetary constraints frequently favor cabinet refurbishment over replacement. Environmentally conscious individuals may opt to reuse existing structures to minimize waste. Moreover, redoing cabinets allows for a personalized transformation, tailoring the kitchen's appearance to specific tastes and needs without the extended timelines and complexities associated with a full-scale renovation.
Key Point 1: Assessment and Preparation
Before commencing any work, a thorough assessment of the existing cabinets is crucial. This evaluation should identify the cabinet material (wood, laminate, metal), the type of construction (face-frame, frameless), and the integrity of the structure. Note any existing damage, such as chipped paint, water damage, loose hinges, or warped doors. This assessment will guide the choice of appropriate methods and materials for the project.
Preparation is arguably the most important phase of redoing kitchen cabinets. Proper preparation ensures the longevity and aesthetic quality of the finished product. This phase involves several essential steps.
First, remove all items from inside the cabinets. This includes dishes, cookware, food items, and any other stored goods. Clear the surrounding workspace, covering countertops and flooring with drop cloths or protective sheeting to prevent damage from spills, dust, and debris.
Next, carefully remove the doors, drawers, and hardware (hinges, knobs, pulls). Label each door and drawer to ensure proper reinstallation later. This is especially important for cabinets of varying sizes or configurations. Using painter's tape and a permanent marker is a simple and effective labeling method. Store all removed hardware in labeled bags to prevent loss or misplacement.
Clean all cabinet surfaces thoroughly. Use a degreasing cleaner to remove grease, grime, and food residue. For stubborn stains, a stronger cleaning solution may be necessary, but always test the cleaner in an inconspicuous area first to avoid damage to the cabinet finish. Rinse all surfaces with clean water and allow them to dry completely.
Inspect the cabinets for any repairs that need to be made. Tighten loose screws, replace damaged hinges, and repair any chips or cracks in the wood or laminate. Wood filler can be used to repair minor imperfections in wooden cabinets. Allow the wood filler to dry completely and sand it smooth before proceeding.
Sanding is a critical step in preparing cabinets for a new finish. Sanding creates a slightly roughened surface that promotes adhesion of paint or stain. The grit of sandpaper required depends on the existing finish and the desired outcome. For cabinets with a glossy finish, start with a coarser grit (e.g., 120-grit) and gradually move to a finer grit (e.g., 220-grit) for a smooth finish. For cabinets with a matte finish, a finer grit (e.g., 220-grit) may be sufficient. Always sand in the direction of the wood grain, if applicable. Wear a dust mask and eye protection during sanding to avoid inhaling dust particles.
After sanding, remove all sanding dust with a tack cloth or a damp cloth. Ensure the surfaces are completely clean and dry before proceeding to the next step.
Key Point 2: Choosing a Method for Redoing Cabinets
Several methods exist for redoing kitchen cabinets, each with its own advantages and disadvantages. The choice of method depends on the budget, skill level, and desired aesthetic outcome.
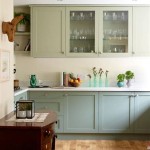
Painting: Painting is a cost-effective and versatile method for transforming kitchen cabinets. It involves applying a new coat of paint to the cabinet surfaces, changing the color and finish. Painting is suitable for both wood and laminate cabinets, but proper preparation is essential for ensuring adhesion and durability.
Choose a high-quality paint specifically designed for cabinets. Alkyd or oil-based paints offer excellent durability but require longer drying times and emit strong odors. Acrylic or water-based paints are easier to clean up and have lower VOCs (volatile organic compounds) but may require more coats for adequate coverage. Consider using a paint primer before applying the topcoat. Primer helps to seal the surface, improve adhesion, and prevent the existing finish from bleeding through. Apply the paint using a brush, roller, or spray gun. A spray gun provides the most even and professional-looking finish, but it requires practice and proper ventilation.
Staining: Staining is a method for enhancing the natural beauty of wood cabinets. It involves applying a stain that penetrates the wood, highlighting the grain and adding color. Staining is best suited for wood cabinets that are in good condition and have an attractive grain pattern.
Choose a stain that complements the existing wood and the overall kitchen design. Oil-based stains provide richer color and better penetration than water-based stains. Apply the stain evenly with a brush or rag, following the direction of the wood grain. Allow the stain to penetrate for the recommended time, then wipe off any excess stain with a clean rag. Apply a clear topcoat (e.g., polyurethane or varnish) to protect the stained surface and provide a durable finish.
Refacing: Refacing involves replacing the doors, drawer fronts, and hardware of the existing cabinets while keeping the cabinet boxes intact. This method offers a significant transformation without the expense and disruption of a complete cabinet replacement. Refacing is suitable for cabinets that have a structurally sound frame but have doors and drawer fronts that are damaged or outdated.
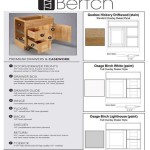
Measure the existing cabinet boxes and order new doors, drawer fronts, and hardware that match the dimensions. The new doors and drawer fronts can be made of wood, laminate, or thermofoil. Prepare the cabinet boxes by cleaning and sanding them. Apply a veneer or laminate to the exposed surfaces of the cabinet boxes to match the new doors and drawer fronts. Install the new doors, drawer fronts, and hardware.
Adding Decorative Hardware and Details: Sometimes, simply changing the hardware and adding decorative details can significantly enhance the appearance of kitchen cabinets. New knobs, pulls, hinges, and decorative moldings can transform the cabinets without requiring extensive work.
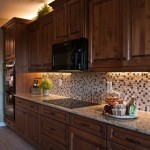
Consider the style and finish of the hardware in relation to the overall kitchen design. Replace existing knobs and pulls with new ones that complement the cabinet color and style. Add decorative moldings to the cabinet doors or frames to create a more custom and sophisticated look. Install under-cabinet lighting to enhance the functionality and ambiance of the kitchen.
Key Point 3: Application and Finishing Touches
After selecting a suitable method, the actual application phase commences. This phase involves meticulous attention to detail and adherence to best practices to achieve the desired results.
When painting, apply multiple thin coats of paint rather than one thick coat. This prevents drips and runs and ensures even coverage. Allow each coat of paint to dry completely before applying the next coat. Lightly sand between coats to smooth out any imperfections and improve adhesion. Use a high-quality paintbrush or roller to achieve a smooth and even finish. For a professional-looking finish, consider using a paint sprayer. However, be sure to practice with the sprayer beforehand to avoid uneven coverage or overspray. Ensure adequate ventilation during painting and wear a respirator to protect against inhaling paint fumes.
When staining, apply the stain evenly with a brush or rag, following the direction of the wood grain. Allow the stain to penetrate for the recommended time, then wipe off any excess stain with a clean rag. Apply a clear topcoat (e.g., polyurethane or varnish) to protect the stained surface and provide a durable finish. Sand lightly between coats of topcoat to smooth out any imperfections. Apply multiple thin coats of topcoat for maximum protection and durability.
When refacing, carefully attach the new veneer or laminate to the cabinet boxes using adhesive. Ensure the veneer or laminate is properly aligned and smooth out any air bubbles. Install the new doors and drawer fronts, making sure they are properly aligned and level. Install the new hardware (hinges, knobs, pulls). Adjust the hinges as needed to ensure the doors open and close smoothly.
After the paint, stain, or veneer has dried completely, reinstall the doors and drawers onto the cabinet boxes. Ensure each door and drawer is properly aligned and closes smoothly. Adjust the hinges as needed to achieve proper alignment. Install the hardware (knobs, pulls) onto the doors and drawers. Clean the cabinets thoroughly with a mild cleaner to remove any dust or fingerprints.
Inspect the finished cabinets for any imperfections or areas that need touch-up. Touch up any imperfections with paint or stain as needed. Consider adding accessories to the cabinets, such as shelf liners, organizers, or lighting. Enjoy the newly redone kitchen cabinets.
Successfully redoing kitchen cabinets necessitates careful planning, meticulous execution, and a commitment to achieving a high-quality finish. By understanding the various methods available, preparing the cabinets properly, and applying the chosen finish with precision, homeowners can revitalize their kitchen spaces and achieve significant aesthetic improvements.

15 Diy Kitchen Cabinet Makeovers Before After Photos Of Cabinets

21 Diy Affordable Ways To Redo Kitchen Cabinets Extra Space Storage

How To Paint Kitchen Cabinets In 7 Simple Steps

Diy Kitchen Cabinets 25 And Easy Ideas For An Update Joyful Derivatives

21 Diy Affordable Ways To Redo Kitchen Cabinets Extra Space Storage

15 Amazing Ways To Redo Kitchen Cabinets

21 Diy Affordable Ways To Redo Kitchen Cabinets Extra Space Storage

Kitchen Diy Shaker Style Cabinets Cherished Bliss

How To Renovate A Kitchen 2024 Guide Forbes Home

Diy Painted Oak Kitchen Cabinets Makeover
Related Posts