How to Reface Kitchen Cabinets Yourself
Refacing kitchen cabinets is a cost-effective alternative to replacing them entirely. This process involves replacing the doors, drawer fronts, and exposed surfaces of the cabinet boxes with new materials, retaining the existing cabinet structure. This approach can significantly update the look of a kitchen without the expense and disruption associated with a full remodel. Successfully refacing cabinets requires planning, preparation, and careful execution.
Planning and Preparation: Laying the Foundation for Success
Before embarking on a cabinet refacing project, a comprehensive assessment of the existing cabinets is crucial. The structural integrity of the cabinet boxes must be evaluated. Warped, water-damaged, or severely deteriorated cabinets may not be suitable for refacing and might necessitate replacement. Assuming the cabinet boxes are sound, the next step involves meticulous measurement.
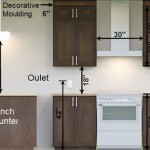
Detailed measurements of all doors, drawer fronts, and exposed cabinet surfaces are essential. Accurate measurements will ensure that the new components fit correctly and contribute to a professional finished product. Creating a detailed diagram of the kitchen layout, with each cabinet labeled and its dimensions recorded, serves as a valuable reference throughout the project. Consider including information about hinge placement on the diagram, which will assist in ordering replacement doors.
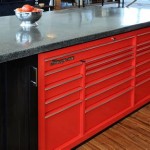
After obtaining measurements, the selection of refacing materials becomes primary. Options include wood veneer, laminate, and rigid thermofoil (RTF). Wood veneer provides a natural wood appearance and can be stained or painted. Laminate offers durability and a wide range of colors and patterns. RTF is a seamless plastic coating applied to MDF (Medium-Density Fiberboard), offering moisture resistance and a smooth finish. The choice of material depends on budget, aesthetic preferences, and desired level of durability.
Ordering the necessary materials is a critical step. Based on the measurements and material selection, order new cabinet doors, drawer fronts, veneer or laminate for the cabinet boxes, edge banding, hinges, knobs, pulls, and any other desired hardware. It is advisable to order slightly more material than needed to account for errors or waste during the installation process. A reputable supplier can assist in selecting the appropriate materials and hardware based on the project specifications.
Gathering the necessary tools is also vital. The required tools typically include a screwdriver (both manual and power), a drill, a sander (orbital or block), a utility knife, a measuring tape, a level, a seam roller (for applying veneer or laminate), contact cement, wood glue, clamps, and safety glasses. Having all the tools readily available will streamline the refacing process and minimize delays.
Finally, preparing the kitchen space is key to a smooth workflow. Clear the countertops, cover the appliances, and protect the flooring with drop cloths. Good ventilation is important, especially when working with adhesives or paints. Dust collection is also essential; a shop vacuum can help minimize dust accumulation during sanding and cutting.
Removing Existing Doors, Drawer Fronts, and Hardware
The initial step in the refacing process involves carefully removing the existing cabinet doors, drawer fronts, and all associated hardware. This includes hinges, knobs, pulls, and any decorative elements. Using a screwdriver or drill, detach the hinges from the cabinet boxes and the doors. It's beneficial to label the doors and hinges to ensure they are reinstalled in the correct locations if reusing them or if the new doors require the same hinge placement. Keep all old doors and drawer fronts for a while, in case they are needed for comparison or for measuring hinge bore distances.
Drawer fronts are typically attached with screws or glue. Depending on the method of attachment, gently pry off the drawer fronts using a putty knife or a similar tool. Exercise caution to avoid damaging the drawer boxes. Once the drawer fronts are removed, clean the surfaces of the drawer boxes to prepare them for the new drawer fronts.
After removing the doors and drawer fronts, thoroughly clean the surfaces of the cabinet boxes. Remove any grease, dirt, or residue that may interfere with the adhesion of the new veneer or laminate. A degreasing cleaner and a scrub brush can be used to effectively clean the surfaces. Rinse the surfaces with clean water and allow them to dry completely before proceeding.
Surface preparation is crucial for proper adhesion. Use a sander to lightly rough up the surfaces of the cabinet boxes. This will create a better bond for the new veneer or laminate. Pay particular attention to edges and corners, ensuring they are smooth and free of any imperfections. After sanding, wipe down the surfaces with a tack cloth to remove any remaining dust.
Inspect the exposed edges of the cabinet boxes for any imperfections. Fill any gaps or cracks with wood filler and allow it to dry completely. Sand the filled areas smooth and wipe away any dust. Ensuring a smooth and even surface is essential for a professional-looking finish.
If necessary, repair any minor damage to the cabinet boxes before applying the new veneer or laminate. This could involve patching holes, reinforcing weak areas, or addressing any other structural issues. A well-prepared surface will ensure the longevity and aesthetic appeal of the refaced cabinets.
Applying New Veneer/Laminate and Installing New Doors and Hardware
The application of new veneer or laminate to the cabinet boxes is a critical step in the refacing process. Before applying the adhesive, dry-fit the veneer or laminate pieces to ensure they fit properly and align correctly. This dry-fitting process will help identify any adjustments that need to be made before the permanent application.
Apply contact cement to both the back of the veneer or laminate and the surfaces of the cabinet boxes. Follow the manufacturer's instructions for the application of the contact cement. Allow the cement to dry to the point where it is tacky but not wet. This typically takes about 15-30 minutes, depending on the ambient temperature and humidity.
Carefully align the veneer or laminate with the edge of the cabinet box. Once aligned, press the material firmly onto the surface. Use a seam roller to apply even pressure and ensure a strong bond. Work from the center outwards to eliminate any air bubbles or imperfections. Trim any excess veneer or laminate using a utility knife. Use a sharp blade and make clean, precise cuts to avoid damaging the surrounding surfaces.
Edge banding is used to cover the exposed edges of the veneer or laminate. Apply edge banding to all exposed edges, using a hot iron or edge banding applicator to activate the adhesive. Trim any excess edge banding with a utility knife. Sand the edges smooth to create a seamless transition between the edge banding and the veneer or laminate.
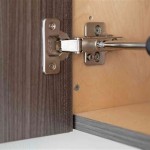
After applying the veneer or laminate and edge banding to the cabinet boxes, install the new cabinet doors and drawer fronts. Attach the hinges to the cabinet doors and then to the cabinet boxes. Ensure the doors are aligned properly and swing smoothly. Adjust the hinges as needed to achieve proper alignment.
Attach the new drawer fronts to the drawer boxes. Use screws or glue to secure the drawer fronts in place. Ensure they are aligned properly with the drawer boxes and that they operate smoothly within the cabinet openings.
Finally, install the new knobs and pulls on the cabinet doors and drawer fronts. Use a drill to create pilot holes for the screws. Attach the knobs and pulls securely. Consider using a template to ensure consistent placement of the hardware across all the doors and drawers. This will contribute to a professional and uniform appearance.

How To Reface Kitchen Cabinets Affordable Cabinet Update On A Budget Anika S Diy Life

Diy Cabinet Refacing Budget Friendly Made Easy Wisewood

Diy Cabinet Refacing Budget Friendly Made Easy Wisewood

Cabinet Refacing Ideas Diy Projects Craft How To S For Home Decor With

Kitchen Cabinet Refacing The Happy Housewife Home Management

How To Reface Your Kitchen Cabinets Diy Family Handyman

Cabinet Refacing Ideas Diy Projects Craft How To S For Home Decor With

Diy Kitchen Cabinets Makeover How To Install New Cabinet Glass Inserts

Painted Furniture Ideas Diy Refacing Kitchen Cabinets

How To Resurface Kitchen Cabinets 2024 Guide Forbes Home
Related Posts